AutoCAD 2016 - Starting a new AutoCAD drawing | 12th Computer Technology : Chapter 6 : AutoCAD 2016
Chapter: 12th Computer Technology : Chapter 6 : AutoCAD 2016
Starting a new AutoCAD drawing
Starting a new AutoCAD drawing
1. Drawing with the line tool
1. Click the New button in the Quick Access toolbar.
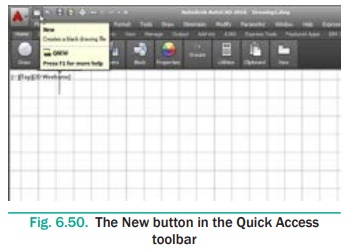
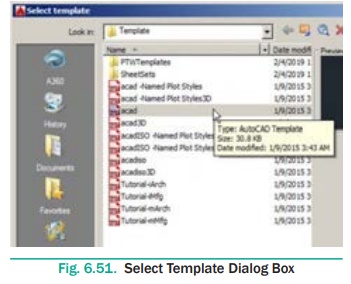
AutoCAD displays the Select Template dialog box.
2. Select a template file acad.dwt, and then click Open.
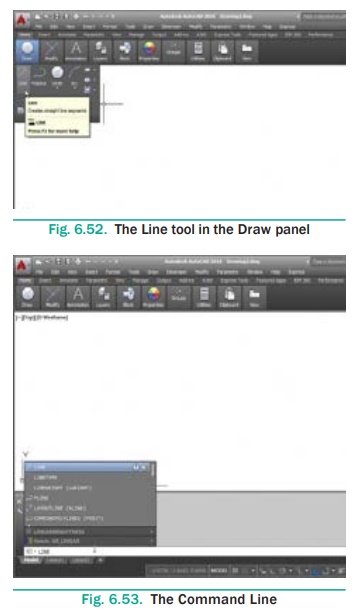
3. The LINE command can be activated:
a) by selecting the icon from the Draw panel
b) from the menu bar with Draw >Line
c) by entering the command at the prompt line, e.g. LINE <R>
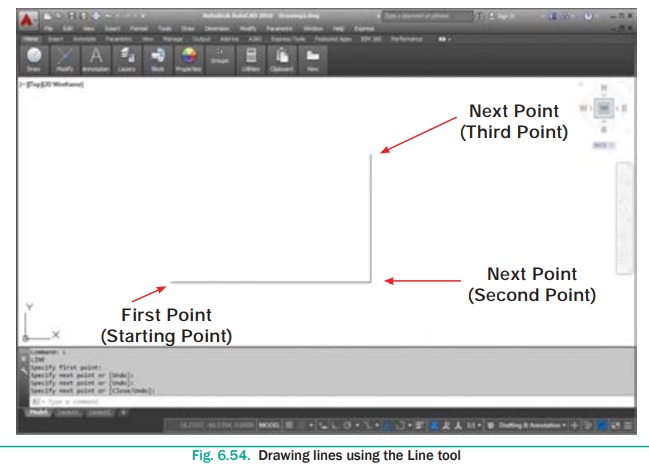
4. The following AutoCAD prompts will appear:
Specify first point: (Using the mouse, left-click anywhere on the
screen to specify the first point.)
Specify next point or [Undo]: (Move the cursor elsewhere on the screen and
left-click again to specify the second point.)
Specify next point or [Undo]: (Specify the third point.)
Specify next point or [Close/Undo]: (Press ENTER to exit the
Line tool.) Now you can see a line appears in the drawing area as shown
in fig.
Note
When you specify the start point of the line by pressing the left
mouse button, a rubber band line stretches between the selected point and the
current position of the cursor.
Note that in the Command prompt the Close and Undo
options will be displayed while creating lines using the Line tool.
The Undo Option
While drawing a line, if you specify a wrong endpoint, then you
can undo the last specified point and go back to the previous stage by using
the Undo option of the Line tool. You can use this option multiple times. To
use this option, type Undo (or just U) at the Specify next point or [Undo]
prompt. You can also right-click to display the shortcut menu and then choose
the Undo option from it.
The Close Option
After drawing two continuous lines by using the Line tool, you
will notice that the Close option is displayed at the Command prompt. (This
option does not appear until you have picked three points, because a minimum of
two line segments are needed before a polygon can be created by the third
closing segment.)
The Close option is used to join the current point to the start
point of the first line when two or more continuous lines are drawn. If you
specify the endpoint by using the mouse, then click at the start point of the
first line or enter C at the Command prompt, as given in the Command prompt
below.
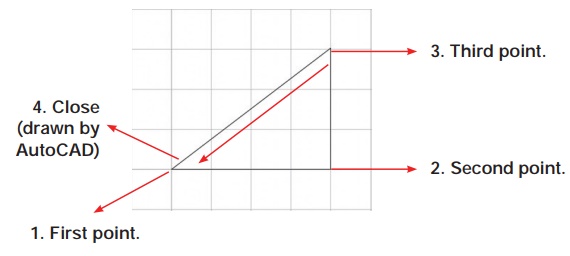
Command: LINE
Specify first point: Pick the first point.
Specify next point or [Undo]: Pick the second point.
Specify next point or [Undo]: Pick the third point.
Specify next point or [Close/Undo]: C (The fourth point
joins with the first point).
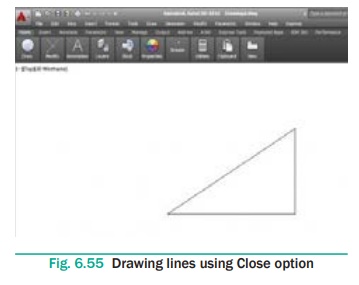
The drawing seen on the screen is a triangle of arbitrary size. To
prepare the correct dimensional engineering drawings, the Coordinate systems is
used.
2. COORDINATE SYSTEMS
In AutoCAD, the location of a point is specified in terms of
Cartesian coordinates. In this system, each point in a plane is specified by a
pair of numerical coordinates. To specify a point in a plane, take two mutually
perpendicular lines as references. The horizontal line is called the X axis,
and the vertical line is called the Y axis. The X and Y axes divide the XY
plane into four parts, generally known as quadrants. The point of intersection
of these two axes is called the origin and the plane is called the XY plane.
The origin has the coordinate values of X = 0, Y = 0. The origin
is taken as the reference for locating a point on the XY plane. Now, to locate
a point, say P, draw a vertical line intersecting the X axis. The horizontal
distance between the origin and the intersection point will be called the X
coordinate of P. It will be denoted as P(x) . The X coordinate specifies how
far the point is to the left or right from the origin along the X axis. Now,
draw a horizontal line intersecting the Y axis.
The vertical distance between the origin and the intersection
point will be the Y coordinate of P. It will be denoted as P(y). The Y
coordinate specifies how far the point is to the top or bottom from the origin
along the Y axis. The intersection point of the horizontal and vertical lines
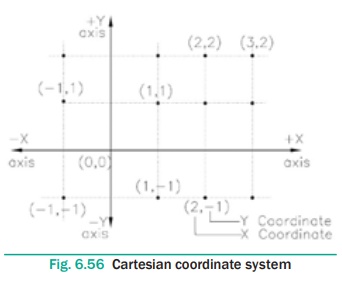
is the coordinate of the point and is denoted as P(x,y). The X coordinate is
positive, if measured from the right of the origin and is negative, if measured
from the left of the origin. The Y coordinate is positive, if measured above
the origin and is negative, if measured below the origin, refer to Figure 6.56.
In AutoCAD, the default origin is located at the lower left corner
of the drawing area.
AutoCAD uses the following coordinate systems to locate a point in
the XY plane.
1.
Absolute coordinates
2.
Relative coordinates
3.
Polar coordinates
4.
Direct distance entry
If you are specifying a point by entering its location at the
Command prompt then you need to use any one of the coordinate systems.
Absolute Coordinate System
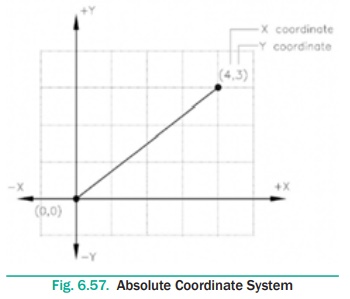
In the Absolute Coordinate System, points are located with respect
to the origin (0,0). For example, a point with X = 4 and Y = 3 is measured 4
units horizontally (distance along the X axis) and 3 units vertically (distance
along the Y axis) from the origin, as shown in Figure 6.57. In AutoCAD, the
absolute coordinates are specified at the Command prompt by entering X and Y
coordinates, separated by a comma.
Draw a line on the points (50,50) and (150,50) using Absolute
Co-ordinate System.
Command: LINE ↵
Specify first point: 50,50 ↵
Specify next point or [Undo]: 150,50 ↵
Specify next point or [Undo]: ↵ (Press Enter Key.)
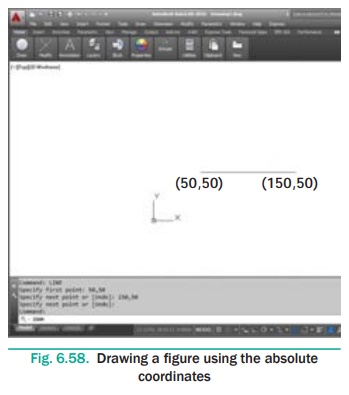
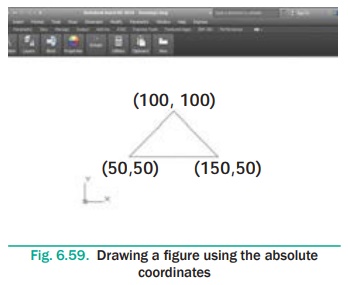
Using Line command, draw a triangle for the given points on the
points (50,50), (150,50), (100,100).(AbsoluteCo-ordinate System)
Command: LINE ↵
Specify first point: 50,50 ↵
Specify next point or [Undo]: 150,50 ↵
Specify next point or [Undo]: 100,100 ↵
Specify next point or [Close/Undo]: C ↵
Draw a figure using the Absolute Coordinate system. The absolute
coordinate of the points are given in the following table.
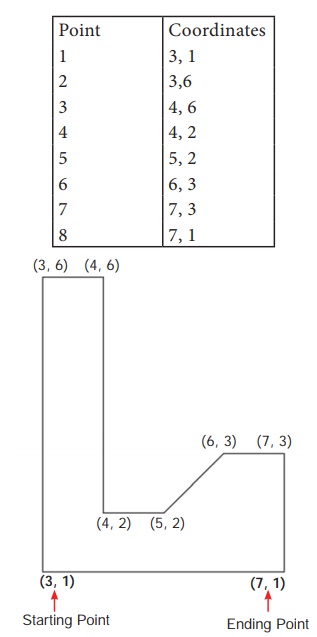
1. Start a new file with acad.dwt template in the Drafting
& Annotation workspace.
2. Type LINE in the Command Line.
The prompt sequence is given below. Command: LINE
Specify first point: 3,1 ↵
Specify next point or [Undo]: 3,6 ↵
Specify next point or [Undo]: 4,6 ↵
Specify next point or [Close/Undo]: 4,2 ↵
Specify next point or [Close/Undo]: 5,2 ↵
Specify next point or [Close/Undo]: 6,3 ↵
Specify next point or [Close/Undo]: 7,3 ↵
Specify next point or [Close/Undo]: 7,1 ↵
Specify next point or [Close/Undo]: C ↵
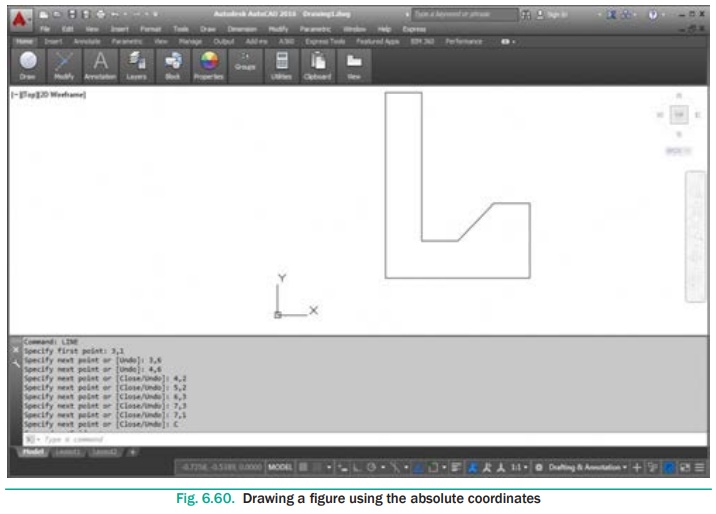
Relative Coordinate System
There are two types of relative coordinates:
relative rectangular and relative polar.
Relative Rectangular Coordinates (@ X distance, Y distance)
In the Relative Rectangular Coordinate system, the location of a
point is specified with respect to the previous point, not with respect to the
origin. To enter coordinate values in terms of the Relative Rectangular
Coordinate system, check whether the Dynamic Input is on or not. If the Dynamic
Input is turned on, then by default the profile will be drawn using the
Relative Rectangular Coordinate system. Therefore, in this case, enter the X
coordinate, type comma (,), and then enter the Y coordinate. However, if the
Dynamic Input is turned off, the coordinate values have to be prefixed by the @
symbol, so that the profile will be drawn using the Relative Rectangular
Coordinate system. For example, to draw a rectangle, refer to Figure 6.61 of
length 4 units and width 3 units and the lower left corner at the point (1,1)
using the Relative Rectangular Coordinate system, you need to use the following
prompt sequence:
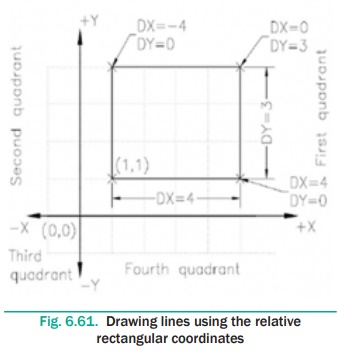
Command: LINE ↵
Specify first point: 1,1 ↵
Specify next point or [Undo]: @4,0 ↵
Specify next point or [Undo]: @0,3 ↵
Specify next point or [Close/Undo]: @-4,0 ↵
Specify next point or [Close/Undo]: @0,-3 ↵
Specify next point or [Close/Undo]: ↵
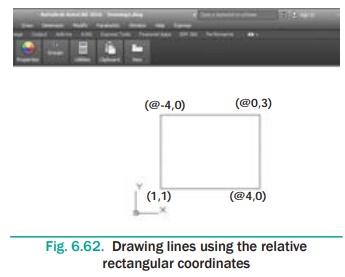
Note :
Distance is measured +ve towards up and right.
It is measured -ve towards down and left.
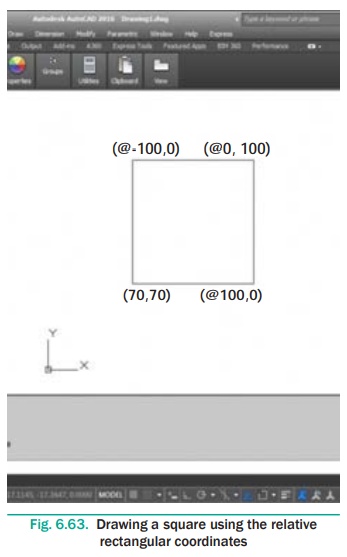
Draw a square of side 100 units using Relative Rectangular
Co-ordinate System.
Command: LINE ↵
Specify first point: 70,70 ↵
Specify next point or [Undo]: @100,0 ↵
Specify next point or [Undo]: @0,100 ↵
Specify next point or [Close/Undo]: @-100,0 ↵
Specify next point or [Close/Undo]: C ↵
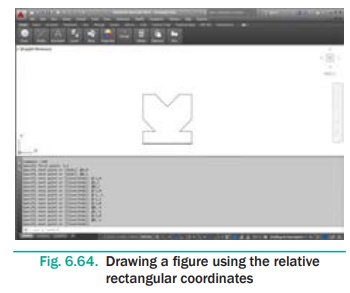
Draw a figure using Relative Rectangular Coordinates. The
coordinates of the points are given in the table below.
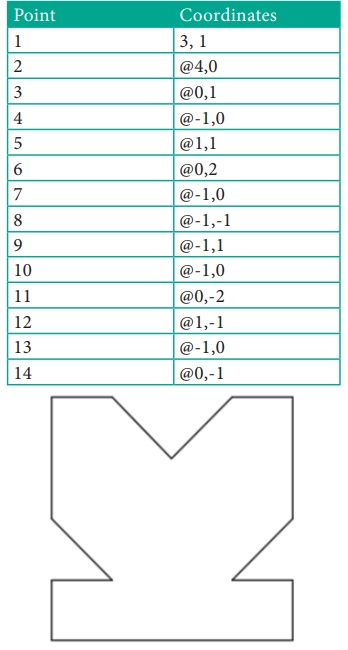
1. Start a new file with acad.dwt template in the Drafting
& Annotation workspace.
2. Type LINE in the Command Line. The prompt sequence is given
below.
Command: LINE ↵
Specify first point: 3,1 ↵
Specify next point or [Undo]: @4,0 ↵
Specify next point or [Undo]: @0,1 ↵
Specify next point or [Close/Undo]: @-1,0 ↵
Specify next point or [Close/Undo]:@1,1 ↵
Specify next point or [Close/Undo]:
@0,2 ↵
Specify next point or [Close/Undo]:
@-1,0 ↵
Specify next point or [Close/Undo]:
@-1,-1 ↵
Specify next point or [Close/Undo]:
@-1,1 ↵
Specify next point or [Close/Undo]:
@-1,0 ↵
Specify next point or [Close/Undo]:
@0,-2 ↵
Specify next point or [Close/Undo]:
@1,-1 ↵
Specify next point or [Close/Undo]:
@-1,0 ↵
Specify next point or [Close/Undo]:
@0,-1 ↵
Specify next point or [Close/Undo]: ↵
Relative Polar Coordinates (@distance < angle)
In the relative polar coordinate system, the location of a point
is specified by defining the distance of the point from the current point and
the angle between the two points with respect to the positive X axis.
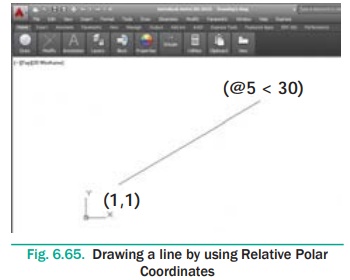
Draw a line of length 5 units whose start point is at 1,1 and
inclined at an angle of 30 degrees to the X axis using Relative Polar Coordinates.
Command: LINE ↵
Specify first point: 1,1 ↵
Specify next point or [Undo]: @5<30 ↵
Specify next point or [Undo]: ↵ (Press ENTER to complete the drawing)
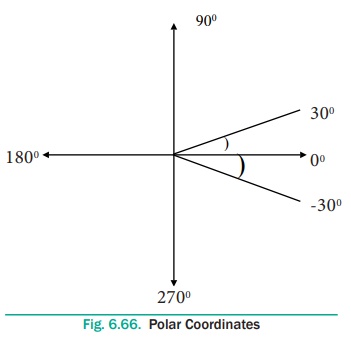
Note : By default, in the relative polar coordinate system, the
angle is measured from the horizontal axis as the zero degree. Also, the angle
is positive if measured in counter clockwise direction and is negative if
measured in clockwise direction.
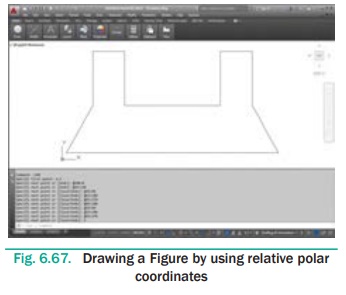
Draw a figure using Relative Polar Co ordinates. The coordinates
of the points are given in the table below.
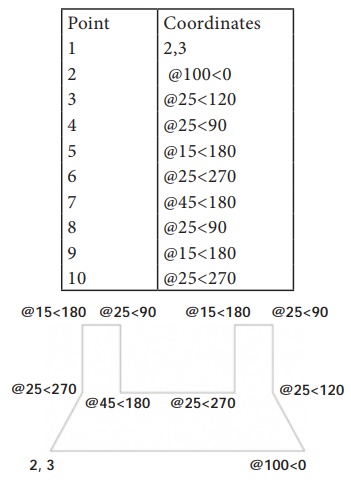
1. Start a new file with acad.dwt template in the Drafting
& Annotation workspace.
2. Type LINE in the Command Line.
The prompt sequence is given below. Command: LINE ↵
Specify first point: 2,3 ↵
Specify next point or [Undo]: @100<0 ↵
Specify next point or [Undo]: @25<120 ↵
Specify next point or [Close/Undo]: @25<90 ↵
Specify next point or [Close/Undo]: @15<180 ↵
Specify next point or [Close/Undo]: @25<270 ↵
Specify next point or [Close/Undo]: @45<180 ↵
Specify next point or [Close/Undo]:
@25<90 ↵
Specify next point or [Close/Undo]:
@15<180 ↵
Specify next point or [Close/Undo]:
@25<270 ↵
Specify next point or [Close/Undo]:
C↵
Direct Distance Entry
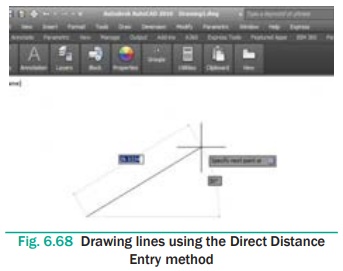
The easiest way to draw a line in AutoCAD is by using the Direct
Distance Entry method. Before drawing a line by using this method, ensure that
the Dynamic Input button is chosen in the Status Bar. Next, choose the Line
tool; you will be prompted to specify the start point. Enter the coordinate
values in the text box and press ENTER; you will be prompted to specify the
next point. Now, enter the absolute length of the line and its angle with
respect to the current position of the cursor in the corresponding text boxes,
as shown in Figure 6.68.
Note that you can use the TAB key to toggle between the text
boxes. If the Ortho mode is on while drawing lines using this method, you can
position the cursor only along the X or Y axis. If the Dynamic Input button is
not chosen, then you need to enter the length of the line at the Command
prompt. Therefore, position the cursor at the desired angle, type the length at
the Command prompt, and then press ENTER, refer to Figure 6.68.
LINE Specify first point: Start point.
Specify next point or [Undo]: Position the cursor and then enter
distance.
Specify next point or [Undo]:
Position the cursor and then enter distance.
3. DRAWING A CIRCLE
Ribbon: Home > Draw > Circle drop-down > Center, Radius
Toolbar: Draw > Circle
Menu Bar: Draw > Circle
Command: CIRCLE or C
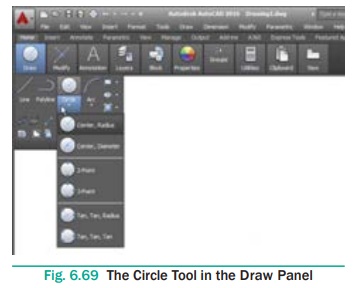
A circle is drawn by using the Circle tool. In AutoCAD, you can
draw a circle by using six different tools. All these tools are grouped
together in the Draw panel of the Ribbon. To view these tools, choose the down
arrow next to the circle tool in the Draw panel, as shown in Figure 6.69; all
tools will be listed in the drop-down. Note that the name of the tool chosen
last will be displayed in the Draw panel. You can also invoke the Circle tool
from the Draw toolbar, or by entering C in the command prompt.
Drawing a Circle by Specifying Center and Diameter
1. Click Home > Draw > Circle > Center, Radius on the
ribbon.
2. Select an arbitrary point in the graphics window to specify the
center point.
3. Type a value as the radius and press ENTER.
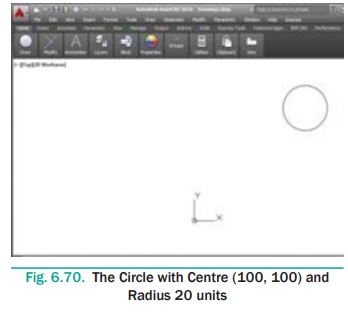
Draw a circle with centre (100, 100) and radius 20 units.
Command: CIRCLE ↵
Specify center point for circle or [3P/2P/Ttr (tan tan radius)]:
100,100 ↵
Specify radius of circle or [Diameter]: 20 ↵
Drawing a Circle by Specifying Center and Diameter
1. Click Home > Draw > Circle > Center, Diameter on the
ribbon. (or) Type CIRCLE or C in the Command line.
2. The following message appears in the command line.
Specify center point for circle or [3P/2P/ Ttr (tan tan radius)]:
Left-click with the mouse anywhere on the screen. (or) Type a
Value.
Specify radius of circle or [Diameter] :
Enter D for Diameter option.
Specify diameter of circle : Enter the value of Diameter.
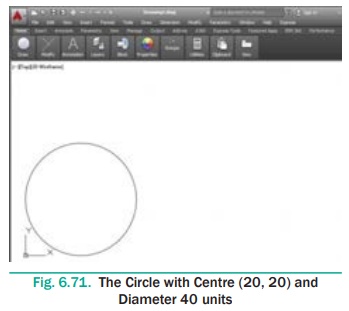
Draw a circle with centre (20,20) and diameter 40 units.
Command: CIRCLE ↵
Specify center point for circle or [3P/2P/Ttr (tan tan radius)]:
20,20 ↵
Specify radius of circle or [Diameter] <20.0000>: D ↵
Specify diameter of circle <40.0000>: 40 ↵
4. Drawing a Rectangle
One of the most basic shapes used by drafters and designers is the
rectangle. You can create a rectangle using the LINE command, but doing so has
some disadvantages. For example, you would have to take the time to make sure
that the corner angles are exactly 90°. Also, each line segment would be a
separate object. Therefore, AutoCAD 2016 provides the RECTANG command, which
allows you to create a rectangle with perfect corners and as a single object.
Clicking anywhere on a rectangle created with the RECTANG command selects the
entire rectangle.
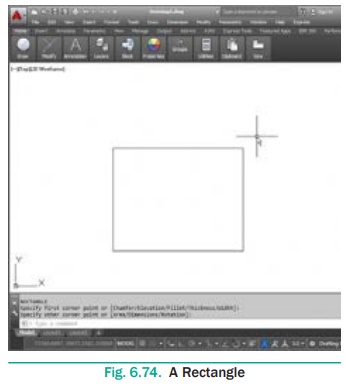
To draw a Rectangle using the cursor to select the corners :
1. Command : RECTANGLE (or ) REC (Press Enter Key)
2. The following will appear on the command line:
RECTANGLE
Specify first corner point or [ Chamfer / Elevation / Fillet /
Thickness/Width]:
Specify the location of the first corner by moving the cursor to a
location (P1) and then press the left mouse button.
The following will appear on the command line:
Specify other corner point or [Area / Dimensions / Rotation]:
Specify the location of the diagonal corner (P2) by moving the
cursor diagonally away from the first corner (P1) and pressing the left mouse
button. Now a rectangle will appear.
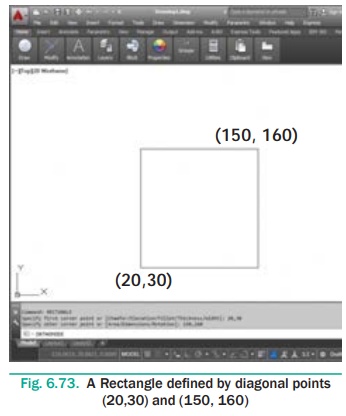
Draw a rectangle defined by diagonal points (20,30) and (150,
160).
Command: RECTANGLE ↵
Specify first corner point or [Chamfer/
Elevation/Fillet/Thickness/Width]: 20,30 ↵
Specify other corner point or [Area/ Dimensions/Rotation]: 150,160
↵
5. Drawings Arcs
Ribbon: Home > Draw > Arc drop-down
(or)
Command: ARC or A
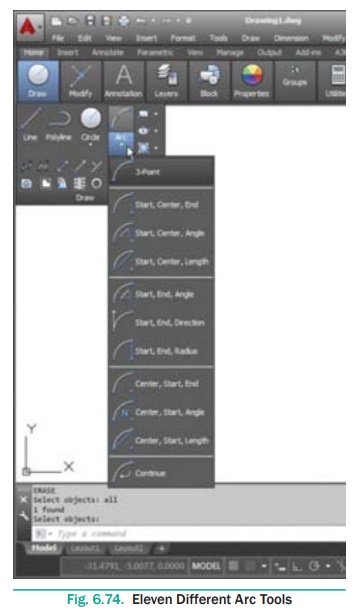
An arc is defined as a section of a circle. In AutoCAD 2016, an
arc is drawn by using the tools available in the Arc drop-down list box. There
are eleven different arc tools to draw an arc.
The tools to draw an arc are grouped together in the Arc drop-down
of the Draw panel in the Ribbon. You can choose the appropriate tool and then
draw the arc.
The tool that was used last to create an arc will be displayed in
the Draw panel of the Home tab.
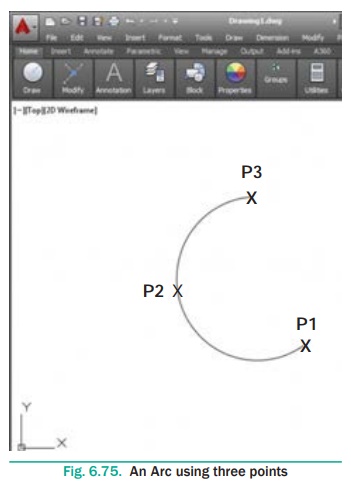
Drawing an Arc by Specifying Three Points
Draw an arc using three point P1, P2, and P3.
Command: ARC ↵
Specify start point
of arc or
[Center]:
(Pick P1) ↵
Specify second point of arc or [Center/ End]: (Pick P2) ↵
Specify end point of arc: (Pick P3) ↵
Related Topics