AutoCAD 2016 - AutoCAD 2016 interface | 12th Computer Technology : Chapter 6 : AutoCAD 2016
Chapter: 12th Computer Technology : Chapter 6 : AutoCAD 2016
AutoCAD 2016 interface
AUTOCAD 2016 INTERFACE
The AutoCAD 2016 interface is based on Ribbons and the Application
Menu. The important feature of this interface is that the size of the Graphical
Area will be bigger.
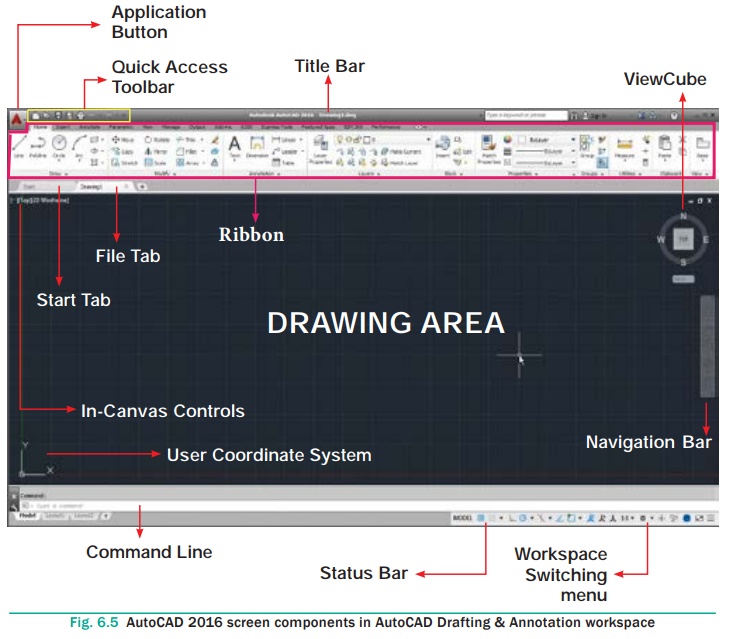
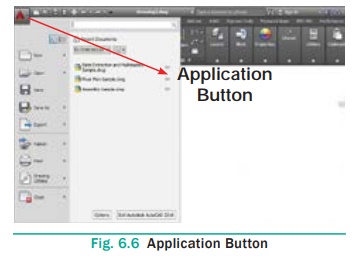
1. Application Menu
The Application menu appears when you click the red “A” called the
Application Button. This menu contains file-related commands such as creating a
new file, opening an existing file, saving the current file, saving the current
file under a new name and in a different folder, exporting the current file to
a different file format, printing and publishing the current file, etc.
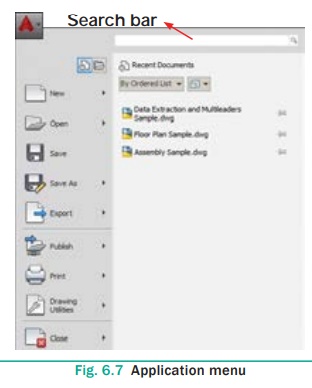
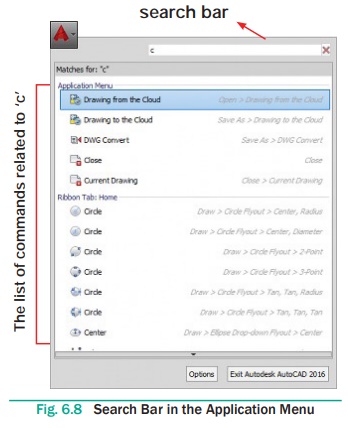
The Search bar displays at the top of the Application menu. It is
used to search for any command. If you
type any keyword Fig. 6.9 in the search bar, you can find a list of
commands related to it.
In the Application Menu, you will see the recent files. You can
also choose how to display the recent files in the Application Menu using this
control ![]()

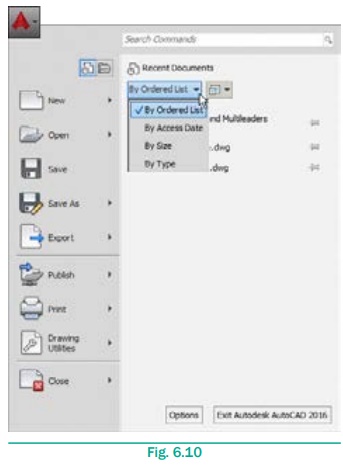
You can also choose how to sort the recent files in the
Application menu using this control:
2. Title bar
The title bar contains the program name (Autodesk AutoCAD 2016)
and the title of the current drawing (Drawing1.dwg).

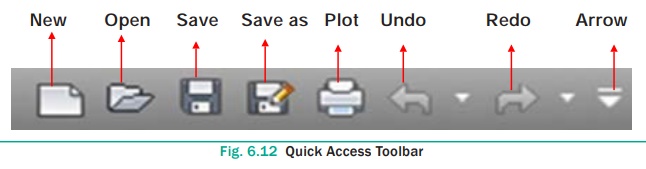
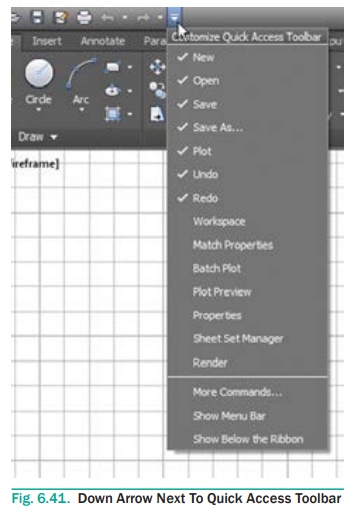
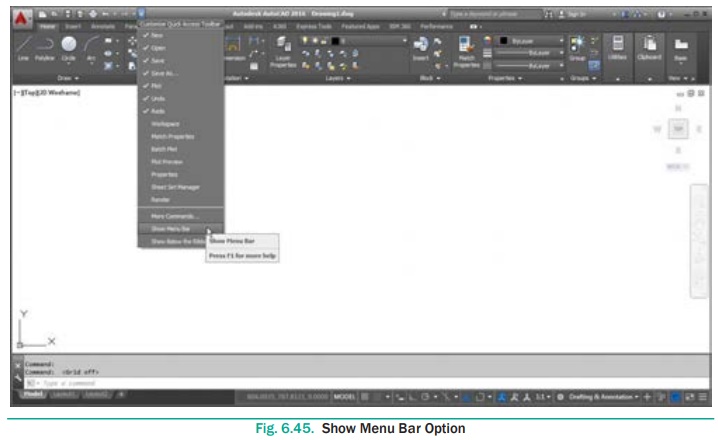
3. Quick Access Toolbar
This toolbar is located at the top left corner of the window next
to the red ‘A’ button. It contains all File commands mentioned in the
Application Menu along with Workspace and Undo/Redo.
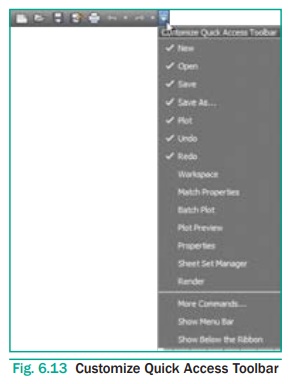
The user can customize this Quick Access toolbar by clicking the
arrow at the end, which will bring up the following:
You can add or remove commands by using Customize Quick Access
Toolbar. You can also add Menu bar by clicking Show Menu Bar.
4. Ribbon
On the top of the AutoCAD 2016 window, just below the title bar,
is a wide area called the Ribbon. The Ribbon consists of two parts: tabs and
panels, as shown below:

In the Home tab of the Ribbon, Draw, Modify, Annotation, Layers,
etc. panels are displayed.
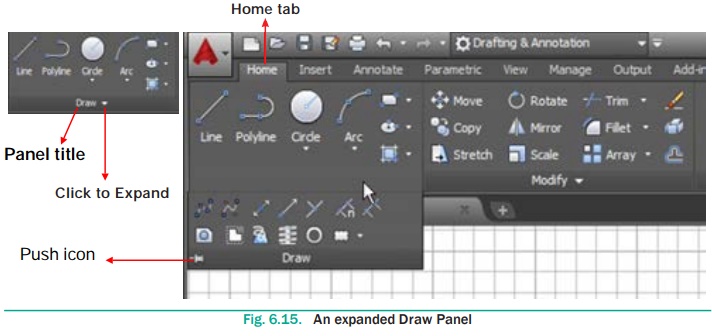
Some panels such as Draw, Modify have more buttons than shown.
These panels can be expanded to display more tools. You can see an arrow to the
right of a panel title. When you click on the arrow, it expands the panel to
display additional tools and controls. By default, an expanded panel closes
automatically when you click or move to another panel. To keep a panel
expanded, click the push icon in the bottom-left corner of the expanded panel.
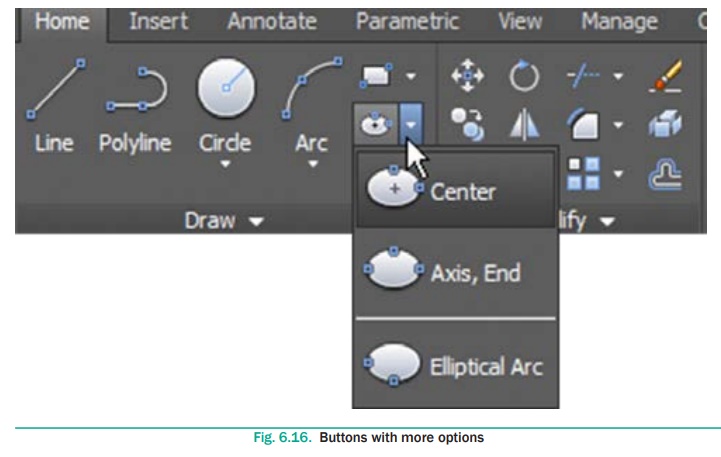
For some commands, there are many options. AutoCAD put all the
options in the same button as shown in Fig. You can easily access these
options.
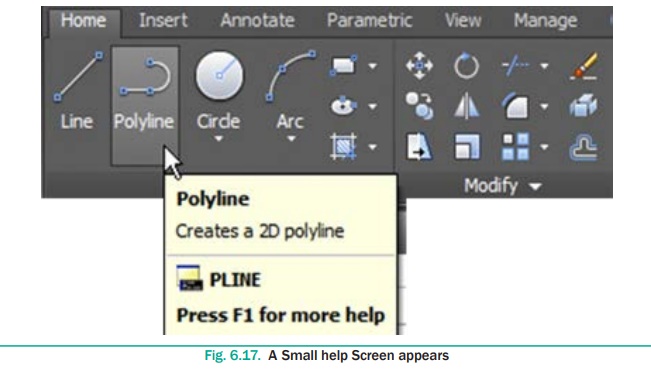
The ribbons have a very simple help feature. If you hover the
mouse over a button, a small help screen will appear.
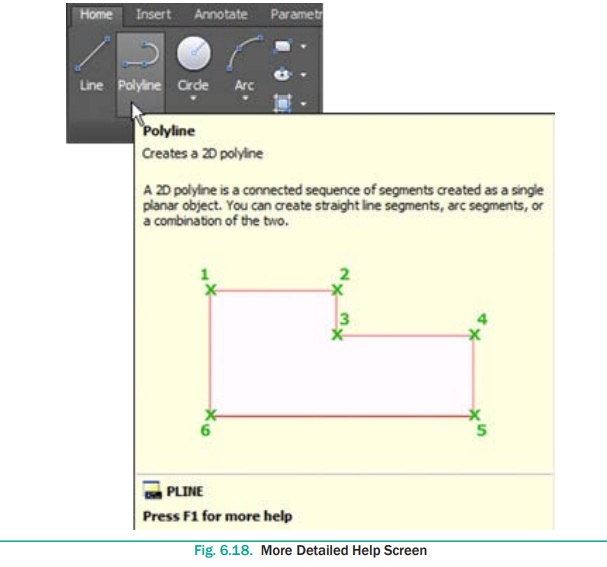
If you leave the mouse over the button for a longer period of
time, AutoCAD will show more detailed help screen.
·
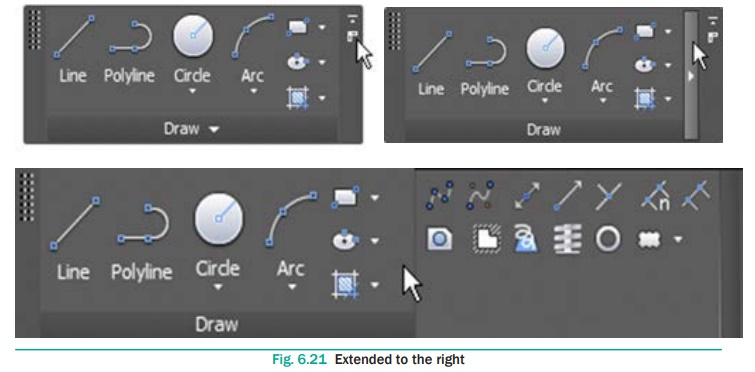
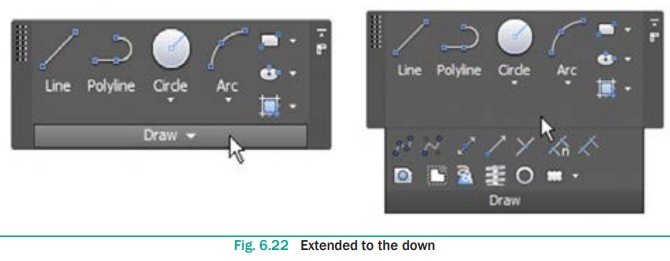
Panels have two states—either docked or floating. By default all
panels in the Ribbon are docked in their respective tab. Drag and drop the
panel in the drawing area to make it floating.
·
You can send the panel back to its respective tab by clicking the
small button at the top right side.

· While the panel is floating you can toggle the orientation.
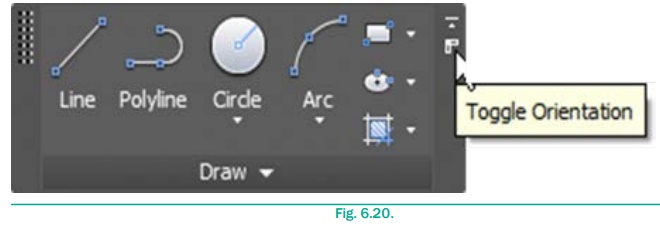
· It will either extend to the right or down.
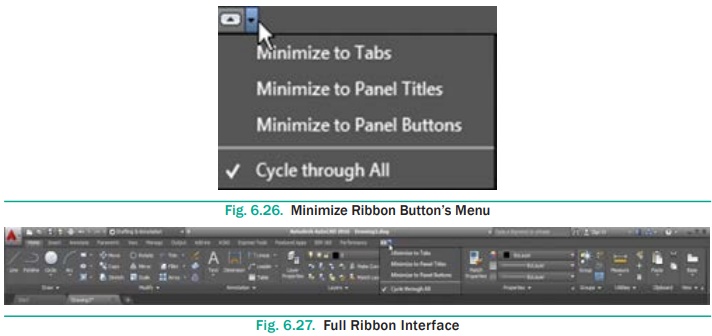
Changing the display of the Ribbon
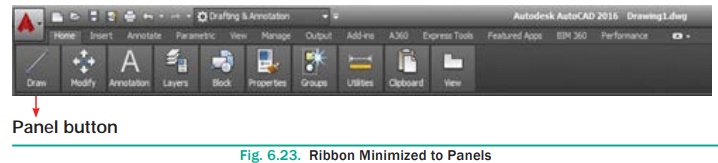
You can change the display of the ribbon by clicking the Minimize
Ribbon button located at the top of it. The ribbon can be displayed in three
different modes as shown below.
1. When you click the Minimize Ribbon button for the first time,
the full ribbon changes to display tabs and panel buttons. Now hover the cursor
over the panel buttons. The panel buttons expand to reveal all the tools shown
on the full ribbon.
2. When you click the Minimize Ribbon button for the second time,
the panel buttons change into panel titles. Now hover the cursor again over the
panel titles to reveal each panel’s tools.

3. When you click the Minimize Ribbon button for the third time,
the panel titles change into panel tabs. Hovering the cursor over the panel
tabs doesn’t have any effect. Click the Home tab in the ribbon to reveal the
full panel temporarily. It disappears after you move the cursor away.

4. Verify that Cycle Through All is selected in the
Minimize Ribbon button’s menu and then click the Minimize Ribbon button for the
fourth time. The full ribbon interface is restored.
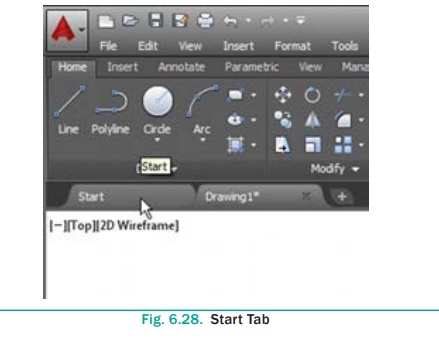
5. Start Tab
When you click the Start tab at any moment, you will get the
AutoCAD 2016 Initial screen again. Using it, you can start a new drawing, open
an existing drawing, etc.
6. File tabs
File tabs are located beneath the ribbon. For each opened file a
tab is created. You can easily switch between different drawing files by using
the file tabs.
You can also create a new drawing file by clicking on the (+) sign
available at the end of the file tabs.
The File tab bar is located at the bottom of the Ribbon. In the
bar, all the tabs added get arranged in the sequence in which the respective
drawings are created. Using mouse you can change the sequence of tabs in the
File tab bar. To do so, press and hold the left mouse button on any tab and
drag it to the desired location on the tab bar.
All File tabs are gray in colour. The current file (tab) will
appear in a lighter gray, and the other tabs will appear in a darker gray.
If you hover over one of the file tabs, two things will take
place:
·
The path of this file will appear above the File tab.
·
The model space and the layouts of this file will appear beneath
the tab.

A star beside the name of the file in the file tab means this file
has changed and you need to save changes.
·
You can also close the File tab by clicking on the (x) sign beside
the name.
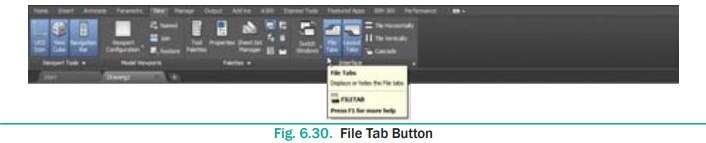
·
The user can customize the File tabs by switching them off. To do
so, press the View tab in the ribbon and locate the Interface panel. Click on
the Files tab button to close the File tab bar.
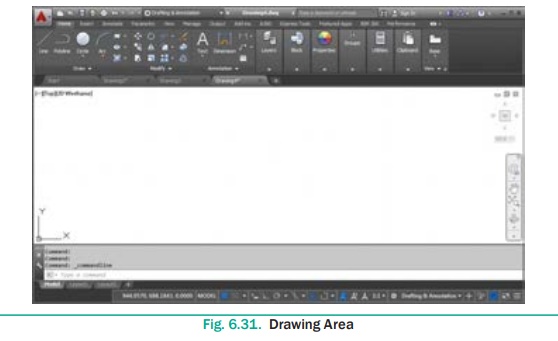
7. Drawing Area
The drawing area covers the major portion of the screen. You can
easily draw objects and create 3D graphics in this area.
8. Command Window
The command window is normally located at the bottom of the
application window, just above the status bar. This window normally contains
three lines of text and the first two lines list the immediate command history.
The bottom line is the command line. If you do not see the command window,
press Ctrl + 9 to make it appear.
You can enter a command manually at the command line. You can type
at the cursor position on the command line, that is, the Command: prompt.
If you just type the first letter of a command, it will list all
the commands starting with that letter. Note: Always press ENTER after you type
values on the command line.
You can drag this window to a different place on the screen and
resize it.

When you enter a command, AutoCAD doesn’t care if you use
UPPERCASE or lowercase characters, or a combination of either. If you make a
mistake typing on the command line, press the BACKSPACE key to correct.
You can press ESC at any time. If you press ESC while an operation
is in progress, it terminates the command.
To repeat the command you previously entered in AutoCAD, press
ENTER (or the spacebar) at the ‘Command:’ prompt. As an alternative,
right-click to display the cursor menu, and then select the Repeat option.
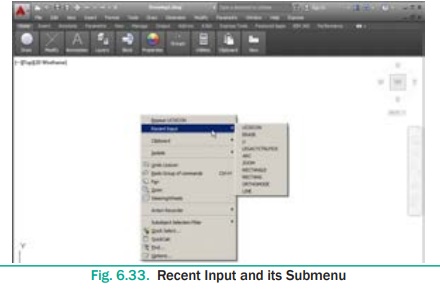
Recent Input
AutoCAD remembers the last twenty commands and options you enter
at the ‘Command:’ prompt, or select from a menu or toolbar. Autodesk calls this
“Recent Input.”
If you prefer to see a list of the command history, right-click,
and then select Recent Input from the shortcut menu. AutoCAD lists the previous
commands and/or coordinate inputs in a submenu.
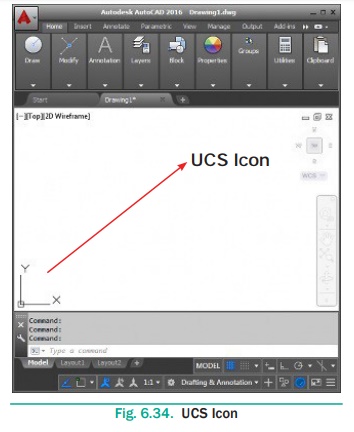
9. UCS Icon
You can see an L-shaped line in the lower-left corner of the
drawing area. It is called the UCS icon; UCS is short for “User Coordinate
System.”
·
The UCS icon is useful primarily for drawing in three dimensions.
·
The icon is not needed for 2D drafting, and you can turn it off
with the UCSICON command. Type the command name, and then enter the Off option,
as follows:
·
Command: ucsicon (Press ENTER.)
·
Enter an option [ON/OFF/All/Noorigin/ ORigin/Properties]
<ON>: off (Press ENTER.)
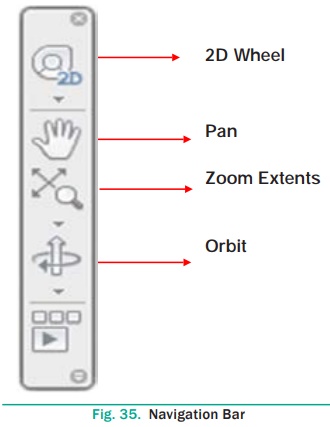
10. Navigation Bar
The Navigation Bar is displayed in the drawing area and contains
navigation tools.
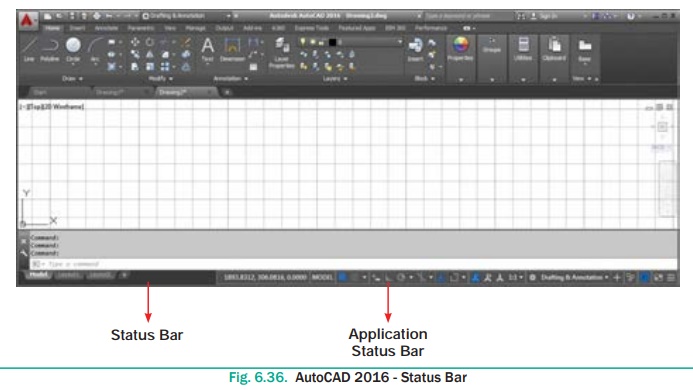
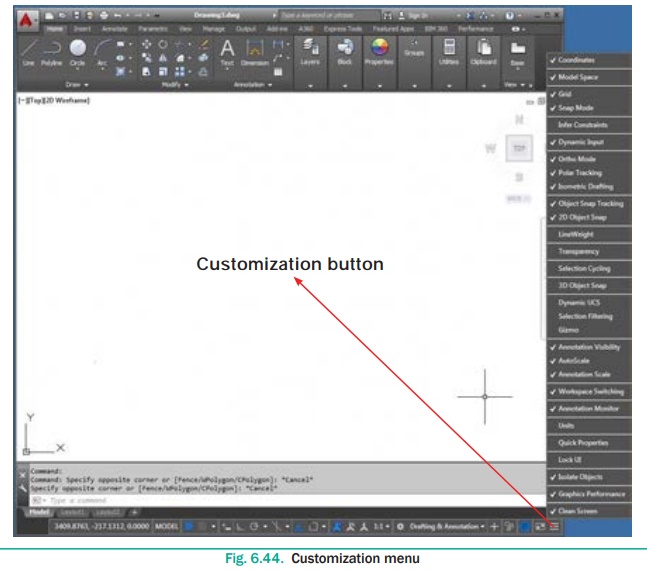
11. Status Bar
The Status Bar which is located below the command line, and docked
in the lower-right corner of the window is called Application Status Bar.
It contains so many buttons which help you to create a drawing
very easily. You can easily turn ON or OFF these buttons just by clicking on
them.
Some buttons are hidden by default. You can also display more buttons
on the status bar by clicking the Customization button at the bottom right
corner and selecting the options from the menu.
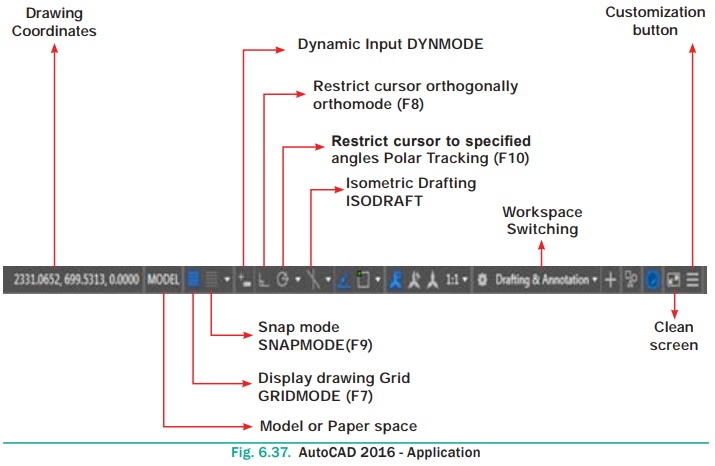
Drawing Coordinates
By default this button is hidden in AutoCAD 2016. Using the
Customization menu you can show it. It displays the drawing coordinates when
you move the pointer in the drawing area. You can also turn OFF this button by
clicking on it.
MODEL
The MODEL button is chosen by default because you are working in
the model space to create drawings.
GRIDMODE (F7)
If the GRIDMODE button is chosen, the Display drawing grid will
turn ON and the grid lines are displayed on the screen. The F7 function
key can be used to turn the grid display on or off.
SNAPMODE (F9)
If the SNAPMODE button is chosen, the snap mode will turn ON. When snap is on, the cursor under mouse
control can only be moved in jumps from one snap point to another. The F9 key acts as a toggle key
to turn the snap off or on.
Dynamic Input (F12)
The Dynamic Input button in the status bar is used to turn the
Dynamic Input on or off. If the Dynamic Input mode is turned on, the x,y coordinates and
prompts show
when the cursor hairs
are moved. Using the F12 key, you
can turn the Dynamic Input on or off.
Ortho Mode (F8)
You can turn ON or OFF the Ortho Mode just by clicking on it. If
the ORTHOMODE button is chosen, you can draw lines at right angles only i.e., lines can only be
drawn vertically or
horizontally. You
can also use
the F8 function
key to turn ortho on or off.
Polar Tracking (F10)
You can turn ON or OFF the Polar Tracking just by clicking on it.
When you turn ON the Polar Tracking, a small tip appears showing the direction and
length of lines etc. in degrees and units. You can draw lines easily at regular angular increments, such as 5,
10, 15, 23, 30, 45, or 90 degrees. You can also use the F10 function key
to turn on this option.
Workspace
A workspace is a complete user interface, which includes the
location and appearance of the drawing area and all menus, buttons, and
groupings of buttons. Think of a workspace as a unique, specific arrangement of
AutoCAD’s features and capabilities that can be retrieved at any time. It is
easy to switch between workspaces, modify workspaces, and create custom
workspaces to match the specific requirements of a user or a particular task.
Workspace Switching
In AutoCAD 2016, you can switch between different workspaces by
using the Workspace Switching button that is available at the right of
the Status Bar. On clicking the Workspace Switching button, a flyout will be
displayed with the list of all available workspace. You can select the required
workspace to invoke.
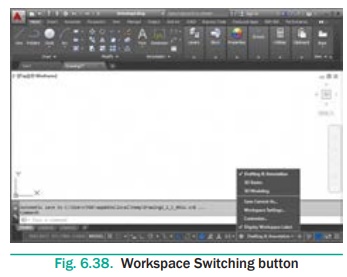
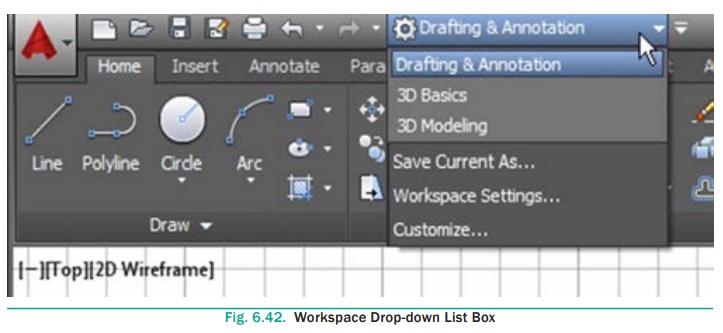
There are three workspaces available in AutoCAD 2016: Drafting
& Annotation, 3D Basics, and 3D Modeling. By default, the
Drafting & Annotation workspace is activated in AutoCAD 2016. You
can easily create 2D drawings in this workspace.


You can also easily switch between workspaces by using the
Workspace drop-down on the top-left corner.
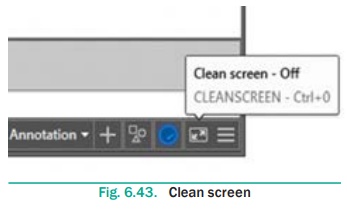
Clean Screen
The Clean Screen button hides most interface elements such as the
Ribbon, and maximizes the drawing area to focus on the current drawing. This
button is at the lower right corner of the screen. Choose the Clean Screen
button again to restore the previous display state of the screen.
Customization
In AutoCAD 2016, you can customize which buttons appear on the
status bar at the bottom of the AutoCAD application window. When you click on
the Customization button, It opens a menu. In it, select the items you want
displayed in the status bar.
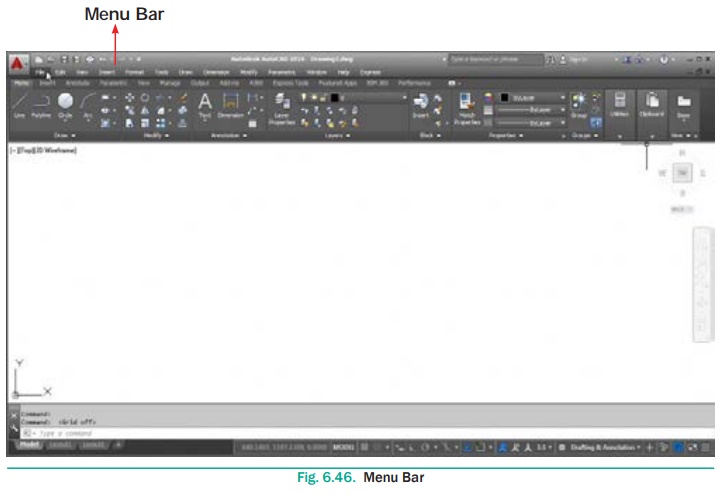
12. Menu Bar
Menu Bar is not displayed by default. To display the menu bar,
Click on the arrow in the Quick Access Toolbar; a flyout is displayed.
Select the Show Menu Bar option from it. The menu bar will be
displayed. You can select commands from the menu bar.
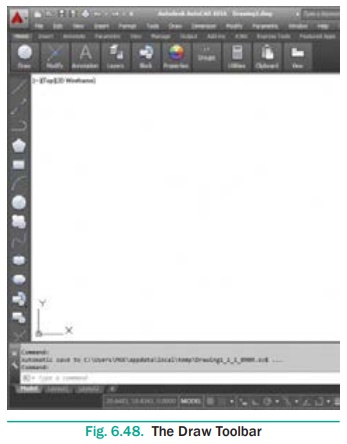
13. Toolbar
Toolbars are not displayed by default. To display a toolbar,
choose Tools > Toolbars > AutoCAD from it; a list of
toolbars will be displayed.
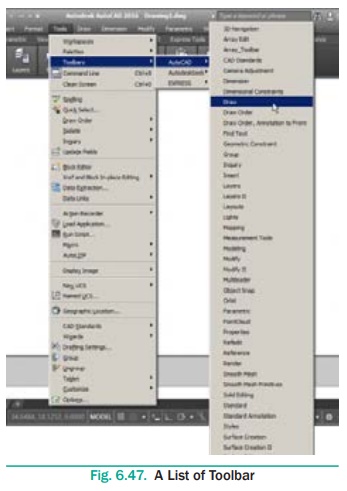
Select the required toolbar. The following Figure shows the Draw
toolbar invoked.
Related Topics