Light | Term 3 Unit 1 | 7th Science - Pinhole Camera | 7th Science : Term 3 Unit 1 : Light
Chapter: 7th Science : Term 3 Unit 1 : Light
Pinhole Camera
Pinhole Camera
Pin hole camera is a simple device
which helps us to understand about the rectilinear propagation of light.
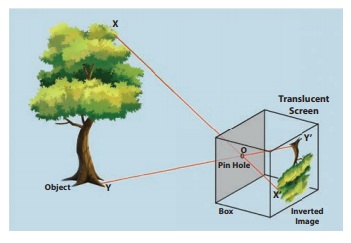
The above picture shows a model of a
pin hole
camera. O is small hole by a pin. XY is the object and Y'X' is the image of XY.
As light travels in straight line, one light ray from X travels along the XO
strikes the screen X'.
ACTIVITY 2
Make your pin-hole
camera
Requirement : Two rectangular pieces
of thick paper, carbon paper, a semi-transparent paper, adhesive
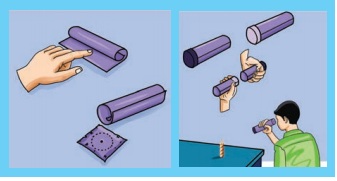
Procedure : Make two tubes using
thick paper as shown in figure. One tube should be slightly smaller in diameter
so that it can slide into the other tube without leaving much gap between the
tubes. Fix a carbon paper to one side of the tube of greater diameter. Make a
hole with a pin at the center of the carbon. Close one end of the second tube
with the butter paper. Slide the smaller tube into the bigger one such a way
that the butter paper is inside. Keep a lighted candle on a table and look
through the hole with black side towards the candle. If you go closer to the
candle, you will see a smaller, but brighter image. You can also change the
image size by adjusting the tubes.
Use the pin-hole camera to see things in sun light outside the window and see how good an image you get. What are your observations about the image? Is it straight, inverted, bright and sharp?
In similar way, another light ray
staring from Y and travels along YO strikes the screen Y'. Similarly, all the
rays in between X and Y fall on the screen between Y' and X'. Thus Y'X' becomes
the image of XY. The image produced is temporary, if a simple paper is used.
The image can be made permanent if the paper is replaced by a photographic
plate.
Reflection
A mirror reflects our face. A still
water body like a pond reflects the scenery around it. When we see our face in the
mirror, we see the light rays from our face bouncing off the surface of the
mirror. How the rays of the light are reflected?
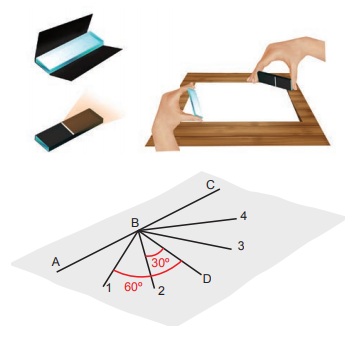
Take a plane mirror. Cover it with black paper. Cut a small slit as shown in the figure. If you shine light on the mirror from a torch light or sunlight, you will get a small ray of light. We can use this to study the properties of light.
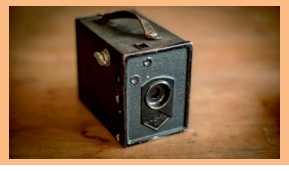
Before the advancement
of camera, Pinhole camera was used to photograph movement of the sun over a
long period of time. This type of photography is known as solography and also
be used for observing and recording solar eclipses. And it was also used to
take photograph of stationary objects.
Place a blank white sheet on a level
ground out in the open. Choose a place where partly the sheet gets sunlight and
partly it is in shadow. Hold the mirror with the slit facing the sun. You can
see a straight ray of light reflected from the slit on the paper. Hold another
mirror to reflect this ray. Observe well.
The light falling on the mirror is called as incident ray and the light reflected is called reflected ray.
Related Topics