Chapter: Medical Surgical Nursing: Principles and Practices of Rehabilitation
Nursing Process: The Patient With Impaired Physical Mobility
NURSING
PROCESS: THE PATIENT WITH IMPAIRED PHYSICAL MOBILITY
Patients who are ill or
injured are frequently placed on bed rest or have their activities limited.
Problems commonly associated with immobility include weakened muscles, joint
contracture, and deformity. Each joint of the body has a normal range of
mo-tion; if the range is limited, the functions of the joint and of the muscles
that move the joint are impaired, and painful deformi-ties may develop. Nurses
must identify patients at risk for such complications.
Another problem
frequently seen in rehabilitation nursing is an altered ambulatory/mobility
pattern. The patient with a dis-ability may be either temporarily or
permanently unable to walk independently and unaided. The nurse assesses the
mobility of the patient and designs care that promotes independent mobility
within the prescribed therapeutic limits.
If a person is not able to exercise and move the joints through their
full range of motion, contractures may develop. A contrac-ture is a shortening
of the muscle and tendon that leads to defor-mity and limits joint mobility.
When the contracted joint is moved, the patient experiences pain; in addition,
more energy is required to move when joints are contracted and deformed.
Assessment
At times, a patient’s mobility is restricted because of pain,
paraly-sis, loss of muscle strength, systemic disease, an immobilizing de-vice
(eg, cast, brace), or prescribed limits to promote healing. Assessment of the
patient’s mobility includes positioning, ability to move, muscle strength and
tone, joint function, and the prescribed mobility limits. The nurse may need to
collaborate with the phys-ical therapist or other team members to assess
mobility.
During position change, transfer, and ambulation activities, the nurse
assesses the patient’s abilities, the extent of disability, and residual
capacity for physiologic adaptation. The nurse ob-serves for orthostatic
hypotension, pallor, diaphoresis, nausea, tachycardia, and fatigue.
If a patient is not able to ambulate without assistance, the nurse
assesses ability to balance, transfer, and use assistive devices (eg, crutches,
walker). Crutch walking requires a high energy expenditure and produces
considerable cardiovascular stress, so older people with reduced exercise
capacity, decreased arm strength, and problems with balance because of old age
and multiple dis-eases may be unable to use them. A walker is more stable and
may be a better choice for such patients. The nurse assesses the pa-tient’s
ability to use various devices that promote mobility. If a patient uses an
orthosis, an external appliance that provides sup-port, prevents or corrects
deformities, and improves function, the nurse monitors the patient for
effective use and potential prob-lems associated with its use.
Nursing Diagnosis
Based on the assessment
data, major nursing diagnoses for the pa-tient may include the following:
· Impaired physical
mobility
· Activity intolerance
· Risk for injury
· Risk for disuse syndrome
· Impaired walking
· Impaired wheelchair
mobility
· Impaired bed mobility
Planning and Goals
The major goals of the
patient may include absence of contrac-ture and deformity, maintenance of
muscle strength and joint mobility, independent mobility, and increased
activity tolerance.
Nursing Interventions
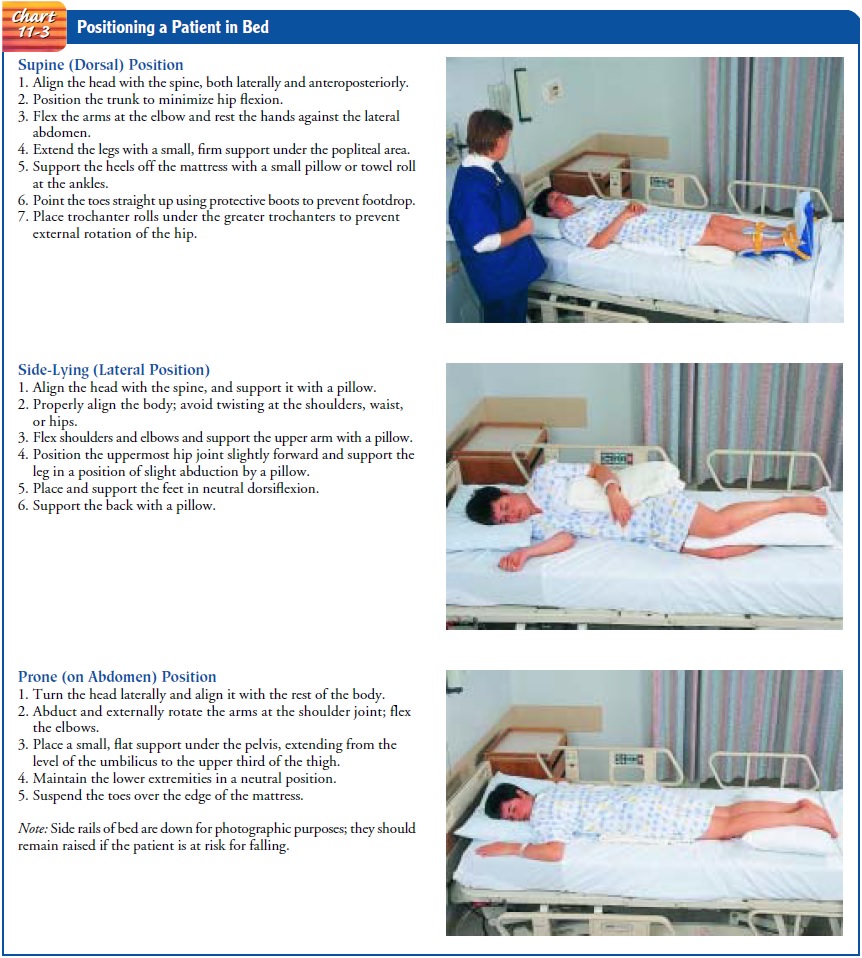
POSITIONING TO PREVENT MUSCULOSKELETAL COMPLICATIONS
Deformities and contractures can often be prevented by proper
positioning. Maintaining correct body alignment when the pa-tient is in bed is
essential regardless of the position selected. Dur-ing each contact with the
patient, the nurse evaluates the patient’s position and assists the patient to
achieve proper positioning and alignment. The most common positions that a
patient assumes in bed are supine (dorsal), side-lying (lateral), and prone.
The nurse helps the patient assume these positions and supports the body in
correct alignment with pillows (Chart 11-3). At times, a splint (eg, wrist or
hand splint) may be fabricated by the occupa-tional therapist to support a
joint and prevent deformity. The nurse must ensure proper use of the splint and
provide skin care.
Preventing External Rotation of the Hip
Patients who are in bed
for any period of time may develop ex-ternal rotation deformity of the hip
because the ball-and-socket joint of the hip has a tendency to rotate outward
when the patient lies on his or her back. A trochanter roll extending from the
crest of the ilium to the midthigh prevents this deformity; with correct
placement, it serves as a mechanical wedge under the projection of the greater
trochanter.
Preventing Footdrop
Footdrop is a deformity in which the foot is plantar flexed (the ankle
bends in the direction of the sole of the foot). If the condi-tion continues
without correction, the patient will not be able to hold the foot in a normal
position and will be able to walk only on his or her toes, without touching the
ground with the heel of the foot. The deformity is caused by contracture of
both the gas-trocnemius and soleus muscles. Damage to the peroneal nerve or
loss of flexibility of the Achilles tendon may result in footdrop.
To prevent this
disabling deformity, the patient is positioned to sit at 90 degrees in a
wheelchair with feet on the footrests or flat on the floor. When the patient is
supine in bed, padded splints or protective boots are used to keep the feet at
right angles to the legs. Frequent skin inspection of the feet must also be
per-formed to determine whether positioning devices have created any unwanted
pressure areas.
The patient is
encouraged to perform the following ankle ex-ercises several times each hour:
dorsiflexion and plantar flexion of the feet, flexion and extension (curl and
stretch) of the toes, and eversion and inversion of the feet at the ankles. The
nurse pro-vides frequent passive range-of-motion exercises if the patient is
unable to perform active exercises.
MAINTAINING MUSCLE STRENGTH AND JOINT MOBILITY
Optimal function depends on the strength of the muscles and joint motion, and active participation in ADLs promotes maintenance of muscle strength and joint mobility. Range-of-motion exercises and specific therapeutic exercises may be included in the nursing plan of care.
Performing Range-of-Motion Exercises
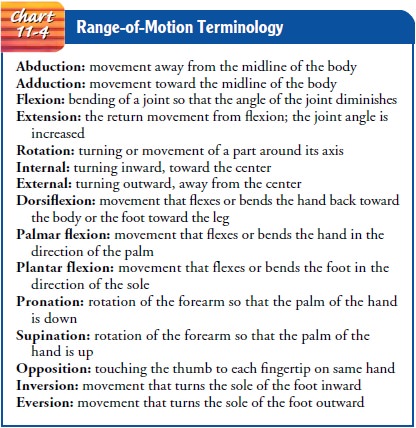
Range of motion is
movement of a joint through its full range in all appropriate planes (Chart
11-4). To maintain or increase the motion of a joint, range-of-motion exercises
are initiated as soon as the patient’s condition permits. The exercises are
planned forthe individual to accommodate the wide variation in the degrees of
motion that people of varying body builds and age groups can attain (Chart
11-5).

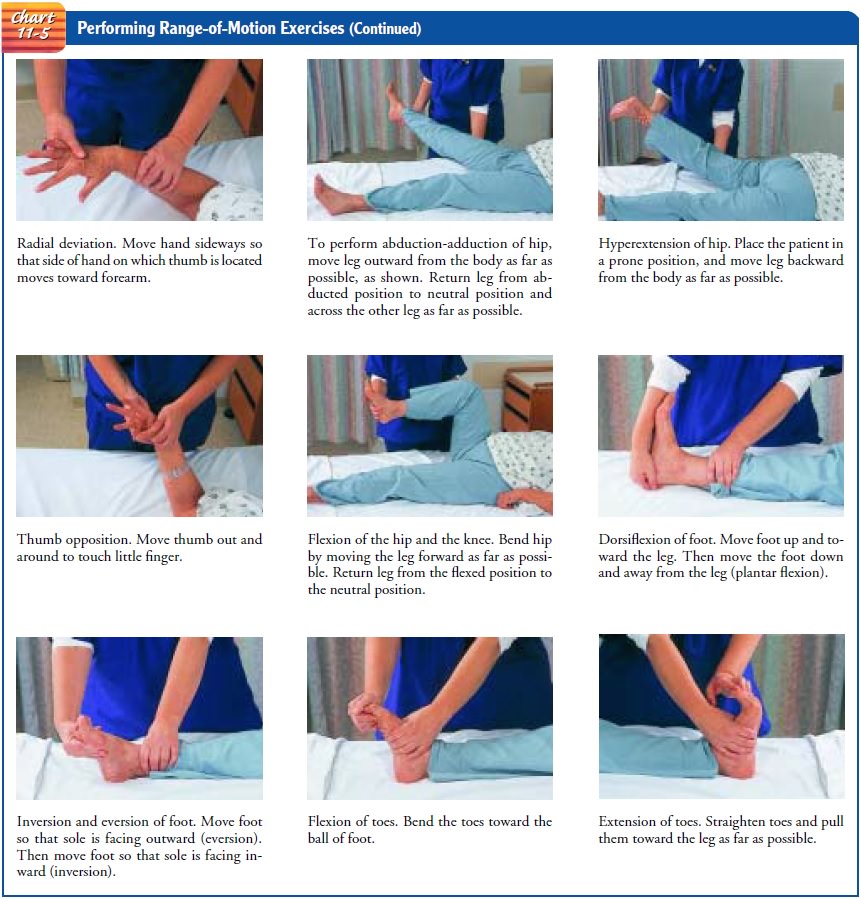
Range-of-motion exercises may be active (performed by the patient under supervision of the nurse), assisted (with the nurse helping if the patient is unable to do the exercise independently), or passive (performed by the nurse). Unless prescribed otherwise, a joint should be moved through its range of motion three times, at least twice a day. The joint to be exercised is supported, the bones above the joint are stabilized, and the body part distal to the joint is moved through the range of motion of the joint. For example, the humerus must be stabilized while the radius and ulna are moved through their range of motion at the elbow joint.
The joint should not be
moved beyond its free range of mo-tion; the joint is moved to the point of
resistance and stopped at the point of pain. If muscle spasms are present, the
joint is moved slowly to the point of resistance. Gentle, steady pressure is
then applied until the muscle relaxes, and the motion is continued to the
joint’s final point of resistance.
To perform assisted or
passive range-of-motion exercises, the patient must be in a comfortable supine
position with arms at the sides and knees extended. Good body posture is
maintained during the exercises. The nurse also uses good body mechanics during
the exercise session.
Performing Therapeutic Exercises
Therapeutic exercises
are prescribed by the physician and per-formed with the assistance and guidance
of a physical therapist or nurse. Research is also underway to develop
computerized robots with gentle, compliant behavior that could be used in the
home setting for upper-extremity exercises (Krebs, 2000).
The patient should have
a clear understanding of the goal of the prescribed exercise. Written
instructions about the frequency, duration, and number of repetitions, as well
as simple line draw-ings of the exercise, help to ensure adherence to the
exercise program.
Exercise, when performed correctly, assists in maintaining and building
muscle strength, maintaining joint function, preventing deformity, stimulating
circulation, developing endurance, and promoting relaxation. Exercise is also
valuable in helping to re-store motivation and the well-being of the patient.
Weight-bearing exercises may slow the bone loss that occurs with disability.
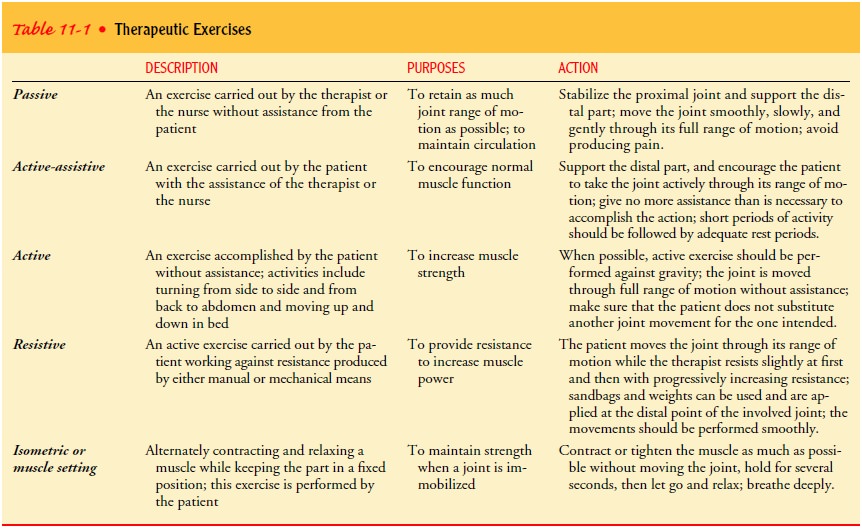
There are five types of exercise: passive, active-assistive, active, resistive,
and isometric. The description, purpose, and action of each of these exercises
are summarized in Table 11-1.
PROMOTING INDEPENDENT MOBILITY
When the patient’s condition stabilizes and the physical condition
permits, the patient is assisted to sit up on the side of the bed and then to
stand. The patient’s tolerance of this activity is assessed. Orthostatic
(postural) hypotension may develop when the patient assumes a vertical
position. Because of inadequate vasomotor re-flexes, blood pools in the
splanchnic (visceral) area and in the legs, resulting in inadequate cerebral
circulation. If indicators of orthostatic hypotension (eg, drop in blood
pressure, pallor, di-aphoresis, nausea, tachycardia, dizziness) are present,
the activity is stopped, and the patient is assisted to a supine position in
bed.
Some disabilities, such
as spinal cord injury, acute brain injury, and other conditions that require
extended periods in the recum-bent position, prevent patients from assuming an
upright position at the bedside. Several strategies can be used to assist a
patient to assume a 90-degree sitting position. First, a reclining wheelchair
with elevating leg rests allows a slow and controlled progression from a supine
position to a 90-degree sitting position. A tilt table, a board that can be
tilted in 5- to 10-degree increments from a horizontal to a vertical position,
may also be used. The tilt table promotes vasomotor adjustment to positional
changes and helps the patient with limited standing balance and limited
weight-bearing activities to avoid the decalcification of bones and low bone
mass associated with disuse syndrome and lack of weight-bearing exercise.
Elastic compression stockings are used to prevent venous sta-sis. For
some patients, a compression garment (leotard) or snug-fitting abdominal binder
and elastic compression bandaging of the legs are needed to prevent venous
stasis and ensuing orthostatic hypotension. When the patient is standing, the
feet are protected with a pair of properly fitted shoes. Extended periods of
standing are avoided because of venous pooling and pressure on the soles of the
feet. The nurse monitors the patient’s blood pressure and pulse and observes
for signs of orthostatic hypotension and cerebral in-sufficiency (eg, the
patient reports feeling faint and weak), which suggest intolerance of the
upright position. If the patient does not tolerate the upright position, the
nurse should recline the patient and elevate the patient’s legs.
Assisting the Patient With Transfer
A transfer is movement
of the patient from one place to another (eg, bed to chair, chair to commode,
wheelchair to tub). As soon as the patient is permitted out of bed, transfer
activities are started. The nurse assesses the patient’s ability to participate
ac-tively in the transfer and determines in conjunction with an oc-cupational
therapist or physical therapist the required adaptive equipment to promote
independence and safety. A lightweight wheelchair with brake extensions,
removable and detachable arm rests, and leg rests minimizes structural
obstacles during the trans-fer. Tub seats or benches make transfers in and out
of tubs easier and safer. Raised, padded commode seats may also be warranted for
patients who must avoid flexing the hips greater than 90 de-grees when
transferring to a toilet.
It is important that the patient maintain muscle strength and, if possible, perform push-up exercises to strengthen the arm and shoulder extensor muscles. The push-up exercise requires the patient to sit upright in bed; a book is placed under each of the patient’s hands to provide a hard surface, and the patient is in-structed to push down on the book raising, the body. The nurse should encourage the patient to raise and move the body in dif-ferent directions by means of these push-up exercises.
The nurse or physical therapist teaches the patient how to trans-fer. There are several methods of transferring from the bed to the wheelchair when the patient is unable to stand, and the technique chosen
should be appropriate for the patient, considering his or her abilities and
disabilities. It is helpful for the nurse to demonstrate the technique. If the
physical therapist is involved in teaching the patient to transfer, the nurse
and the physical therapist must col-laborate so that consistent instructions
are given to the patient. Dur-ing transfer, the nurse assists and coaches the
patient. Figure 11-1 shows weight-bearing and non–weight-bearing transfer.
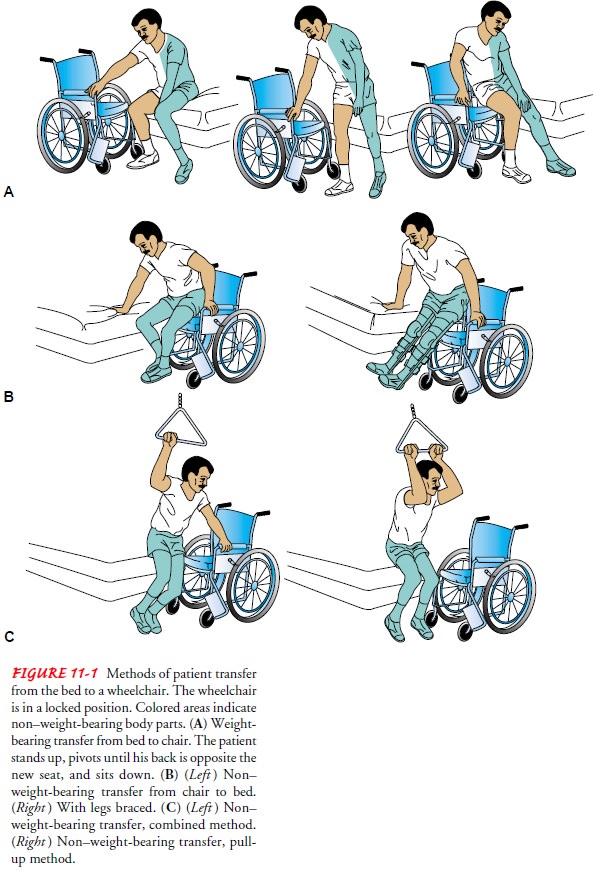
If the patient’s muscles are not strong enough to overcome the
resistance of body weight, a polished lightweight board (transfer board,
sliding board) may be used to bridge the gap between the bed and the chair. The
patient slides across on the board with or without assistance from a caregiver.
This board may also be used to transfer the patient from the chair to the
toilet or bathtub bench. The nurse should make sure that the patient’s fingers
do not curl around the edge of the board during the transfer, because the
weight of the patient’s body can crush them as the patient moves across the
board. Safety is a primary concern during a transfer:
•
Wheelchairs and beds must be locked before the
patient transfers.
•
Detachable arm and foot rests are removed to make
getting in and out of the chair easier.
•
One end of the transfer board is placed under the
patient’s buttocks and the other end on the surface to which the transfer is
being made (eg, the chair).
•
The patient is instructed to lean forward, push up
with his or her hands, and then slide across the board to the other surface.
•
The nurse frequently assists weak and incapacitated
patients out of bed. The nurse supports and gently assists the patient dur-ing
position changes, protecting the patient from injury. The nurse avoids pulling
on the weak or paralyzed upper extremity, to prevent dislocation of the
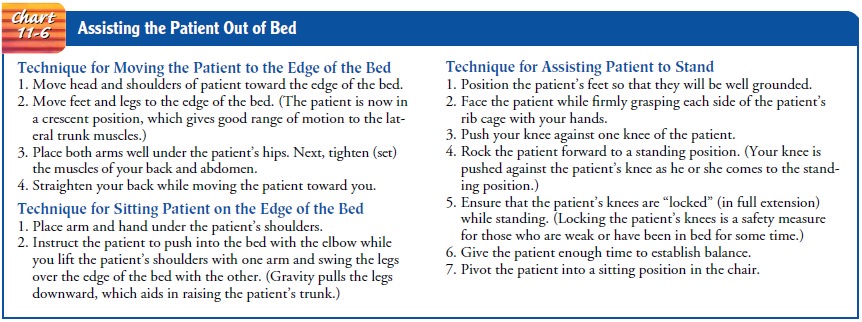
shoulder. The patient is assisted to move toward the stronger side (Chart 11-6).
In the home setting, getting in and out of bed and perform-ing chair,
toilet, and tub transfers are difficult for patients with weak musculature and
loss of hip, knee, and ankle motion. A rope attached to the headboard of the
bed enables the patient to pull toward the center of the bed, and the use of a
rope attached to the footboard facilitates getting in and out of bed. The
height of a chair can be raised with cushions on the seat or with hollowed-out
blocks placed under the chair legs. Grab bars can be attached to the wall near
the toilet and tub to provide leverage and stability.
Preparing for Ambulation
Regaining the ability to
walk is a prime morale builder. However, to be prepared for ambulation—whether
with brace, walker, cane, or crutches—the patient must strengthen the muscles
required. Exercise, therefore, is the foundation of preparation. The nurse and
physical therapist instruct and supervise the patient in these exercises.
For ambulation, the quadriceps muscles, which stabilize the knee joint,
and the gluteal muscles are strengthened. To perform quadriceps-setting
exercises, the patient contracts the quadriceps muscle by attempting to push
the popliteal area against the mat-tress and at the same time raising the heel.
The patient maintains the muscle contraction until a count of five and relaxes
for a count of five. The exercise is repeated 10 to 15 times hourly. Exercising
the quadriceps muscles prevents flexion contractures of the knee.
In gluteal setting, the patient contracts or “pinches” the but-tocks
together to the count of five, relaxes for the count of five, and repeats 10 to
15 times hourly. If ambulatory aids (ie, walker, cane, crutches) are to be
used, the muscles of the upper extremities are exercised and strengthened.
Push-up exercises are useful. While in a sitting position, the patient raises
the body by pushing the hands against the chair seat or mattress. The patient
should be encour-aged to do push-up exercises while in a prone position also.
Pull-up exercises done on a trapeze while lifting the body are also effective
for conditioning. The patient is taught to raise the arms above the head and
then lower them in a slow, rhythmic manner while hold-ing weights. Gradually,
the weight is increased. The hands are strengthened by squeezing a rubber ball.
Typically, the physical
therapist designs exercises to help the patient develop the sitting and
standing balance, stability, and co-ordination needed for ambulation. After
sitting and standing bal-ance are achieved, the patient uses parallel bars.
Under the supervision of the physical therapist, the patient practices
shift-ing weight from side to side, lifting one leg while supporting weight on
the other, and then walking between the parallel bars.
A patient who is ready to begin ambulation must be fitted with the appropriate ambulatory aid, instructed about the prescribed weight-bearing limits (eg, non–weight-bearing, partial weight-bearing ambulation), and taught how to use the aid safely. The nurse continually assesses the patient for stability and adherence to weight-bearing precautions and protects the patient from falling. The nurse provides contact guarding by holding on to a gait belt that the patient wears around the waist. The patient should wear sturdy, well-fitting shoes and be advised of the dangers of wet or highly polished floors and throw rugs. The patient should also learn how to ambulate on inclines, uneven surfaces, and stairs.
Ambulating With Crutches
Patients who are prescribed partial weight-bearing or non–
weight-bearing ambulation may use crutches. The nurse or physi-cal therapist
should determine whether crutches are appropriate for the patient, because good
balance, adequate cardiovascular reserve, strong upper extremities, and erect
posture are essential for crutch walking. Ambulating a functional distance (at
least the length of a room or house) or maneuvering stairs on crutches requires
signifi-cant arm strength, because the arms must bear the patient’s weight.
Muscle groups important for crutch walking include the following:
• Shoulder depressors—to
stabilize the upper extremity and prevent shoulder hiking
• Shoulder adductors—to hold
the crutch top against the chest wall
• Arm flexors, extensors, and
abductors (at the shoulder)—to move crutches forward, backward, and sideways
• Forearm extensors—to prevent
flexion or buckling; impor-tant in raising the body for swinging gait
• Wrist extensors—to enable
weight bearing on hand pieces
• Finger and thumb flexors—to
grasp the hand piece
Preparing the Patient to Walk With Crutches
Preparatory exercises are prescribed to strengthen the shoulder gir-dle
and upper extremity muscles. Meanwhile, crutches need to be adjusted to the
patient before the patient begins ambulating. To determine the approximate
crutch length, the patient may be mea-sured standing or lying down. A standing
patient is positioned against the wall with the feet slightly apart and away
from the wall. Then a distance of 5 cm (2 inches) is marked on the floor, out
to the side from the tip of the toe; 15 cm (6 inches) is measured straight
ahead from the first mark, and this point is marked on the floor. Next, 5 cm (2
inches) is measured below the axilla to the sec-ond mark for the approximate
crutch length.
If the patient has to be
measured while lying down, he or she is measured from the anterior fold of the
axilla to the sole of the foot, and then 5 cm (2 inches) is added. If the
patient’s height is used, 40 cm (16 inches) is subtracted to obtain the
approximate crutch length. The hand piece should be adjusted to allow 20 to 30
degrees of flexion at the elbow. The wrist should be extended and the hand
dorsiflexed. A foam rubber pad on the underarm piece is used to relieve
pressure of the crutch on the upper arm and thoracic cage. For safety, crutches
should have large rubber tips, and the patient should wear firm-soled shoes
that fit well.
Teaching Crutch Walking
The nurse or physical
therapist explains and demonstrates to the patient how to use the crutches. The
patient learns standing bal-ance by standing on the unaffected leg by a chair.
To help the pa-tient maintain balance, the nurse holds the patient near the
waist or uses a transfer belt.
The patient is taught to
support his or her weight on the hand pieces. (For patients who are unable to
support their weight through the wrist and hand because of arthritis or
fracture, plat-form crutches that support the forearm and allow the weight to
be borne through the elbow are available.) If weight is borne on the axilla,
the pressure of the crutch can damage the brachial plexus nerves, producing
“crutch paralysis.”
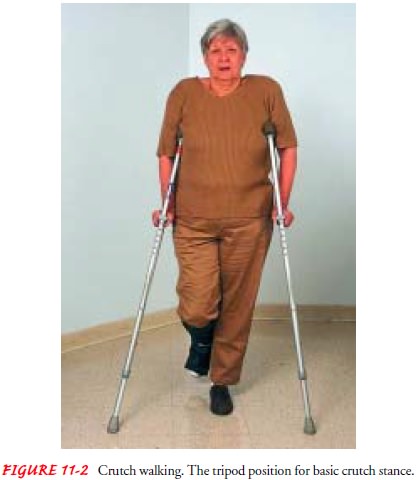
For maximum stability,
the patient first assumes the tripod po-sition by placing the crutches about 20
to 25 cm (8 to 10 inches) in front and to the side of his or her toes (Fig.
11-2). (This base of support is adjusted according to the height of the
patient; a tall person requires a broader base of support than does a short
per-son). In this position, the patient learns how to shift weight and maintain
balance.
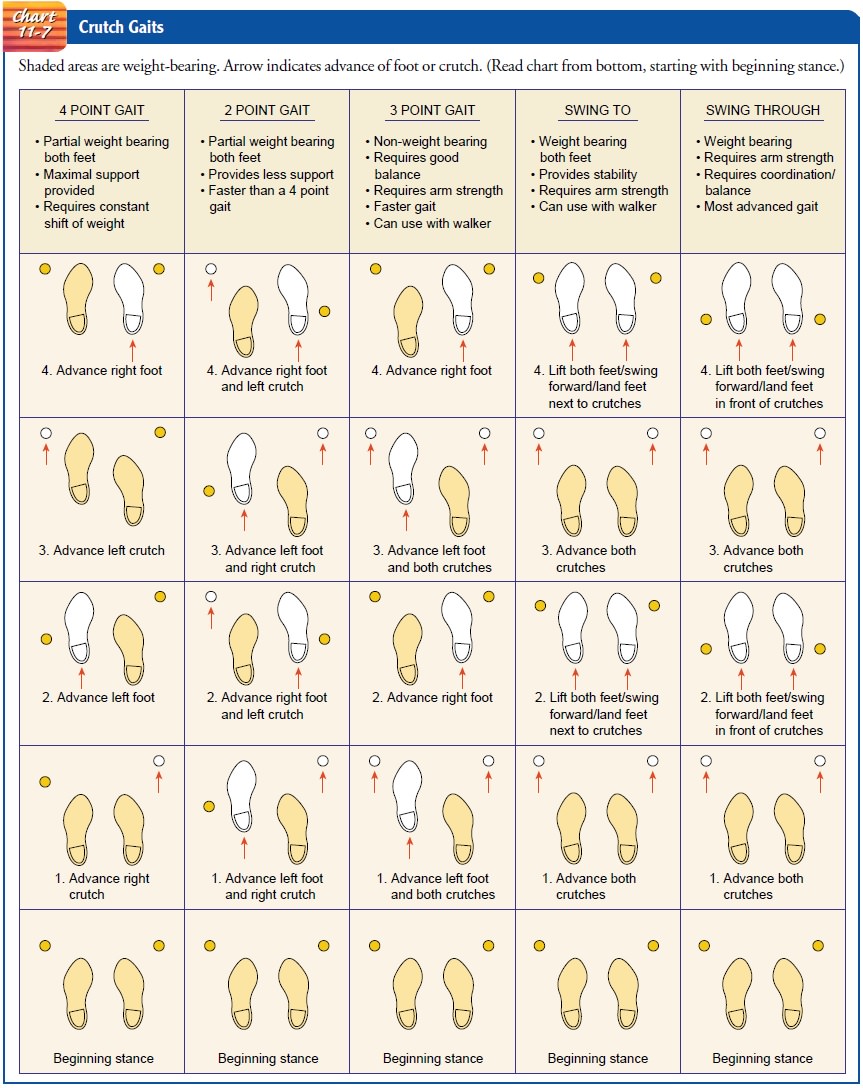
Before teaching crutch walking, the nurse or therapist deter-mines which gait will be best for the patient. The selection of the crutch gait depends on the type and severity of the disability and on the patient’s physical condition, arm and trunk strength, and body balance. The patient should be taught two gaits so that he or she can change from one to another. Shifting crutch gaits re-lieves fatigue, because each gait requires the use of a different combination of muscles (if a muscle is forced to contract steadily without relaxing, the circulation of the blood to that part is de-creased). A faster gait can be used when walking an uninterrupted distance, and a slower gait can be used for short distances or in crowded places. The more common gaits are the four-point, the three-point, the two-point, and the swinging-to and swinging through gaits. The sequence of movements for each of these gaits is depicted in Chart 11-7.
The nurse walks with the
patient who is just learning how to ambulate with crutches, holding him or her
at the waist as needed for balance. During this time, the nurse protects the
patient from falls and continually assesses the patient’s stability and
stamina, since prolonged periods of bed rest and inactivity affect a patient’s
strength and endurance. Sweating and shortness of breath are in-dications that
crutch-walking practice should be stopped and the patient permitted to rest.
Teaching Maneuvering Techniques
Before a patient is considered to be independent in crutch walk-ing, he
or she needs to learn to sit in a chair, stand from sitting, and go up and down
stairs.
To sit down:
1.
Grasp the crutches at the hand pieces for control.
2.
Bend forward slightly while assuming a sitting
position.
3. Place the affected leg
forward to prevent weight-bearing and flexion.
To stand up:
1.
Move forward to the edge of the chair with the
strong leg slightly under the seat.
2.
Place both crutches in the hand on the side of the
affected extremity.
3.
Push down on the hand piece while raising the body
to a standing position.
To go down stairs:
1.
Walk forward as far as possible on the step.
2. Advance crutches to the lower step. The weaker leg is ad-vanced first and then the stronger one. In this way, the stronger extremity shares with the arms the work of raising and lowering the body weight.
To go up stairs:
·
Advance the stronger leg first up to the next step.
·
Advance the crutches and the weaker extremity. Note
that the strong leg goes up first and comes down last. A mem-ory device for the
patients is, “Up with the good, down with the bad.”
AMBULATING WITH A WALKER
A walker provides more support and stability than a cane or crutches.
There are two types of walkers: pick-up walkers and rolling walkers. A pick-up
walker (one that has to be picked up and moved with each step forward) does not
permit a natural walking pattern and is useful for patients who have poor
balance or limited cardiovascular reserve or who cannot use crutches. A rolling
walker allows automatic walking and is used by patients who cannot lift or who
inappropriately carry a pick-up walker. The height of the walker is adjusted to
the patient. The patient’s arms resting on the walker hand grips should exhibit
20 to 30 degrees of flexion at the elbows. The patient should wear sturdy,
well-fitting shoes. The nurse walks with the patient, holds him or her at the
waist as needed for balance, continually assesses the patient’s stability, and
protects the patient from falls.
The patient is
instructed to ambulate with a pick-up walker as follows:
·
Push off a chair or bed to come to a standing
position. Never pull yourself up using the walker.
·
Hold the walker on the hand grips for stability.
·
Lift the walker, placing it in front of you while
leaning your body slightly forward.
·
Walk into the walker, supporting your body weight
on your hands when advancing your weaker leg, permitting partial weight bearing
or non–weight bearing as prescribed.
· Balance yourself on your
feet.
·
Lift the walker, and place it in front of you
again. Continue this pattern of walking.
·
Remember to look up as you walk.
USING A CANE
A cane helps the patient
walk with greater balance and support and relieves the pressure on
weight-bearing joints by redistribut-ing weight. Quad canes (four-footed canes)
provide more stabil-ity than straight canes. To fit the patient for a cane, the
patient is instructed to flex the elbow at a 30-degree angle, hold the handle
of the cane about level with the greater trochanter, and place the tip of the
cane 15 cm (6 inches) lateral to the base of the fifth toe. Adjustable canes
make individualization easy. The cane should be fitted with a gently flaring
tip that has flexible, concentric rings; the tip with its concentric rings
provides optimal stability, functions as a shock absorber, and enables the
patient to walk with greater speed and less fatigue.
The cane is held in the hand opposite the affected extremity. In normal
walking, the opposite leg and arm move together (recipro-cal motion); this
motion is to be carried through in walking with a cane. The patient is taught
to ambulate with a cane as follows:
Cane–foot sequence:
1.
Hold the cane in the hand opposite the affected
extremity to widen the base of support and to reduce the stress on the involved
extremity. If the patient for some reason is unable to use the cane in the
opposite hand, the cane may be used on the same side.
2.
Advance the cane at the same time the affected leg
is moved forward.
3.
Keep the cane fairly close to the body to prevent
leaning.
4. Bear down on the cane
when the unaffected extremity be-gins the swing phase.
To go up and down stairs
using the cane:
1.
Step up on the unaffected extremity.
2.
Place the cane and affected extremity up on the
step.
3.
Reverse this procedure for descending steps (“up
with the good, down with the bad”).
As for all patients
beginning ambulation with an ambulatory aid, the nurse continually assesses the
patient’s stability and pro-tects the patient from falls. The nurse accompanies
the patient, holding him or her at the waist as needed for balance. The patient
is assessed for tolerance of walking, and rest periods are provided as needed.
ASSISTING THE PATIENT WHO USES AN ORTHOSIS OR PROSTHESIS
Orthoses and prostheses are designed to facilitate mobilization and to
maximize the patient’s quality of life. An orthosis is an external appliance
that provides support, prevents or corrects deformities, and improves function.
Orthoses include braces, splints, collars, corsets, or supports that are designed
and fitted by an orthotist or prosthetist. Static orthoses (no moving parts)
are used to stabilize joints and prevent contractures. Dynamic or-thoses are
flexible and are used to improve function by assisting weak muscles. A
prosthesis is an artificial body part; it may be in-ternal, such as an
artificial knee or hip joint, or external, such as an artificial leg or arm.
In addition to learning
how to apply and remove the orthosis and maneuver the affected body part
correctly, rehabilitation pa-tients must learn how to properly care for the
skin that comes in contact with the appliance. Skin problems or pressure ulcers may develop if the
device is applied too tightly or too loosely, or if it is adjusted improperly.
The nurse instructs the patient to clean and inspect the skin daily, to make
sure the brace fits snugly without being too tight, to check that the padding
distributes pressure evenly, and to wear a cotton garment without seams
be-tween the orthosis and the skin.
If the patient has had an amputation, the nurse promotes tissue healing,
uses compression dressings to promote residual limb shaping, and minimizes
contracture formation. A permanent prosthetic limb cannot be fitted until the
tissue has healed com-pletely and the residual limb shape is stable and free of
edema. The nurse also helps the patient cope with the emotional issues
sur-rounding loss of a limb and encourages acceptance of the pros-thesis. The
prosthetist, the nurse, and the physician collaborate to provide instructions
related to skin care and care of the prosthesis.
Evaluation
EXPECTED PATIENT OUTCOMES
Expected patient
outcomes may include:
1.
Demonstrates improved physical mobility
a.
Maintains muscle strength and joint mobility
b.
Does not develop contractures
c.
Participates in exercise program
2.
Transfers safely
a.
Demonstrates assisted transfers
Performs independent
transfers
3.
Ambulates with maximum independence
a.
Uses ambulatory aid safely
b.
Adheres to weight-bearing prescription
c.
Requests assistance as needed
4.
Demonstrates increased activity tolerance
a.
Does not experience episodes of orthostatic
hypotension
b. Reports absence of
fatigue with ambulatory efforts
c.
Gradually increases distance and speed of
ambulation
Related Topics