Chapter: Web Technology : Web Essentials
HTML Forms
HTML Forms:
• Form is a
layout component used in web page to interact the user.
• Form is
also used to link the another page or another form based on the action .
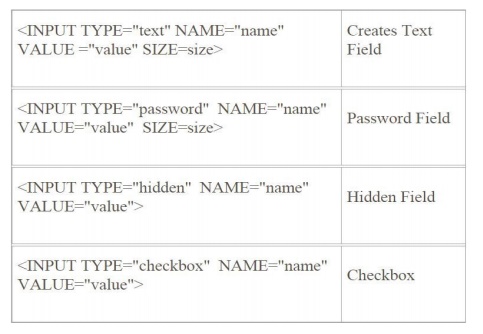
• List of component Text
Text Area
Label Button Check box Radio button Menus
1. Text
• Text
component is used to insert a text in web page.
• <Input>
tag is used to insert a text component in document.
• General
form
<input
type=”text” size=25 value= “ “>
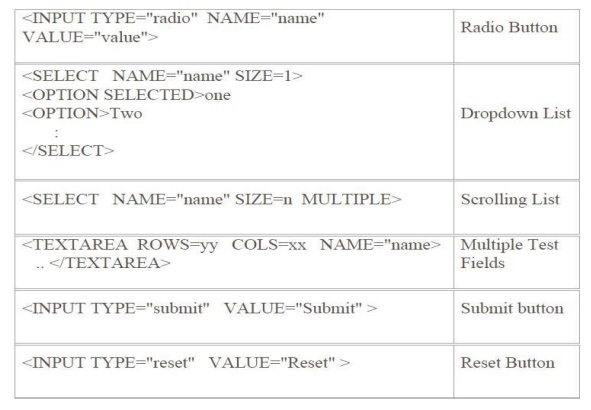
2. Text Area
• Text Area
component is used to feed multiple line of text.
• Attribute
in text area component.
• Row: Row
attribute used to denote the total number of rows in the text area.
• Column:
Column attribute is used to denote the number of column in the text area.
• Name:
Name attribute is used to denote the name of the text area.
• Wrap:
Wrap attribute is used to wrap the text inside the text area.
• <text
area> tag is used to insert the text area in the web document.
• General
form:
o
<text area cols=”value” rows=”values” >----</text area>
•
Example:
o
<text area cols=”50” rows=”40” name=”name”>---</text area>
3. Label
• Label tag
is used to create text box to fill the text.
• This tag
has starting tag (<label>) and ending tag (</label>).
• Example
o<label>
Name <input type=text size=40>--</label>
4. Check box
• Check box
component is used to place the checkbox in the web document.
• General
form:
o<input
type=checkbox> ----- </input>
The MENU
tag displays a list of simple items. This tag works just like the UL tag. Use
the LI tag to designate the individual menu items.
This tag
is being deprecated because it has become obsolete in favor of the UL tag.
Syntax
<MENU>
...
</MENU>
Example
The following example creates a list of three short
items: <P>HTML Menu Example:</P>
<MENU>
<LI>
Windows 9x
<LI>
Windows NT
<LI>
Windows 2000 </MENU>
Forms
This
section discusses the tags for creating forms.
FORM INPUT
INPUT TYPE="BUTTON"
INPUT TYPE="CHECKBOX"
INPUT TYPE="FILE"
INPUT TYPE="HIDDEN"
INPUT TYPE="IMAGE"
INPUT TYPE="PASSWORD"
INPUT TYPE="RADIO"
INPUT TYPE="RESET"
INPUT TYPE="SUBMIT"
INPUT TYPE="TEXT"
SELECT OPTION ISINDEX
FORM - (form for user input)
The FORM
tag creates an HTML form. The form can contain interface elements such as text
fields, buttons, checkboxes, radio buttons, and selection lists that let users
enter text and make choices. Each interface element in the form must be defined
with an appropriate tag, such as <INPUT> or <SELECTION>. All
elements in the form must be defined between the <FORM> and </FORM>
tags. As well as user input elements, the form can contain other elements such
as headings, paragraphs, tables, and so on.
When the
form is displayed in a web browser, the user can fill it out by making choices
and entering text using the interface elements, and then submit the form by
clicking a "Submit" button.
Kinds of Interface Elements
Several kinds
of form elements can be defined using the INPUT tag, which uses the TYPE
attribute to indicate the type of element, such as button, checkbox, and so on.
Two other
kinds of interface elements you can put in a form are selection lists and text
areas. Selection lists act as menus and are defined with the SELECT tag.
Multi-line text-entry fields are defined with the TEXTAREA tag.
Submit Buttons and CGI Programs
To enable
the form to process the data that the user enters, it must have a
"Submit" button, which is a button defined by an <INPUT
TYPE="SUBMIT"> or an <INPUT TYPE="IMAGE"> tag.
The
action invoked when the user clicks a "Submit" button is defined by
the ACTION attribute of the FORM tag. The value of the ACTION attribute is
usually a URL that points to a CGI program. A CGI program runs on a server,
processes arguments sent by the form, and returns data to the browser.
The value
of the form's METHOD attribute also affects the way the CGI program is invoked.
It is beyond the scope of this reference to provide details of CGI programming,
but many fine books are available on the subject, and also lots of information
is available on the web.
ONCLICK and ONSUBMIT
You can
also define OnClick event handlers for several kinds of input elements. An
OnClick event handler is a piece of JavaScript code that is executed when the
element is clicked. The FORM tag has an optional ONSUBMIT attribute, whose
value is a JavaScript event handler that executes when a "Submit"
button in the form is pressed. If the JavaScript code returns false, the form's
action ends there, and the URL specified by the ACTION attribute is not
invoked.
If the
JavaScript code returns anything else, the URL specified by the ACTION
attribute is invoked. For example, you could use the ONSUBMIT attribute to
check whether or not the user really wants to submit the form.
Name/Value Pairs
When a
form is submitted, the data contained in the form is sent to the invoked CGI
program as a series of name/value pairs. The name portion of each pair is the
name of an interface element as specified by its NAME attribute. In most cases
the value portion is the value displayed by the element, for example, the text
displayed in a text field.
Nesting Forms
A
document can have multiple forms, but forms cannot be nested -- you cannot have
a form within a form. If your document uses positioned HTML content, each form
must be completely contained within one positioned block.
Syntax
<FORM
ACTION="serverURL"
ENCTYPE="encodingType"
METHOD="GET"|"POST"
NAME="formName"
ONRESET="JScode"
ONSUBMIT="JScode"
TARGET="windowName"
>
...
</FORM>
The
ACTION attribute is required if any action is to occur when the user presses a
"Submit" button in the form.
ACTION="serverURL" specifies
the URL of the program to be invoked when the form is submitted. The action can also be a mailto: URL if the form
results are to be mailed to someone. ENCTYPE="encodingType"
specifies the MIME encoding of the data sent:
"application/x-www-form-urlencoded"
(the default), is usually used if the METHOD attribute has the value POST.
"multipart/form-data"
is used when the form contains a file upload element (INPUT
TYPE="FILE").
METHOD specifies how information is sent
to program invoked by submitting the form.
GET (the
default) appends the input information to the URL which on most receiving
systems becomes the value of the environment variable QUERY_STRING.
POST
sends the input information in a data body that is available on stdin with the
data length set in the environment variable CONTENT_LENGTH.
NAME="formName" specifies
the name of the form. The name is not displayed on the form. JavaScript can use the NAME attribute
to differentiate different forms if there are multiple forms on a page.
ONRESET="JScode" specifies
JavaScript code that executes when a user resets the form by using a RESET button.
ONSUBMIT="JScode" specifies
JavaScript code that executes when a user submits the form by clicking a "Submit" button.You can use the ONSUBMIT
attribute to prevent a form from being submitted; to do so, put a return
statement that returns false in the JavaScript code. Any other returned value
lets the form submit. If you omit the return statement, the form is submitted. TARGET="windowName" specifies
the window that displays the data returned by the invoked program.
Example
The
following example creates a form called LoginForm that contains text fields for
user name and password, a submit button, and a cancel button.
<FORM
NAME="LoginForm" METHOD=POST ACTION="urltoInvoke">
<P>User name:
<INPUT
TYPE="text" NAME="userName" SIZE="10">
<P>Password:
<INPUT
TYPE="password" NAME="password" SIZE="12">
<P><INPUT TYPE="submit" VALUE="Log in">
<INPUT
TYPE="button" VALUE="Cancel"
onClick="window.close()"> </FORM>
INPUT - (input element in a form)
o
The INPUT tag defines a form element that can
receive user input. The TYPE attribute determines the specific sort of form
element to be created. TYPE can be one of the following:
o
BUTTON places a button on an HTML form. Use
JavaScript code to make the button perform an action you define.
o
CHECKBOX places a toggle switch on an HTML form,
letting the user set a value on or off.
o
FILE places an element on an HTML form letting the
user supply a file as input. When the form is submitted, the content of the
specified file is sent to the server along with the other form data.
o
HIDDEN specifies an invisible text element. A
hidden element is used for passing information to the server when a form is
submitted.
o IMAGE places
an image, serving as a custom button, on an HTML form. When a user clicks an
image element, the form is submitted to the server.
o PASSWORD
places a text input field on an HTML form. Each character typed in the field is
displayed as a character such as * or a black dot to conceal the actual value.
o RADIO places
a radio button on an HTML form. Radio buttons can be grouped into sets, and
only one button per set can be selected at a time.
o
RESET places a reset button on an HTML form. When a
user clicks a reset button, all elements in the form are reset to their default
values.
o
SUBMIT places a submit button on an HTML form. When
a user presses a submit button, the form is submitted.
o
TEXT places a single line text input field on an
HTML form. A text field lets the user enter text.
INPUT TYPE="BUTTON"
A button
apears in the form. You must specify JavaScript code as the value of the
ONCLICK attribute to determine what happens when the user clicks the
button.
Syntax
<INPUT
TYPE="BUTTON" NAME="buttonName"
VALUE="buttonText" ONCLICK="JScode"
>
NAME="buttonName" specifies
the name of the button. The name does not appear in the form.
VALUE="buttonText" specifies
the text to be displayed in the button.
ONCLICK="JScode" specifies JavaScript code to execute when a user
clicks the button.
Example
<FORM
METHOD=POST ACTION="/cgi-bin/example.cgi"> <INPUT
TYPE="button" VALUE="Close Window"
onClick="window.close();">
</FORM>
INPUT TYPE="CHECKBOX" A
checkbox is a toggle that the user can select (switch on) or deselect (switch off.)
Syntax
<INPUT
TYPE="CHECKBOX"
CHECKED
NAME="name" ONCLICK="JScode"
VALUE="checkboxValue"
>
CHECKED indicates
that the checkbox is displayed with a tick mark to indicate that it is selected.
NAME="name" specifies
the name of the input element. This value is the name portion of the name/value pair for this element that
is sent to the server when the form is submitted. The name is not displayed on
the form.
ONCLICK="JScode" specifies
JavaScript code to execute when a user clicks the checkbox. VALUE="checkboxValue" specifies the value to be returned
to the server if the checkbox is selected
when the form is submitted. The default value is ON, but you can specify a
different value if you want. When the form is submitted, only the name/value
pairs for selected checkboxes are sent to the invoked CGI program.
Example
<P>Specify
your music preferences (check all that apply):</P> <BR><INPUT
TYPE="checkbox" NAME="musicpref_rnb" CHECKED> R&B
<BR><INPUT
TYPE="checkbox" NAME="musicpref_jazz" CHECKED> Jazz
<BR><INPUT
TYPE="checkbox" NAME="musicpref_blues" CHECKED> Blues
<BR><INPUT
TYPE="checkbox" NAME="musicpref_newage" CHECKED> New Age
INPUT TYPE="FILE" This
places an element on an HTML form that lets the user supply a file as input. When the form is
submitted, the content of the specified file is sent to the server as the value
portion of the name/value pair for this input element.
If a form
contains a file input element, the value of the ENCTYPE attribute of the FORM
tag should be "multipart/form-data".
Syntax
<INPUT
TYPE="FILE" NAME="name" VALUE="filename"
>
NAME=name specifies the name of the input
element. This value is used as the name portion of the name/value pair for this element that is sent to the server
when the form is submitted. The name is not displayed on the form.
VALUE=filename specifies the initial value of
the input element.
Example
<FORM
ENCTYPE="multipart/form-data" ACTION="/cgi-bin/example.cgi"
METHOD="POST"> <P>File name:
<INPUT
TYPE="file"> </FORM>
INPUT TYPE="HIDDEN"
A hidden
input element is an invisible element whose main purpose is to contain data
that the user does not enter. This data gets sent to the invoked CGI program
when the form is submitted.
This tag
provides a mechanism for delivering a value to the CGI program without the user
having entered it, but note that it is not very hidden because the user can
discover it by viewing the document source.
Syntax
<INPUT
TYPE="HIDDEN" NAME="name" VALUE="value"
>
NAME="name" specifies
the name of the input element. This value is the name portion of the name/value pair sent to the invoked
CGI program when the form is submitted. The name is not displayed on the form.
VALUE="value" specifies
the initial value of the input element.
Example
This
example creates a form with a hidden element, DefaultPass, that stores the
initial value of the password field.
<FORM
NAME="LoginForm" METHOD=POST ACTION="/cgibin/
example.cgi">
<P>Password:
<INPUT
TYPE="password" NAME="password" SIZE="12"
VALUE="treasure">
<INPUT
TYPE="hidden" NAME="DefaultPass"
VALUE="treasure"> </FORM>
INPUT TYPE="IMAGE"
This
places an image, serving as a custom button, on an HTML form. When a user
clicks the image, the form is submitted to the server.
Syntax
<INPUT
TYPE="IMAGE"
ALIGN="LEFT"|"RIGHT"|"TOP"|"ABSMIDDLE"|"ABSBOTTOM"|
"TEXTTOP"|"MIDDLE"|"BASELINE"|"BOTTOM"
NAME="name"
SRC="location"
>
ALIGN specifies the alignment of the
image in relation to the surrounding text. If you do not specify a value for ALIGN, Navigator uses BOTTOM as the default.
The possible values are LEFT, RIGHT, TOP, ABSMIDDLE, ABSBOTTOM, TEXTTOP,
MIDDLE, BASELINE, and BOTTOM. See the section "IMG" for a description
of the values.
NAME=name specifies the name of the input
element. This value is used as the name portion of the name/value pair for this element that is sent to the
invoked CGI program when the form is submitted. The name is not displayed on
the form.When Navigator sends the offsets of the image to the server, it sends
them as name.x and name.y.
SRC="location" specifies
the URL of the image to be displayed in the document.
Example
<CENTER><INPUT
TYPE="image" SRC="signnow.gif"></CENTER>
INPUT TYPE="PASSWORD" A
password element is a text input field in which each character typed is displayed as a character such as * or a black
dot to conceal the actual value.
Syntax
<INPUT
TYPE="PASSWORD" MAXLENGTH="maxChar" NAME="name"
ONSELECT="JScode" SIZE="charLength"
VALUE="textValue"
>
MAXLENGTH="maxChar" specifies
the maximum number of characters a password box can accept.
NAME="name" specifies
the name of the input element. This value is used as the name portion of thename/value pair for this element
that is sent to the server when the form
is
submitted. The name is not displayed on the form.
ONSELECT="JScode” specifies
JavaScript code to execute when a user selects some of the text in the text element.
SIZE="charLength" specifies
the length of the input field, in characters. The value should be an integer.
VALUE="textValue"specifies
the initial value of the password, if any.
Example
<P>Password:
<INPUT
TYPE="password" NAME="password" VALUE=""
SIZE="25">
INPUT TYPE="RADIO" A radio
element is a radio button. A set of radio buttons consists of multiple radio buttons that all have
the same NAME attribute. Only one radio button in the set can be selected at
one time. When the user selects a button in the set, all other buttons in the
set are deselected. If one radio button in a set has the CHECKED attribute,
that one is selected when the set is first laid out on the window.
Syntax
<INPUT
TYPE="RADIO"
CHECKED
NAME="name" ONCLICK="JScode" VALUE="buttonValue"
>
CHECKED indicates that the radio button
is selected.
NAME="name" specifies
the name of the input element. This value is used as the name portion of the name/value pair for this
element that is sent to the invoked CGI program when the form is submitted. The
name is not displayed on the form. All radio buttons that have the same name
constitute a radio group; only one radio button of a group can be set at one
time.
ONCLICK="JScode" specifies
JavaScript code to execute when a user clicks the radio button. VALUE="value” specifies the value
that is returned to the server when the radio button is selected and the form is submitted. Only name/value pairs for
radio buttons that are selected are sent to the invoked CGI program. The value
defaults to ON.
Example
The following example creates a radio button group. <P>Category:
<BR><INPUT
TYPE="radio" NAME="category" VALUE="liv"
CHECKED> Living
<BR><INPUT
TYPE="radio" NAME="category" VALUE="din">
Dining <BR><INPUT TYPE="radio" NAME="category"
VALUE="bed"> Bedroom
INPUT TYPE="RESET" When a
user presses a reset button, all elements in the form are reset to their default values
Syntax
<INPUT
TYPE="RESET" NAME="name" ONCLICK="JScode"
VALUE="label"
>
NAME="name"specifies
the name of the input element.
ONCLICK="JScode" specifies
JavaScript code to execute when a user clicks the button. VALUE="label" specifies the text to display on the face
of the reset button.
Example
This
example displays a text element with the default value CA and a reset button
labelled Clear Form. If the user types a state abbreviation in the text element
and then clicks the Clear Form button, the original value of CA is restored.
<FORM>
<P>State:
<INPUT TYPE="text" NAME="state" VALUE="CA"
SIZE="2"> <P><INPUT TYPE="reset"
VALUE="Clear Form">
</FORM>
INPUT TYPE="SUBMIT" When a
user clicks a submit button, the form is submitted, which means that the ACTION specified for the form is invoked.
Syntax
<INPUT
TYPE="SUBMIT" NAME="name" VALUE="label">
NAME="name" specifies
the name of the input element. The name is not displayed on the form.
VALUE="label" specifies
the text to display on the face of the submit button.
Example
<INPUT
TYPE="submit" NAME="SubmitButton"
VALUE="Done">
INPUT TYPE="TEXT" A text element
is a single line text input field in which the user can enter text.
Syntax
<INPUT
TYPE="TEXT" MAXLENGTH="maxChars" NAME="name"
ONBLUR="Scode" ONCHANGE="JScode" ONFOCUS="Scode"
ONSELECT="JScode" SIZE="lengthChars" VALUE="text"
>
MAXLENGTH="maxChars" specifies
the maximum number of characters a text box can accept.
NAME="name" specifies
the name of the input element. This value is used as the name portion of the name/value pair for this
element that is sent to the invoked CGI program when the form is submitted. The
name is not displayed on the form.
ONBLUR="JScode" specifies
JavaScript code to execute when the text element loses keyboard focus.
ONCHANGE="JScode" specifies
JavaScript code to execute when the text element loses focus and its value has been modified.
ONFOCUS="JScode" specifies
JavaScript code to execute when a user clicks the text element. See the JavaScript Guide forSee the
JavaScript Guide for more information. ONSELECT="JScode"
specifies JavaScript code to execute when a user selects some of the text in the text element.
SIZE="lengthChars" specifies
the length of the input field, in characters. VALUE="text" specifies the initial value of the text
element.
Example
<P>Last
name:
<INPUT
TYPE="text" NAME="last_name" VALUE="" SIZE="25">
SELECT - (selection list in a form)
The
SELECT tag defines a selection list on an HTML form. A selection list displays
a list of options from which the user can select an item. If the MUTLIPLE
attribute is supplied, users can select multiple options from the list at a
time. If the MULTIPLE attribute is not supplied users can select only one
option in the list at a time.
The SIZE
attribute specifies how many options in the list are displayed at one time. For
multiple-selection lists, if you do not specify the SIZE attribute, the browser
displays some, maybe all, of the options. For single-selection lists, by
default Navigator displays the list as a drop-down menu that initially shows
only one option. The user can click the list to display the rest of the
options. If you specify the SIZE attribute, the list is displayed as a
scrolling list that shows the specified number of options, regardless of
whether the list allows single or
multiple
selection..
The
SELECT tag should be used between <FORM> and </FORM> tags. Use the
OPTION tag to define options in the list. When the form containing the
selection list is submitted to the server, a name/value pair is sent for each
selected option in the list.
Syntax
<SELECT
NAME="selectName"
MULTIPLE
ONBLUR="JScode" ONCHANGE="JScode"
ONCLICK="JScode" ONFOCUS="fScode"
SIZE="listLength"
>
<OPTION...>
...
<OPTION
...> </SELECT>
MULTIPLE specifies that multiple items can
be selected. If this attribute is omitted, only one item can be selected from the list. If multiple selection is
enabled, the user usually needs to hold down the Shift key to select additional
items.
NAME="selectName" specifies
the name of the select element. This value is the name portion of the name/value pair sent to the
invoked CGI program when the form is submitted. The name is not displayed on
the form.
ONBLUR="blurJScode specifies
JavaScript code to execute when the select element loses focus.
ONCHANGE="changeJScode" specifies
JavaScript code to execute when the select element loses focus and its value has been modified.
ONCLICK="JScode" specifies
JavaScript code to execute when a user clicks an item in the list.
ONFOCUS="focusJScode" specifies
JavaScript code to execute when the element gets focus.
SIZE="ListLength" specifies
the number of options visible when the form is displayed. If the list contains more options than
specified by size, the list is displayed with scrollbars.
Used WithinFORM
Select Example 1:Single Item Selection
<FORM>
<B>Shipping
method:</B><BR> <SELECT>
<OPTION>
Standard <OPTION SELECTED> 2-day <OPTION> Overnight </SELECT>
</FORM>
Example 2: Multiple Selection
<FORM>
...
<B>Music
types for your free CDs:</B><BR> <SELECT
NAME="music_type_multi" MULTIPLE> <OPTION> R&B
<OPTION>
Jazz
<OPTION>
Blues
<OPTION>
Reggae </SELECT> </FORM>
Example 3: Multiple Selection With Default
In the
following example, all seven options can be chosen, but bananas areselected by
default. The list is displayed as a scrollable menu that fits four options at a
time.
<FORM>
<SELECT
NAME="fruit_choices" MULTIPLE> <OPTION>Apples
<OPTION
SELECTED>Bananas <OPTION>Cherries <OPTION>Oranges
<OPTION>Pineapple <OPTION>Figs <OPTION>Guava
</SELECT>
</FORM>
OPTION - (option in a SELECT list) The
OPTION tag specifies an option in a selection list. Use the OPTION tag inside a SELECTION tag. When the form
containing the selection list is submitted to the server, a name/value pair is
sent for each selected option in the list. The value portion of an option is
the value of the VALUE attribute, if it has one, otherwise, it is the text that
follows the <OPTION> tag.
Syntax
<OPTION
VALUE="optionValue"
SELECTED
>
...
</OPTION>
VALUE="OptionValue" specifies
a value that is returned to the server when the option is selected and the form is submitted. When no VALUE attribute is
present, the value returned
is the
same as the text following the <OPTION> tag. SELECTED specifies that the option is selected by default.
Used within FOR
Example See example 1:Single Item
Selection.
ISINDEX - (searchable index)
The
ISINDEX tag causes the web page to display a text entry field in which the user
can type a string. The intent of this tag is that it "switches on
searching" in the page, but in reality, this tag is useful only if the
page is generated by a CGI program.
The
intent is that when the user enters text into the text entry field and presses
the Return key (or clicks an appropriate button on the browser), the CGI
program is invoked again, with the arguments generated from the data in the
text field. The browser outputs a new page whose content is determined by what
the user entered in the text field.
The CGI
program should test for the presence of arguments. If there are none, it should
display a default page that includes the ISINDEX tag in the header. If there are
arguments, the script does whatever it needs to do. The string entered by the
user is the first argument, and the language your script uses determines how
you access the first argument.
It is
beyond the scope of this reference to provide details on CGI programming, but
many fine books are available on the subject, and lots of information is
available on the web.
Note that
ISINDEX does not require a closing tag.
Syntax
<ISINDEX
PROMPT="text" >
PROMPT="text" specifies
the text that appears as the search prompt in the browser.
Used Within HEAD
Example
The
following snippet of code from a CGI program generates the header for an HTML
page. When the page is displayed, it has a text entry field whose prompt is
"Enter a search keyword:".
cat
<< EOF <HEAD>
<ISINDEX
PROMPT="Enter a search keyword:"> </HEAD>
Related Topics