Chapter: Java The Complete Reference : Introducing GUI Programming with JavaFX : Introducing JavaFX Menus
Create a Main Menu - JavaFX
Create
a Main Menu
As a general rule, the most
commonly used menu is the main menu.
This is the menu defined by the menu bar, and it is the menu that defines all
(or nearly all) of the functionality of an application. As you will see, JavaFX
streamlines the process of creating and managing the main menu. Here, you will
see how to construct a simple main menu. Subsequent sections will show various
options.
Constructing the main menu
requires several steps. First, create the MenuBar
instance that will hold the menus. Next, construct each menu that will be in
the menu bar. In general, a menu is constructed by first creating a Menu object and then adding MenuItems to it.
After the menus have been
created, add them to the menu bar. Then, the menu bar, itself, must be added to
the scene graph. Finally, for each menu item, you must add an action event
handler that responds to the action event fired when a menu item is selected.
A good way to understand the
process of creating and managing menus is to work through an example. Here is a
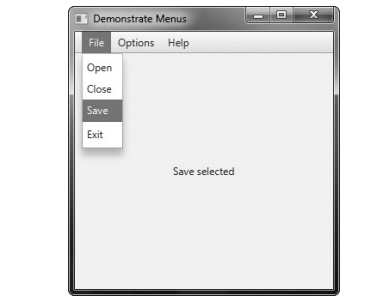
program that creates a simple menu bar that contains three menus. The first is
a standard File menu that contains Open, Close, Save, and Exit selections. The
second menu is called Options, and it contains two submenus called Colors and
Priority. The third menu is called Help, and it has one item: About. When a
menu item is selected, the name of the selection is displayed in a label.
// Demonstrate Menus
import javafx.application.*; import
javafx.scene.*; import javafx.stage.*; import javafx.scene.layout.*; import
javafx.scene.control.*;
import javafx.event.*; import
javafx.geometry.*;
public class MenuDemo extends Application {
Label response;
public static void main(String[] args) {
// Start the JavaFX application by calling
launch().
launch(args);
}
// Override the start() method.
public void start(Stage myStage) {
//Give the stage a title.
myStage.setTitle("Demonstrate
Menus");
//Use a BorderPane for the root node.
BorderPane rootNode = new BorderPane();
//Create a scene.
Scene myScene = new Scene(rootNode, 300, 300);
//Set the scene on the stage.
myStage.setScene(myScene);
//Create a label that will report the
selection.
response = new Label("Menu Demo");
//Create the menu bar.
MenuBar mb = new MenuBar();
// Create the File
menu.
Menu fileMenu = new Menu("File");
MenuItem open = new MenuItem("Open");
MenuItem close = new
MenuItem("Close"); MenuItem save = new MenuItem("Save");
MenuItem exit = new MenuItem("Exit");
fileMenu.getItems().addAll(open, close, save,
new SeparatorMenuItem(), exit);
//Add File menu to the menu bar.
mb.getMenus().add(fileMenu);
//Create the Options menu.
Menu optionsMenu = new
Menu("Options");
// Create the Colors submenu.
Menu colorsMenu = new Menu("Colors");
MenuItem red = new MenuItem("Red"); MenuItem green = new
MenuItem("Green"); MenuItem blue = new MenuItem("Blue");
colorsMenu.getItems().addAll(red, green, blue);
optionsMenu.getItems().add(colorsMenu);
// Create the Priority submenu.
Menu priorityMenu = new
Menu("Priority");
MenuItem high = new MenuItem("High");
MenuItem low = new MenuItem("Low");
priorityMenu.getItems().addAll(high, low);
optionsMenu.getItems().add(priorityMenu);
// Add a separator.
optionsMenu.getItems().add(new
SeparatorMenuItem());
//Create the Reset menu item.
MenuItem reset = new
MenuItem("Reset");
optionsMenu.getItems().add(reset);
//Add Options menu to the menu bar.
mb.getMenus().add(optionsMenu);
//Create the Help menu.
Menu helpMenu = new Menu("Help");
MenuItem about = new
MenuItem("About"); helpMenu.getItems().add(about);
//Add Help menu to the menu bar.
mb.getMenus().add(helpMenu);
//Create one event handler that will handle
menu action events.
EventHandler<ActionEvent> MEHandler =
new EventHandler<ActionEvent>() { public
void handle(ActionEvent ae) {
String name =
((MenuItem)ae.getTarget()).getText();
// If Exit is chosen, the program is
terminated.
if(name.equals("Exit"))
Platform.exit();
response.setText( name + "
selected");
}
};
// Set action event handlers for the menu
items.
open.setOnAction(MEHandler);
close.setOnAction(MEHandler);
save.setOnAction(MEHandler);
exit.setOnAction(MEHandler);
red.setOnAction(MEHandler);
green.setOnAction(MEHandler);
blue.setOnAction(MEHandler);
high.setOnAction(MEHandler);
low.setOnAction(MEHandler);
reset.setOnAction(MEHandler);
about.setOnAction(MEHandler);
//Add the menu bar to the top of the border
pane and
//the response label to the center position.
rootNode.setTop(mb);
rootNode.setCenter(response);
//Show the stage and its scene.
myStage.show();
}
}
Sample output is shown here:
Let’s examine, in detail, how
the menus in this program are created. First, note that MenuDemo uses a BorderPane instance
for the root node. BorderPane is
similar to the AWT’s BorderLayout discussed in Chapter 26.
It defines a window that has five areas: top, bottom, left, right, and center.
The following methods set the node assigned to these areas:
final void setTop(Node node) final void setBottom(Node node) final void setLeft(Node node) final void setRight(Node node) final void setCenter(Node node)
Here, node specifies the element, such as a control, that will be shown
in each location. Later in the program, the menu bar is positioned in the top
location and a label that displays the menu selection is set to the center
position. Setting the menu bar to the top position ensures that it will be
shown at the top of the application and will automatically be resized to fit
the horizontal width of the window. This is why BorderPane is used in the menu examples. Of course, other
approaches, such as using a VBox,
are also valid.
Much of the code in the
program is used to construct the menu bar, its menus, and menu items, and this
code warrants a close inspection. First, the menu bar is constructed and a
reference to it is assigned to mb by
this statement:
// Create the menu bar.
MenuBar mb = new MenuBar();
At this point, the menu bar
is empty. It will be populated by the menus that follow. Next, the File menu
and its menu entries are created by this sequence:
// Create the File menu.
Menu fileMenu = new Menu("File");
MenuItem open = new MenuItem("Open"); MenuItem close = new
MenuItem("Close"); MenuItem save = new MenuItem("Save");
MenuItem exit = new MenuItem("Exit");
The names Open, Close, Save,
and Exit will be shown as selections in the menu. The menu entries are added to
the File menu by this call to addAll( )
on the list of menu items returned by getItems(
):
fileMenu.getItems().addAll(open, close, save,
new SeparatorMenuItem(), exit);
Recall that getItems( ) returns the menu items
associated with a Menu instance. To
add menu items to a menu, you will add them to this list. Notice that a
separator is used to separate visually the Exit entry from the others.
Finally, the File menu is
added to the menu bar by this line:
// Add File menu to the menu bar.
mb.getMenus().add(fileMenu);
Once the preceding code
sequence completes, the menu bar will contain one entry: File. The File menu
will contain four selections in this order: Open, Close, Save, and Exit.
The Options menu is
constructed using the same basic process as the File menu. However, the Options
menu consists of two submenus, Colors and Priority, and a Reset entry. The
submenus are first constructed individually and then added to the Options menu.
As explained, because Menu inherits MenuItem, a Menu can be added as an entry into another Menu. This is the way the submenus are created. The Reset item is
added last. Then, the Options menu is added to the menu bar. The Help menu is
constructed using the same process.
After all of the menus have
been constructed, an ActionEvent
handler called MEHandler is created
that will process menu selections. For demonstration purposes, a single handler will process all
selections, but in a real-world application, it is often easier to specify a
separate handler for each individual selection by using anonymous inner classes
or lambda expressions. The ActionEvent
handler for the menu items is shown here:
// Create one event handler that will handle
all menu events.
EventHandler<ActionEvent> MEHandler = new
EventHandler<ActionEvent>() {
public void handle(ActionEvent ae) {
String name =
((MenuItem)ae.getTarget()).getText();
// If Exit is chosen, the program is
terminated.
if(name.equals("Exit"))
Platform.exit();
response.setText( name + "
selected");
}
};
Inside handle( ), the target of the event is obtained by calling getTarget( ). The returned reference is
cast to MenuItem, and its name is
returned by calling getText( ). This
string is then assigned to name. If name contains the string
"Exit", the application is terminated by calling Platform.exit( ). Otherwise, the name is displayed in the response label.
Before continuing, it must be
pointed out that a JavaFX application must call
Platform.exit( ), not
System.exit( ). The Platform class
is defined by JavaFX and packaged in
javafx.application. Its exit( ) method causes the stop( ) life-cycle method to be called.
System.exit( ) does not.
Finally, MEHandler is registered as the action event handler for each menu
item by the following statements:
// Set action event handlers for the menu
items.
open.setOnAction(MEHandler);
close.setOnAction(MEHandler);
save.setOnAction(MEHandler);
exit.setOnAction(MEHandler);
red.setOnAction(MEHandler);
green.setOnAction(MEHandler);
blue.setOnAction(MEHandler);
high.setOnAction(MEHandler);
low.setOnAction(MEHandler); reset.setOnAction(MEHandler);
about.setOnAction(MEHandler);
Notice that no listeners are
added to the Colors or Priority items because they are not actually selections.
They simply activate submenus.
Finally, the menu bar is
added to the root node by the following line:
rootNode.setTop(mb);
This causes the menu bar to
be placed at the top of the window.
At this point, you might want
to experiment a bit with the MenuDemo
program. Try adding another menu or adding additional items to an existing
menu. It is important that you understand the basic menu concepts before moving
on because this program will evolve throughout the remainder of this chapter.
Related Topics