Geometry | Term 2 Chapter 4 | 6th Maths - Construction of Parallel Lines | 6th Maths : Term 2 Unit 4 : Geometry
Chapter: 6th Maths : Term 2 Unit 4 : Geometry
Construction of Parallel Lines
Construction
of Parallel Lines
Place a scale on a paper and draw lines along both
the edges of the scale as shown.

Place the set square at two different points on
ℓ1 and
find the distance between ℓ 1 and
ℓ 2. Are
they equal? Yes. Thus, the perpendicular distance between a set of parallel lines
remains the same.
Note
Parallel line segments need not be of equal length
Think
Identify the parallel lines in English
alphabets (Capital Letters) and list the letters.
Examples: 
Example 7:
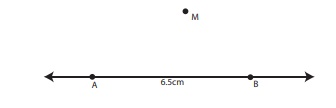
Draw a line segment AB = 6.5 cm and mark a point M above it. Through M draw a line parallel to AB.
Step 1: Draw a line. Mark two points A and B on the line such that AB = 6.5 cm. Mark a point M anywhere above the line.
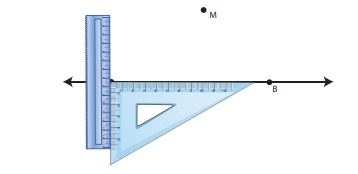
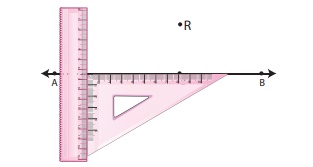
Step 2: Place the set square below AB in such a way that one of the edges that
form a right angle lies along AB. Place the scale along the other edge of the set
square as shown in the figure.
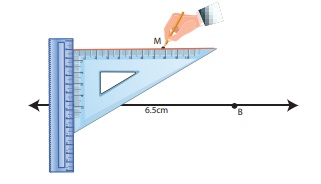
Step 3: Holding the scale firmly, Slide the set square along the edge of the scale
until the other edge of the set square reaches the point M. Through M draw a line
as shown.
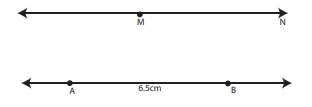
Step 4: The line MN is parallel to AB.
That is, MN || AB

Example 8:
Draw a line and mark a point R at a
distance of 4.8 cm above the line. Through R draw a line parallel to the given line.
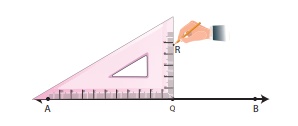
Step 1: Using a scale draw a line AB and mark a point Q on the line.
Step 2: Place the set square in such a way that the vertex of the right angle coincides
with Q and one of the edges of right angle lies along AB. Mark the point R such
that QR = 4.8 cm.
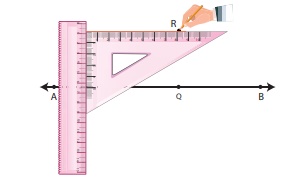
Step 3: Place the scale and the set square as shown in the figure.
Step 4: Hold the scale firmly and slide the set square along the edge of the scale
until the other edge touches the point R. Draw a line RS through R.
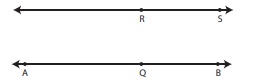
Step 5: The line RS is parallel to AB. That is, RS || AB.
Example 9:
Draw a line segment PQ = 12 cm. Mark two points M, N at a distance of 5 cm above the line segment PQ. Through M and N draw a line parallel to
PQ.
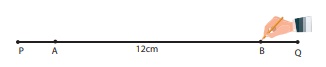
Step 1: Using a scale, draw a line segment PQ = 12
cm. Mark two points A and B on the line segment.
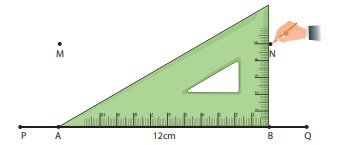
Step 2: Using the set square as shown, mark points M and N such that AM = BN = 5
cm.
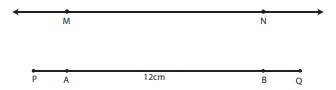
Step 3: Using the scale, join M and N. MN is parallel to PQ. That is, MN || PQ.
ICT CORNER
GEOMETRY
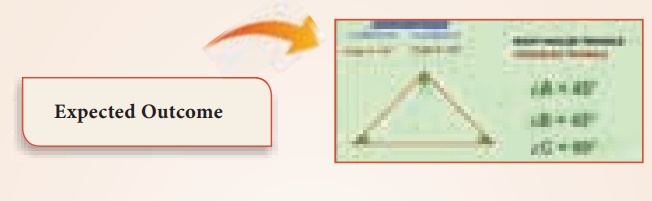
Expected Outcome
Step 1
Open the Browser and type the URL Link
given below (or) Scan the QR Code. GeoGebra work sheet named “Geometry” will open.
The work sheet contains three activities. 1. Types of triangles, 2. Perpendicular
line construction and 3. Parallel line construction.
In the first activity move the sliders
or enter the angle to change the Angles of the triangle and check what type of triangle
is it and compare with the angles.
Step 2
In the second and third activity you
can learn how to draw Perpendicular and parallel lines through a Video.
Browse in the link:
Geometry: https://ggbm.at/dPXHSSTF or Scan the QR Code.
Related Topics