Chapter: Java The Complete Reference : Introducing GUI Programming with JavaFX : Introducing JavaFX Menus
Introducing JavaFX Menus
CHAPTER 36
Introducing JavaFX Menus
Menus are an important part
of many GUIs because they give the user access to a program’s core
functionally. Furthermore, the proper implementation of an application’s menus
is a necessary part of creating a successful GUI. Because of the key role they
play in many applications, JavaFX provides extensive support for menus.
Fortunately, JavaFX’s approach to menus is both powerful and streamlined.
As you will see throughout
the course of this chapter, JavaFX menus have several parallels with Swing
menus, which were described in Chapter 33. As a result, if you already know how
to create Swing menus, learning how to create menus in JavaFX is easy. That
said, there are also several differences, so it is important not to jump to
conclusions about the JavaFX menu system.
The JavaFX menu system
supports several key elements, including
The menu bar, which is the main menu for an application.
The standard menu, which can contain either items to be selected or
other menus (submenus).
The context menu, which is often activated by right-clicking the
mouse. Context menus are also called popup menus.
JavaFX menus also support accelerator keys, which enable menu
items to be selected without having to activate the menu, and mnemonics, which allow a menu item to be
selected by the keyboard once the menu options are displayed. In addition to
“normal” menus, JavaFX also supports the toolbar,
which provides rapid access to program functionality, often paralleling menu
items.
Menu
Basics
The JavaFX menu system is
supported by a group of related classes packaged in javafx.scene.control. The ones used in this chapter are shown in
Table 36-1, and they represent the
core of the menu system. Although JavaFX allows a high degree of
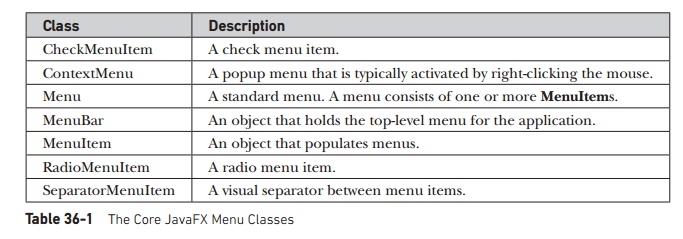
customization if desired,
normally you will simply use the menu classes as-is because their default look
and feel is generally what you will want.
Here is brief overview of how
the classes fit together. To create a main menu for an application, you first
need an instance of MenuBar. This
class is, loosely speaking, a container for menus. To the MenuBar you add instances of Menu.
Each Menu object defines a menu.
That is, each Menu object contains
one or more selectable items. The items displayed by a Menu are objects of type MenuItem.
Thus, a MenuItem defines a selection
that can be chosen by the user.
In addition to “standard”
menu items, you can also include check and radio menu items in a menu. Their
operation parallels check box and radio button controls. A check menu item is
created by CheckMenuItem. A radio
menu item is created by RadioMenuItem.
Both of these classes extend MenuItem.
SeparatorMenuItem is a convenience class that creates a separator
line in a menu. It inherits CustomMenuItem, which is a class that
facilitates embedding other types of controls in a menu item. CustomMenuItem extends MenuItem.
One key point about JavaFX
menus is that MenuItem does not inherit Node. Thus, instances of MenuItem
can only be used in a menu. They cannot be otherwise incorporated into a scene
graph. However, MenuBar does inherit
Node, which does allow the menu bar
to be added to the scene graph.
Another key point is that MenuItem is a superclass of Menu. This allows the creation of
submenus, which are, essentially, menus within menus. To create a submenu, you
first create and populate a Menu
object with MenuItems and then add
it to another Menu object. You will
see this process in action in the examples that follow.
When a menu item is selected,
an action event is generated. The text associated with the selection will be
the name of the selection. Thus, when using one action event handler to process
all menu selections, one way you can determine which item was selected is by
examining the name. Of course, you can also use separate anonymous inner
classes or lambda expressions to handle each menu item’s action events. In this
case, the menu selection is already known and there is no need to examine the
name to determine which item was selected.
As an alternative or adjunct to
menus that descend from the menu bar, you can also create stand-alone, context
menus, which pop up when activated. To create a context menu, first create an
object of type ContextMenu. Then,
add MenuItems to it. A context menu
is often activated by clicking the right mouse button when the mouse is over a
control for which a context menu has been defined. It is important to point out
that ContextMenu is not derived from
MenuItem. Rather, it inherits PopupControl.
A feature related to the menu
is the toolbar. In JavaFX, toolbars
are supported by the ToolBar class.
It creates a stand-alone component that is often used to provide fast access to functionality contained within the
menus of the application. For example, a toolbar might provide fast access to
the formatting commands supported by a word processor.
Related Topics