Chapter: Java The Complete Reference : Introducing GUI Programming with JavaFX : Introducing JavaFX Menus
Create a Context Menu - JavaFX
Create
a Context Menu
A popular alternative or
addition to the menu bar is the popup menu, which in JavaFX is referred to as a
context menu. Typically, a context
menu is activated by clicking the right mouse button when over a control. Popup
menus are supported in JavaFX by the ContextMenu
class. The direct superclass of
ContextMenu is PopupControl. An
indirect superclass of ContextMenu is javafx.stage.PopupWindow, which supplies much of its basic
functionality.
ContextMenu has two constructors. The one used in this chapter is shown here: ContextMenu(MenuItem ... menuItems)
Here, menuItems specify the menu items that will constitute the context
menu. The second ContextMenu constructor
creates an empty menu to which items must be added.
In general, context menus are
constructed like regular menus. Menu items are created and added to the menu.
Menu item selections are also handled in the same way: by handling action
events. The main difference between a context menu and a regular menu is the
activation process.
To associate a context menu
with a control is amazingly easy. Simply call setContextMenu( ) on the control, passing in a reference to the
menu that you want to pop up. When
you right-click on that control, the associated context menu will be shown. The
setContextMenu( ) method is shown
here:
final void
setContextMenu(ContextMenu menu)
In this case, menu specifies the context menu
associated with the invoking control.
To demonstrate a context
menu, we will add one to the MenuDemo
program. The context menu will present a standard “Edit” menu that includes the
Cut, Copy, and Paste entries. It will be set on a text field control. When the
mouse is right-clicked while in the text field, the context menu will pop up.
To begin, create the context menu, as shown here:
Create the context menu items MenuItem cut =
new MenuItem("Cut"); MenuItem copy = new MenuItem("Copy");
MenuItem paste = new MenuItem("Paste");
//Create a context (i.e., popup) menu that
shows edit options.
final ContextMenu editMenu = new
ContextMenu(cut, copy, paste);
This sequence begins by
constructing the MenuItems that will
form the menu. It then creates an instance of ContextMenu called editMenu
that contains the items.
Next, add the action event
handler to these menu items, as shown here:
cut.setOnAction(MEHandler);
copy.setOnAction(MEHandler);
paste.setOnAction(MEHandler);
This finishes the
construction of the context menu, but the menu has not yet been associated with
a control.
Now, add the following
sequence that creates the text field:
// Create a text field and set its column width
to 20.
TextField tf = new TextField();
tf.setPrefColumnCount(20);
Next, set the context menu on
the text field:
// Add the context menu to the textfield.
tf.setContextMenu(editMenu);
Now, when the mouse is
right-clicked over the text field, the context menu will pop up.
To add the text field to the
program, you must create a flow pane that will hold both the text field and the
response label. This pane will then be added to the center of the BorderPane. This step is necessary
because only one node can be added to any single location within a BorderPane.
First, remove this line of code:
rootNode.setCenter(response);
Replace it with the following
code:
Create a flow pane that will hold both the
response
label and the text field.
FlowPane fpRoot = new FlowPane(10, 10);
///Center the controls in the scene.
fpRoot.setAlignment(Pos.CENTER);
//Add both the label and the text field to the
flow pane.
fpRoot.getChildren().addAll(response, tf);
//Add the flow pane to the center of the border
layout.
rootNode.setCenter(fpRoot);
Of course, the menu bar is
still added to the top position of the border pane.
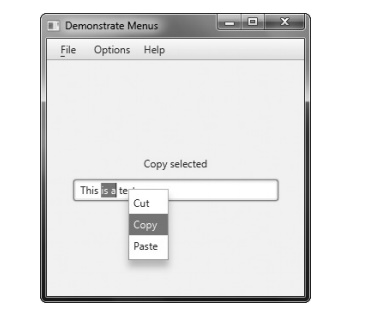
After making these changes,
when you right-click over the text field, the context menu will pop up, as
shown here:
It is also possible to
associate a context menu with a scene. One way to do this is by calling setOnContextMenuRequested( ) on the
root node of the scene. This method is defined by Node and is shown here:
final void
setOnContextMenuRequested(
EventHandler<? super
ContextMenuEvent> eventHandler)
Here, eventHandler specifies the handler that will be called when a popup
request has been received for the context menu. In this case, the handler must
call the show( ) method defined by ContextMenu to cause the context menu
to be displayed. This is the version we will use:
final void show(Node node, double upperX, double upperY)
Here, node is the element on which the context menu is linked. The values
of upperX and upperY define the X,Y location of the upper-left corner of the
menu, relative to the screen. Typically,
you will pass the screen coordinates at which the right-click occurred. To do
this, you will call the getScreenX( )
and getScreenY( ) methods defined by
ContextMenuEvent. They are shown
here:
final double getScreenX( )
final double getScreenY( )
Thus, you will typically pass
the results of these methods to the show(
) method.
The preceding theory can be
put into practice by adding the context menu to the root node of the scene
graph. After doing so, right-clicking anywhere in the scene will cause the menu
to pop up. To do this, first add the following sequence to the MenuDemo program:
// Add the context menu to the entire scene
graph.
rootNode.setOnContextMenuRequested(
new EventHandler<ContextMenuEvent>() {
public void handle(ContextMenuEvent ae) {
// Popup menu at the location of the right
click.
editMenu.show(rootNode, ae.getScreenX(),
ae.getScreenY());
}
});
Second, declare rootNode final so that it can be
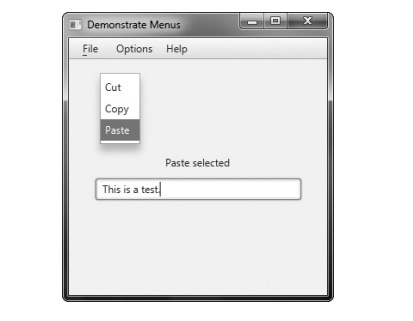
accessed within the anonymous inner class. After you have made these additions
and changes, the context menu can be activated by clicking the right mouse
button anywhere inside the application scene. For example, here is the menu
displayed after right-clicking in the upper-left portion of the window.
Related Topics