Chapter: Measurements and Instrumentation : Introduction
Static& Dynamic Performance Characteristics of an Instrument
STATIC& DYNAMIC CHARACTERISTICS
The performance characteristics of an instrument are mainly divided into two categories:
i) Static characteristics
ii) Dynamic characteristics
Static characteristics:
The set of criteria defined for the instruments, which are used to measure the quantities which are slowly varying with time or mostly constant, i.e., do not vary with time, is called ‘static characteristics’.
The various static characteristics are:
i) Accuracy
ii) Precision
iii) Sensitivity
iv) Linearity
v) Reproducibility
vi) Repeatability
vii) Resolution
viii) Threshold
ix) Drift
x) Stability
xi) Tolerance
xii) Range or span
Accuracy:
It is the degree of closeness with which the reading approaches the true value of the quantity to be measured. The accuracy can be expressed in following ways:
a) Point accuracy:
Such an accuracy is specified at only one particular point of scale. It does not give any information about the accuracy at any other point on the scale.
b) Accuracy as percentage of scale span:
When an instrument as uniform scale, its accuracy may be expressed in terms of scale range.
c) Accuracy as percentage of true value:
The best way to conceive the idea of accuracy is to specify it in terms of the true value of the quantity being measured.
Precision:
It is the measure of reproducibility i.e., given a fixed value of a quantity, precision is a measure of the degree of agreement within a group of measurements. The precision is composed of two characteristics:
a) Conformity:
Consider a resistor having true value as 2385692 , which is being measured by an ohmmeter. But the reader can read consistently, a value as 2.4 M due to the non availability of proper scale. The error created due to the limitation of the scale reading is a precision error.
b) Number of significant figures:
The precision of the measurement is obtained from the number of significant figures, in which the reading is expressed. The significant figures convey the actual information about the magnitude & the measurement precision of the quantity.
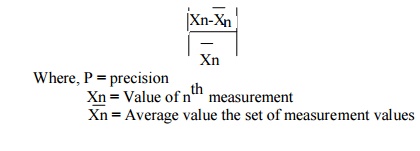
The precision can be mathematically expressed as: P=1

Sensitivity:
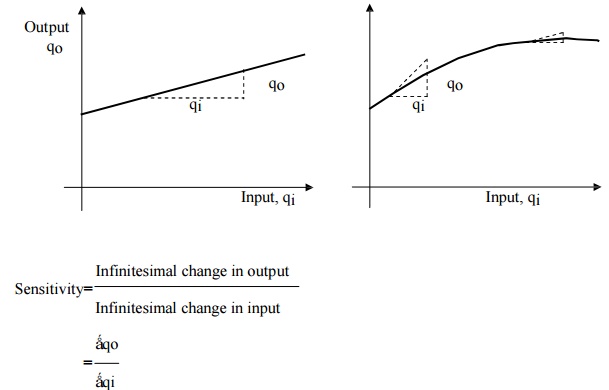
The sensitivity denotes the smallest change in the measured variable to which the instrument responds. It is defined as the ratio of the changes in the output of an instrument to a change in the value of the quantity to be measured. Mathematically it is expressed as,

Thus, if the calibration curve is liner, as shown, the sensitivity of the instrument is the slope of the calibration curve.
If the calibration curve is not linear as shown, then the sensitivity varies with the input.
Inverse sensitivity or deflection factor is defined as the reciprocal of sensitivity.
Inverse sensitivity or deflection factor = 1/ sensitivity

Linearity:
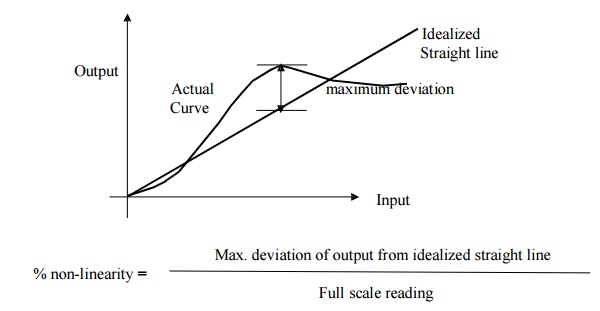
The linearity is defined as the ability to reproduce the input characteristics symmetrically & linearly.
The curve shows the actual calibration curve & idealized straight line.

Reproducibility:
It is the degree of closeness with which a given value may be repeatedly measured. It is specified in terms of scale readings over a given period of time.
Repeatability:
It is defined as the variation of scale reading & random in nature.
Drift:
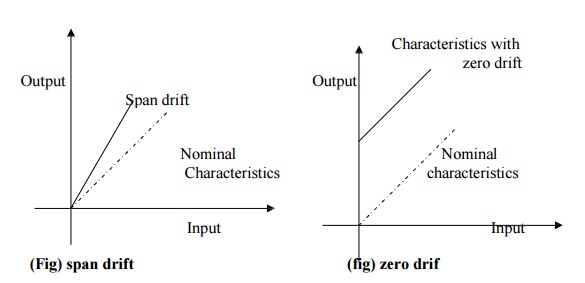
Drift may be classified into three categories:
a) zero drift:
If the whole calibration gradually shifts due to slippage, permanent set, or due to undue warming up of electronic tube circuits, zero drift sets in.

b) span drift or sensitivity drift
If there is proportional change in the indication all along the upward scale, the drifts is called span drift or sensitivity drift.
c) Zonal drift:
In case the drift occurs only a portion of span of an instrument, it is called zonal drift.
Resolution:
If the input is slowly increased from some arbitrary input value, it will again be found that output does not change at all until a certain increment is exceeded.
This increment is called resolution.
Threshold:
If the instrument input is increased very gradually from zero there will be some minimum value below which no output change can be detected. This
minimum value defines the threshold of the instrument.
Stability:
It is the ability of an instrument to retain its performance throughout is specified operating life.
Tolerance:
The maximum allowable error in the measurement is specified in terms of some value which is called tolerance.
Rangeorspan:
The minimum & maximum values of a quantity for which an instrument is designed to measure is called its range or span.
Dynamic characteristics:
The set of criteria defined for the instruments, which are changes rapidly with time, is called ‘dynamic characteristics’.
The various static characteristics are:
i) Speed of response
ii) Measuring lag
iii) Fidelity
iv) Dynamic error
Speed of response:
It is defined as the rapidity with which a measurement system responds to changes in the measured quantity.
Measuring lag:
It is the retardation or delay in the response of a measurement system to changes in the measured quantity. The measuring lags are of two types:
a) Retardation type:
In this case the response of the measurement system begins immediately after the change in measured quantity has occurred.
b) Time delay lag:
In this case the response of the measurement system begins after a dead time after the application of the input.
Fidelity:
It is defined as the degree to which a measurement system indicates changes in the measurand quantity without dynamic error.
Dynamic error:
It is the difference between the true value of the quantity changing with time & the value indicated by the measurement system if no static error is assumed. It is also called measurement error.
Related Topics