Structured Query Language(SQL) - SQL Commands and their Functions | 12th Computer Science : Chapter 12 : Database concepts and MySql : Structured Query Language(SQL)
Chapter: 12th Computer Science : Chapter 12 : Database concepts and MySql : Structured Query Language(SQL)
SQL Commands and their Functions
SQL Commands
and their Functions
Tables are the only way to store data,
therefore all the information has to be arranged in the form of tables. The SQL
provides a predetermined set of commands to work on databases.
Keywords : They have a special meaning in SQL. They are
understood as instructions.
Commands : They are instructions given by the user to the
database also known as statements.
Clauses : They begin with a keyword and consist of
keyword and argument.
DDL Commands
CREATE TABLE Command
You can create a table by using the CREATE TABLE command. When a table is
created, its columns are named, data types and sizes are to be specified. Each
table must have at least one column. The syntax of CREATE TABLE command is :
CREATE TABLE <table-name>
(<column name><data type>[<size>]
(<column name><data type>[<size>]……
);
Now let us use the above syntax to store some
information about the students of a class in a database, for this you first
need to create table. To create a student table, let us take some information
related to students like admission number which we can use it in short form as
(admno), name of student (name), gender, age etc. of the student. Let us create
a table having the field names Admno, Name, Gender, Age and Place.
The SQL command will be as
follows:
CREATE TABLE Student
(Admno integer,
Name char(20),
Gender char(1),
Age integer,
Place char(10),
);
The above one is a simple table structure
without any restrictions. You can also set constraints to limit the type of
data that can go into the fields of the table. Constraints are used to limit
the type of data that can go into a table. This ensures the accuracy and
reliability of the data in the database. Constraints could be either on a
column level or a table level.
Column constraint: Column constraint apply only to individual
column.
Table constraint : Table constraint apply to a group of one or
more columns.
The syntax for a table
created with constraint is given as below:
CREATE TABLE <table-name>
(<column name><data
type>[<size>]<column constraint>, (<column name><data
type>[<size>]<column constraint>……
<table constraint>(<column name>,[<column
name>….])…..
);
Following is an example for student table with “NOT NULL” column constraint. This
constraint enforces a field to always contain a value.
CREATE TABLE Student
(
Admno integer NOT NULL PRIMARY KEY, → Primary Key constraint
Name char(20)NOT NULL,
Gender char(1),
Age integer,
Place char(10),
);
The above command creates a table “student” in
which the field Admno of integer type is defined NOT NULL, Name of char type is
defined as NOT NULL which means these two fields must have values. The fields
Gender, Age and Place do not have any constraints.
Type of Constraints
Constraints ensure database integrity,
therefore known as database integrity constraints. The different types of
constraints are :
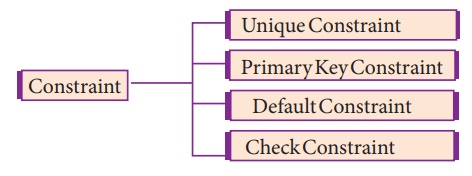
(i)Unique Constraint
This constraint ensures that no two rows have
the same value in the specified columns. For example UNIQUE constraint applied on Admno of student table ensures that no
two students have the same admission number and the constraint can be used as:
CREATE TABLE Student
(
Admno integer NOT NULL UNIQUE, → Unique constraint
Name char (20) NOT NULL,
Gender char (1),
Age integer,
Place char (10),
);
The UNIQUE
constraint can be applied only to fields that have also been declared as NOT NULL.
When two constraints are applied on a single
field, it is known as multiple constraints. In the above Multiple constraints NOT NULL and UNIQUE are applied on a single field Admno, the constraints are
separated by a space and at the end of the field definition a comma(,) is
added. By adding these two constraints the field Admno must take some value ie.
will not be NULL and should not be
duplicated.
ii) Primary Key Constraint
This constraint declares a field as a Primary
key which helps to uniquely identify a record. It is similar to unique
constraint except that only one field of a table can be set as primary key. The
primary key does not allow NULL
values and therefore a field declared as primary key must have the NOT NULL constraint.
Example showing Primary Key Constraint in the
student table:
CREATE TABLE Student
(
Admno integer NOT NULL PRIMARY KEY, → Primary Key constraint
Name char(20)NOT NULL,
Gender char(1),
Age integer,
Place char(10),
);
In the above example the Admno field has been
set as primary key and therefore will help us to uniquely identify a record, it
is also set NOT NULL, therefore this
field value cannot be empty.
(iii) DEFAULT Constraint
The DEFAULT
constraint is used to assign a default value for the field. When no value is
given for the specified field having DEFAULT
constraint, automatically the default value will be assigned to the field.
Example showing DEFAULT Constraint in the student table:
CREATE TABLE Student
(
Admno integer NOT
NULL PRIMARY KEY,
Name char(20)NOT NULL,
Gender char(1),
Age integer DEFAULT = “17”, → Default
Constraint
Place char(10),
);
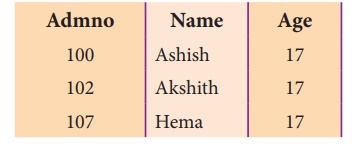
In the above example the “Age” field is
assigned a default value of 17, therefore when no value is entered in age by
the user, it automatically assigns 17 to Age.
(iv) Check Constraint
This constraint helps to set a limit value
placed for a field. When we define a check constraint on a single column, it
allows only the restricted values on that field. Example showing check
constraint in the student table:
CREATE TABLE Student
(
Admno integer NOT NULL PRIMARY KEY
Name char(20)NOT NULL,
Gender char(1),
Age integer (CHECK<=19), → Check
Constraint
Place char(10),
);
In the above example the check constraint is
set to Age field where the value of Age must be less than or equal to 19.
(v) TABLE CONSTRAINT
When the constraint is applied to a group of
fields of the table, it is known as Table constraint. The table constraint is
normally given at the end of the table definition. Let us take a new table
namely Student1 with the following fields Admno, Firstname, Lastname, Gender,
Age, Place:
CREATE TABLE Student 1
(
Admno integerNOT NULL,
Firstname char(20),
Lastname char(20),
Gender char(1),
Age integer,
Place char(10),
PRIMARY KEY (Firstname, Lastname)
→ Table constraint
);
In the above example, the two fields, Firstname
and Lastname are defined as Primary key which is a Table constraint.
DML COMMANDS
Once the schema or structure of the table is
created, values can be added to the table.
The DML commands consist of inserting, deleting
and updating rows into the table.
(i) INSERT command
The INSERT
command helps to add new data to the database or add new records to the table.
The command is used as follows:
INSERT INTO <table-name> [column-list]
VALUES (values);
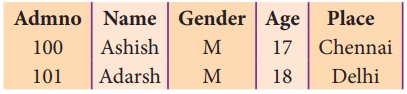
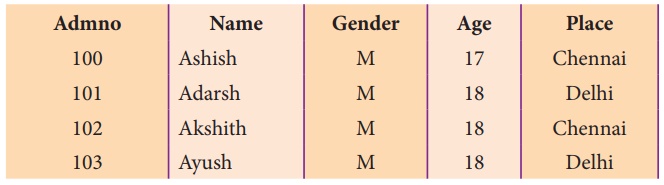
INSERT INTO Student (Admno, Name, Gender, Age, Place)
VALUES (100,’ Ashish’,’ M’, 17,’ Chennai’);
INSERT INTO Student (Admno, Name, Gender, Age, Place)
VALUES (102, ‘Adarsh’, ‘M’, 18, ‘Delhi’);
Two new records are added to the table as shown
below:
The order of values must match the order of
columns in the CREATE TABLE command.
Specifying the column names is optional if data is to be added for all columns.
The command to add values into the student table can also be used in the
following way:
INSERT INTO Student VALUES ( 102, ‘Akshith’, ‘M’, ‘17,’
‘Bangalore’);

The above command inserts the record into the
student table.
To add data to only some columns in a record by
specifying the column name and their data, it can be done by:
INSERT INTO Student(Admno, Name, Place) VALUES (103, ‘Ayush’,
‘Delhi’);

The above command adds the following record
with default values of ‘M’ for Gender and Age as 18.
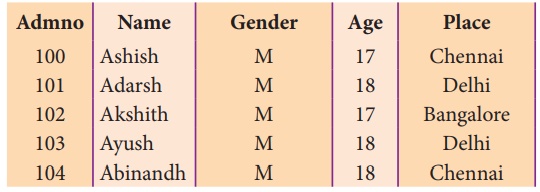
INSERT INTO Student (Admno, Name, Place) VALUES (104, ‘Abinandh’,
‘Chennai’);

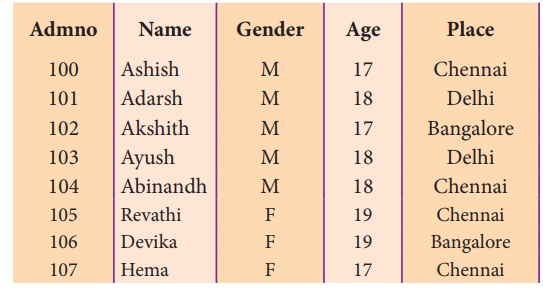
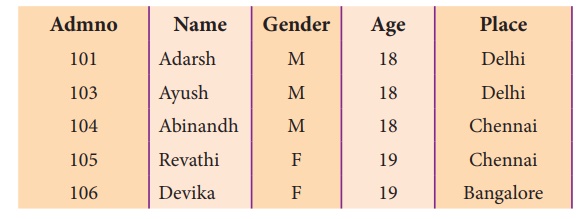
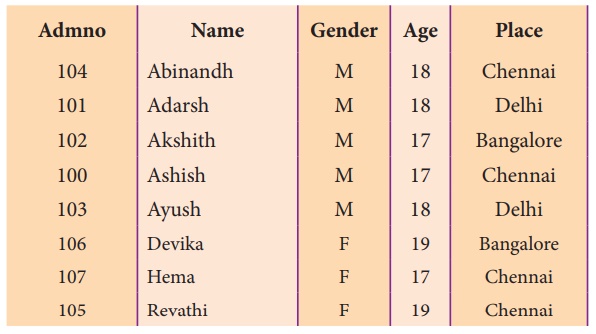
The student table will have the following data:
The fields that are not given in the INSERT
command will take default values, if it is defined for them, otherwise NULL
value will be stored.
(ii) DELETE COMMAND
The DELETE
command permanently removes one or more records from the table. It removes the
entire row, not individual fields of the row, so no field argument is needed.
The DELETE command is used as
follows :
DELETE FROM table-name WHERE
condition;
For example to delete the record whose
admission number is 104 the command is given as follows:
DELETE FROM Student WHERE Admno=104;

The following record is deleted from the
Student table.
To delete all the rows of the table, the
command is used as :
DELETE * FROM Student;
The table will be empty now and could be
destroyed using the DROP command (Discussed in section 12.7.4.3).
(iii) UPDATE COMMAND
The UPDATE
command updates some or all data values in a database. It can update one or
more records in a table. The UPDATE
command specifies the rows to be changed using the WHERE clause and the new data using the SET keyword. The command is used as follows:
UPDATE <table-name> SET
column-name = value, column-name = value,… WHERE condition;
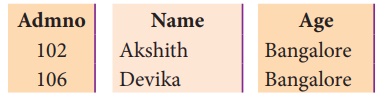
For example to update the following fields:
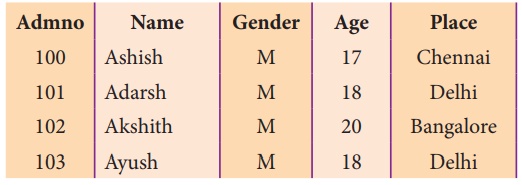
UPDATE Student SET Age = 20 WHERE Place = “Bangalore”;
The above command will change the age to 20 for
those students whose place is “Bangalore”.
The table will be as updated as below:
To update multiple fields, multiple field
assignment can be specified with the SET
clause separated by comma. For example to update multiple fields in the Student
table, the command is given as:
UPDATE Student SET Age=18, Place = ‘Chennai’ WHERE Admno = 102;

The above command modifies the record in the following way.
Some Additional DDL Commands:
(i) ALTER COMMAND
The ALTER
command is used to alter the table structure like adding a column, renaming the
existing column, change the data type of any column or size of the column or
delete the column from the table. It is used in the following way :
ALTER TABLE <table-name> ADD
<column-name><data type><size>;
To add a new column “Address” of type ‘char’ to
the Student table, the command is used as ALTER
TABLE Student ADD Address char;
To modify existing column of table, the ALTER TABLE command can be used with MODIFY clause like wise:
ALTER <table-name>
MODIFY<column-name><datatype><size>;
ALTER TABLE Student MODIFY Address char (25);
The above command will modify the address
column of the Student table to now hold 25 characters.
The ALTER
command can be used to rename an existing column in the following way :
ALTER <table-name> RENAME
old-column-name TO new-column-name;
For example to rename the column Address to
City, the command is used as :
ALTER TABLE Student RENAME Address TO City;
The ALTER
command can also be used to remove a column or all columns, for example to
remove a particular column, the DROP
COLUMN is used with the ALTER TABLE
to remove a particular field, the command can be used as:
ALTER <table-name> DROP
COLUMN <column-name>;
To remove the column City from the Student
table, the command is used as :
ALTER TABLE Student DROP COLUMN City;
(ii) TRUNCATE command
The TRUNCATE
command is used to delete all the rows from the table, the structure remains
and the space is freed from the table. The syntax for TRUNCATE command is:
TRUNCATE TABLE table-name;
For example to delete all the records of the
student table and delete the table the SQL statement is given as follows:
TRUNCATE TABLE Student;
The table Student is removed and the space is
freed.
(iii) DROP TABLE command
The DROP TABLE command is used to remove a
table from the database. If you drop
a table, all the rows in the table is deleted and the table structure is
removed from the database. Once a table is dropped we cannot get it back, so be
careful while using DROP TABLE command. But there is a condition
for dropping a table; it must be an empty table.
Remove all the rows of the table using DELETE command. The DELETE command is already explained.
To delete all rows, the command is given as :
DELETE * FROM Student;
Once all the rows are deleted, the table can be
deleted by DROP TABLE command in the
following way:
DROP TABLE table-name;
For example to delete the Student table:
DROP TABLE Student;
DELETE, TRUNCATE AND DROP statement:
DELETE : The DELETE command deletes only the rows from the table based on
the condition given in the where clause or deletes all the rows from the table
if no condition is specified. But it does not free the space containing the
table.
TRUNCATE : The TRUNCATE command is used to delete all the rows, the structure
remains in the table and free the space containing the table.
DROP : The DROP command is used to remove an object from the database. If
you drop a table, all the rows in the table is deleted and the table structure
is removed from the database. Once a table is dropped we cannot get it back.
DQL COMMAND– SELECT command
One of the most important tasks when working
with SQL is to generate Queries and retrieve data. A Query is a command given
to get a desired result from the database table. The SELECT command is used to query or retrieve data from a table in
the database. It is used to retrieve
a subset of records from one or more tables. The SELECT command can be used in various forms:
Syntax of SELECT
command :
SELECT
<column-list>FROM<table-name>;
·
Table-name is the name of the table from which the information is
retrieved.
·
Column-list includes one or more columns from which data is
retrieved.
For example to view only admission number and
name of students from the Student table the command is given as follows:\
If the Student table has the following data:
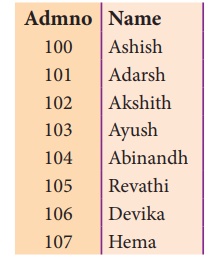
SELECT Admno, Name FROM Student;
The above SELECT
command will display the following data:
To view all the fields and rows of the table
the SELECT command can be given as SELECT * FROM STUDENT;
(i) DISTINCT Keyword
The DISTINCT
keyword is used along with the SELECT
command to eliminate duplicate rows in the table. This helps to eliminate
redundant data. For Example:
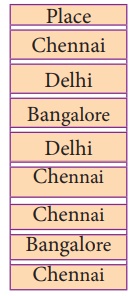
SELECT DISTINCT Place FROM Student;
Will display the following data as follows :
SELECT * FROM Student;
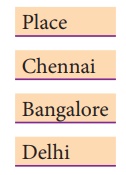
In the above output you can see, there would be
no duplicate rows in the place field. When the keyword DISTINCT is used, only one NULL
value is returned, even if more NULL
values occur.
(ii) ALL Keyword
The ALL
keyword retains duplicate rows. It will display every row of the table without
considering duplicate entries.
SELECT ALL Place FROM Student;
The above command will display all values of
place field from every row of the table without considering the duplicate
entries.
The WHERE
clause in the SELECT command
specifies the criteria for getting the desired result. The general form of SELECT command with WHERE Clause is:
SELECT <column-name>[,<column-name>,….] FROM
<table-name>WHERE condition>;
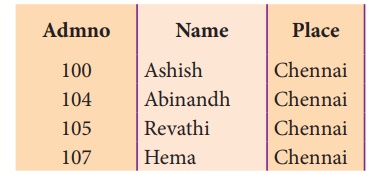
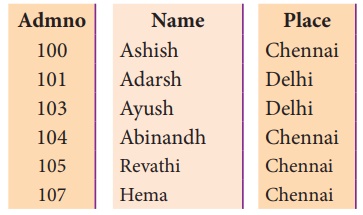
For example to display the students admission
number and name of only those students who belong to Chennai, the SELECT command is used in the following
way :
SELECT Admno, Name, Place FROM Student WHERE Place =”Chennai”;
SELECT Admno, Name, Age FROM Student WHERE Age >= 18;
The relational operators like =, <, <=,
>, >=, <> can be used to compare two values in the SELECT command used with WHERE clause. The logical operaors OR, AND and NOT can also be used to connect search conditions in the WHERE clause. For example :
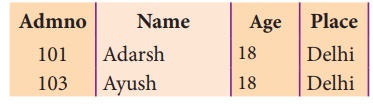
SELECT Admno, Name, Age, Place FROM Student WHERE (Age>=18 AND
Place = "Delhi");
The SELECT
command can also be used in the following ways:
SELECT Admno, Name, Age, Place FROM Student WHERE (Age>=18 OR
Place ="Delhi"); SELECT Admno, Name, Place FROM Student WHERE (NOT
Place ="Delhi");
(iii) BETWEEN
and NOT BETWEEN Keywords
The BETWEEN
keyword defines a range of values the record must fall into to make the
condition true. The range may include an upper value and a lower value between
which the criteria must fall into.
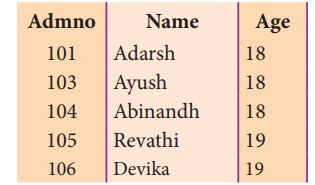
SELECT Admno, Name, Age, Gender FROM Student WHERE Age BETWEEN 18
AND 19;
The NOT
BETWEEN is reverse of the BETWEEN
operator where the records not satisfying the condition are displayed.
SELECT Admno, Name, Age FROM Student WHERE Age NOT BETWEEN 18 AND
19;
(iv) IN Keyword
The IN
keyword is used to specify a list of values which must be matched with the
record values. In other words it is used to compare a column with more than one
value. It is similar to an OR
condition.
For example :
SELECT Admno, Name, Place FROM Student WHERE Place IN (“Chennai”,
“Delhi”);
The NOT
IN keyword displays only those records that do not match in the list.
For example:
SELECT Admno, Name, Place FROM Student WHERE Place NOT IN
(“Chennai”, “Delhi”);
will display students only from places other
than “Chennai” and “Delhi”.
NULL Value :
The NULL value in a field can be searched in a table using the IS NULL in the WHERE clause. For example to list all the students whose Age contains no value, the command is used as:
SELECT * FROM Student WHERE Age IS NULL;
(v) ORDER BY clause
The ORDER
BY clause in SQL is used to sort the data in either ascending or descending
based on one or more columns.
1. By default ORDER BY sorts the data in ascending order.
2. We can use the keyword DESC to sort the data in descending order and the keyword ASC to sort in ascending order.
The ORDER BY clause is used as :
SELECT
<column-name>[,<column-name>,….] FROM <table-name>ORDER
BY
<column1>,<column2>,…ASC| DESC ;
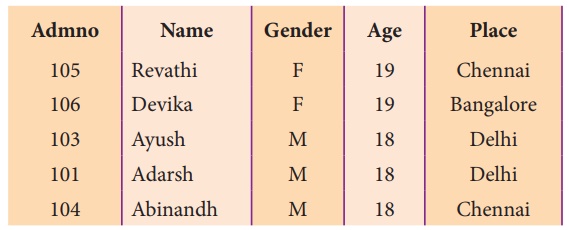
For example :
To display the students in alphabetical order
of their names, the command is used as
SELECT * FROM Student ORDER BY Name;
The above student table is arranged as follows
:
(vi) WHERE clause
The WHERE
clause is used to filter the records. It helps to extract only those records
which satisfy a given condition. For example in the student table, to display
the list of students of age18 and above in alphabetical order of their names,
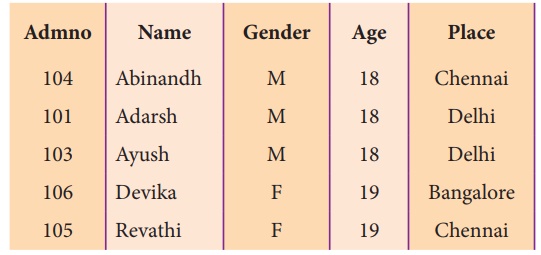
the command is given as below:
SELECT * FROM Student WHERE Age>=18 ORDER BY Name;
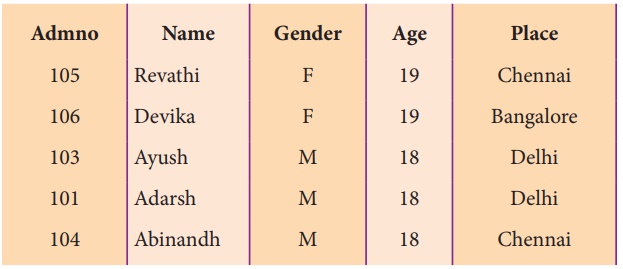
To display the list of students in the
descending order of names of those students of age 18 and above the command is
given as :
SELECT * FROM Student WHERE Age>=18 ORDER BY Name DESC;
(vii) GROUP BY clause
The GROUP
BY clause is used with the SELECT
statement to group the students on rows or columns having identical values or
divide the table in to groups. For example to know the number of male students
or female students of a class, the GROUP
BY clause may be used. It is mostly used in conjunction with aggregate
functions to produce summary reports from the database.
The syntax for the GROUP BY clause is
SELECT <column-names> FROM
<table-name> GROUP BY <column-name>HAVING condition];
To apply the above command on the student table
:
SELECT Gender FROM Student GROUP BY Gender;
The following command will give the below given
result:
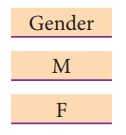
The point to be noted is that only two results
have been returned. This is because we only have two gender types ‘Male’ and
‘Female’. The GROUP BY clause grouped all the ‘M’ students together and
returned only a single row for it. It did the same with the ‘F’ students.
For example to count the number of male and
female students in the student table, the following command is given :
SELECT Gender, count(*) FROM Student GROUP BY Gender;
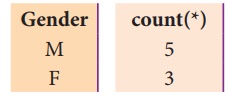
The GROUP BY applies the aggregate functions
independently to a series of groups that are defined by having a field value in
common. The output of the above SELECT statement gives a count of the number of
Male and Female students.
(viii) HAVING clause
The HAVING
clause can be used along with GROUP BY clause in the SELECT statement to place
condition on groups and can include aggregate functions on them. For example to
count the number of Male and Female students belonging to Chennai .
SELECT Gender , count(*) FROM Student GROUP BY Gender HAVING Place
= ‘Chennai’;
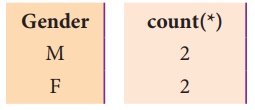
The above output shows the number of Male and
Female students in Chennai from the table student.
TCL commands
(i) COMMIT command
The COMMIT
command is used to permanently save any transaction to the database. When any
DML commands like INSERT, UPDATE, DELETE
commands are used, the changes made by these commands are not permanent. It is
marked permanent only after the COMMIT command
is given from the SQL prompt. Once the
COMMIT command is given, the
changes made cannot be rolled back. The COMMIT
command is used as
COMMIT;
(ii) ROLLBACK command
The ROLLBACK
command restores the database to the last commited state. It is used with SAVEPOINT command to jump to a
particular savepoint location. The syntax for the ROLLBACK command is :
ROLL BACK TO save point name;
(iii) SAVEPOINT command
The SAVEPOINT
command is used to temporarily save a transaction so that you can rollback to
the point whenever required. The different states of our table can be saved at
anytime using different names and the rollback to that state can be done using
the ROLLBACK command.
SAVEPOINT savepoint_name;
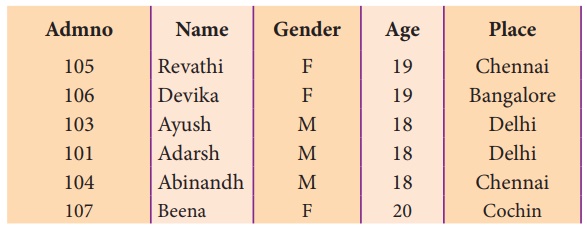
Example showing COMMIT, SAVEPOINT and ROLLBACK
in the student table having the following data:
INSERT INTO Student VALUES (107,
'Beena', 'F', 20 , 'Cochin'); COMMIT;
UPDATE Student SET Name = ‘Mini’
WHERE Admno=105; SAVEPOINT A;
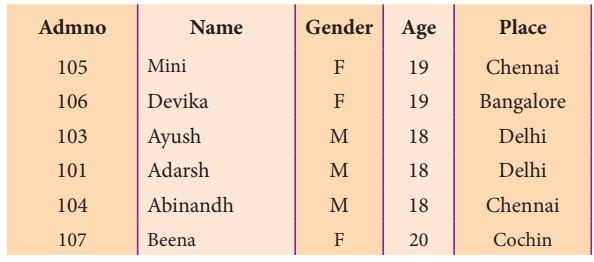
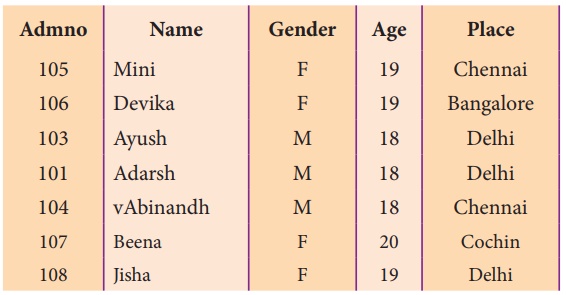
INSERT INTO Student VALUES(106,
'Jisha', 'F', 19, 'Delhi'); SAVEPOINT B;
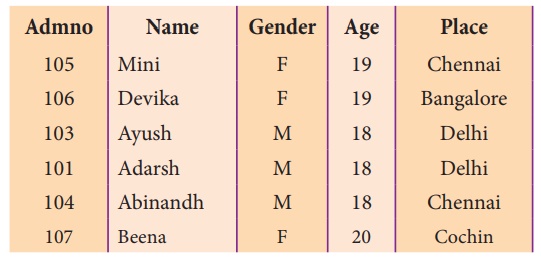
ROLLBACK TO A;
Related Topics