Chapter: SCIENCE EXPERIMENTS & AMUSEMENTS FOR CHILDREN BY CHARLES VIVIAN. Simple Technical Steped Practical Projects for school and college students.
Make a Simple Electric Motor
Make a Simple Electric Motor
You will
need: A large cork, plastic knitting needle, covered wire, 6-volt
battery with lead-in wires, plywood, tin can, adhesive tape, magnet,
tin-snips, pliers, hammer, U-shaped brads, nails, screws.

Michael Faraday was the first man who succeeded in driving a machine by electricity. This was in 1821. His experiments paved the way for the enormous use of electric power in domestic and industrial work today.
With quite simple materials we can make a small electric motor which can safely be driven by a 6-volt battery.
First, cut two strips of metal from an empty tin can with the snips- taking care not to cut yourself. The strips should be about 5 inches long by 5| inches wide. Bend the ends of these strips over with the pliers at about one inch from the end.
Use a hammer and a sharp nail to make a hole in each end of each metal strip, as shown in Fig. 3, and screw them to a small plywood baseboard. Adjust the distance between the strips so that a plastic knitting needle can be housed in the holes at the top (see Fig. 4).


Make sure that the knitting needle revolves quite freely in its metal housing. Select a large cork that will fit easily between the ends of the magnet, and then skewer the cork on the knitting needle (Fig. 6). Nail 2 U-shaped brads into the base.
Take 40 or 50 turns of covered wire around the cork to form a coil, as shown in Fig. 7.
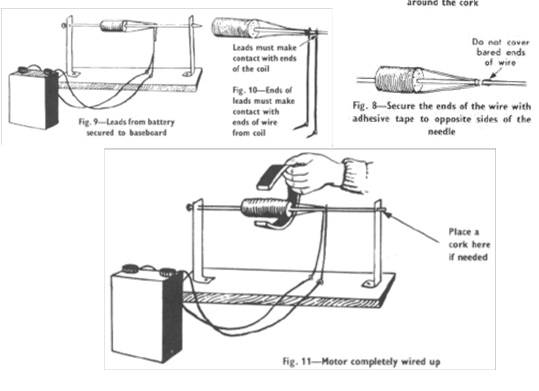
Now remove the insulation from the two free ends of the wire leading from the coil. Use adhesive tape to secure the ends of the wire to opposite sides of the knitting needle, but be sure that the bared ends of the wire are not covered by the tape or touching each other.

Note the set-up in Fig. 9, and start by attaching the lead-in wires to the bared ends of the wired coil before attaching them to the battery posts. In fact, put them through the brads first also, so that they will not get tangled. The ends of the lead-in wires must be bared to make contact. Now hold the magnet in position so that the coil can revolve freely between the ends of the magnet legs without actually touching them. Give the cork a spin with your finger and the motor will start up and spin by itself while you hold the magnet there.
Should the knitting needle spindle have a tendency to work free from the metal housing, impale a small cork on the pointed end of the needle to retain it in position (see Fig. 11).

Related Topics