Chapter: Essential Microbiology: Microbiology: What, Why and How?
Light microscopy

Light
microscopy
Try this simple experiment. Fill a glass with water,
then partly immerse a pencil and observe from one side; what do you see? The
apparent ãbendingã of the pencil is due to rays of light being slowed down as
they enter the water, because air and water have different refractive indices. Light rays are similarly retarded as they enter
glass and all optical instruments are based on this phenomenon. The compound
light microscope consists of three sets of lenses (Figure 1.3):
ôñ
the condenser
focuses light onto the specimen to give optimum illumination
ôñ
the objective
provides a magnified and inverted image of the specimen
ôñ
the eyepiece
adds further magnification
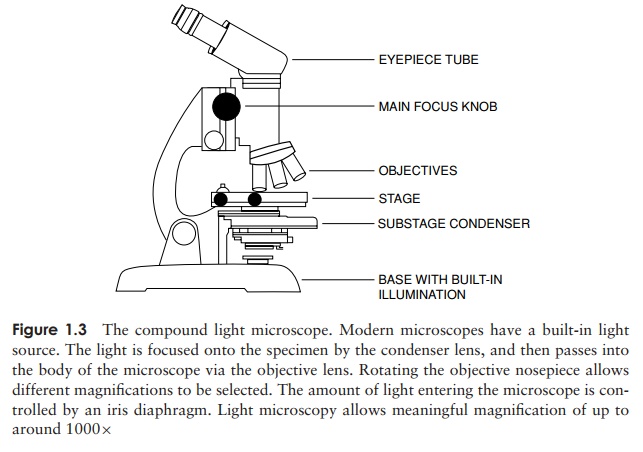
Most microscopes have three or four different
objectives, giving a range of magnifica-tions, typically from 10û to 100û. The total
magnification is obtained by multiply-ing this by the eyepiece value (usually
10û), thus giving
a maximum magnification of 1000û.
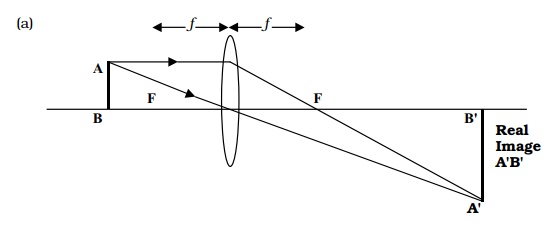
In order to appreciate how this magnification is
achieved, we need to understand the behaviour of light passing through a convex
lens:
ôñ
rays parallel to the axis of the lens are brought to
a focus at the focal point of the
lens (Figure 1.4)
ôñ
similarly, rays entering the lens from the focal
point emerge parallel to the axis
ôñ
rays passing through the centre of the lens from any
angle are undeviated.

Because the condenser is not involved in
magnification, it need not concern us here. Consider now what happens when
light passes through an objective lens from an object AB situated slightly
beyond its focal point (Figure 1.5a). Starting at the tip of the object, a ray
parallel to the axis will leave the lens and pass through the focal point; a
ray leaving the same point and passing through the centre of the lens will be
undeviated. The point at which the two rays converge is an image of the
original point formed by the lens. The same thing happens at an infinite number
of points along the objectãs length, resulting in a primary image of the
specimen, A B . What can we say about this image, compared to the original
specimen AB? It is magnified and it is inverted (i.e. it appears upside down).
The primary image now serves as an object for a
sec-ond lens, the eyepiece, and is magnified further (Fig-ure 1.5b); this time
the object is situated within the focal length. Using the same principles as
before, we can con-struct a ray diagram, but this time we find that the two
lines drawn from a point do not converge on the other side of the lens, but
actually get further apart. The point at which the lines do eventually converge
is actually ãfur-ther backã than the original object! What does this mean? The
secondary image only appears to be
coming from A B , and isnãt actually there. An image such as this is
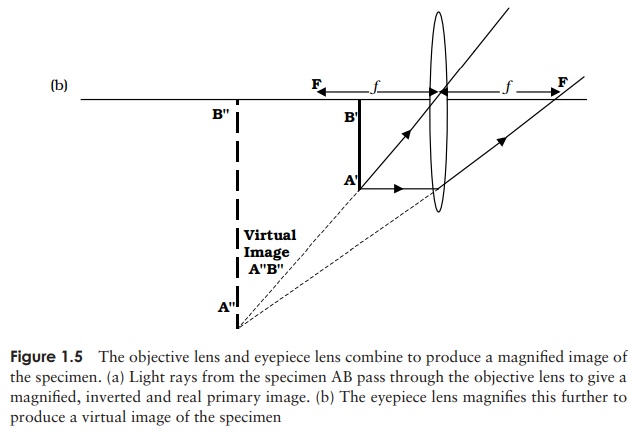
called a virtual
image. Todayãs reader, familiar with the concept of virtual reality, will
probably find it easier to come to terms with this than have students of
earlier genera-tions! The primary image A B , on the other hand, is a real image; if a screen was placed at
that position, the image would be projected onto it. If we compare A B with A B
, we can see that it has been further magnified, but not further inverted, so
it is still upside down compared with the original. One of the most difficult
things to get used to when you first use a microscope is that everything
appears ãwrong way aroundã. The rays of light emerging from the eyepiece lens
are focussed by the lens of the observerãs eye to form a real image on the
retina of the viewerãs eye.
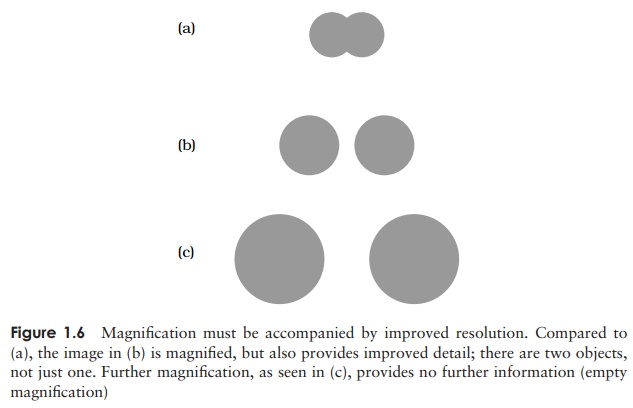
So, a combination of two lens systems allows us to
see a considerably magnified image of our specimen. To continue magnifying an
image beyond a certain point, however, serves little purpose, if it is not
accompanied by an increase in detail (Figure 1.6). This is termed emptymagnification. The resolution (resolving power, d) of
amicroscope is its capacity for discerning detail. More specifically, it is the
ability to distinguish between two points a short distance apart, and is
determined by the equation:
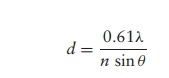
where ö£ is the
wavelength of the light source, n is
the refractive index of the air or liquid between the objec-tive lens and the
specimen and ö¡ is the
aperture angle (a measure of the light-gathering ability of the lens).
The expression n
sinö¡ is called the numerical aperture and for high quality
lenses has a value of around 1.4. The lowest wavelength of light visible to the
human eye is approximately 400 nm, so the maximum resolving power for a light
microscope is approximately
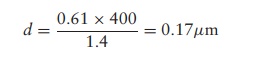
that is, it cannot distinguish between two points
closer together than about 0.2 ôçm. For
comparison, the naked eye is unable to resolve two points more than about 0.2
mm apart.
For us to be able to discern detail in a specimen, it
must have contrast; most biological specimens, however, are more or less
colourless, so unless a structure is ap-preciably denser than its surroundings,
it will not stand out. This is why preparations are commonly subjected to
staining procedures prior to viewing. The introduc-tion of coloured dyes, which
bind to certain structures, enables the viewer to discern more detail.
Since staining procedures involve the addition and
washing off of liquid stains, the sample must clearly be immobilised or fixed
to the slide if it is not to end up down the sink. The commonest way of doing
this is to make a heat-fixed smear; this kills and attaches the cells to the
glass microscope slide. A thin aqueous suspension of the cells is spread across
the slide, allowed to dry, then passed (sample side up!) through a flame a few
times. Excessive heating must be avoided, as it would distort the natural
structure of the cells.
Using simple stains, such as methylene blue, we can
see the size and shape of bacterial cells, for example, and their arrangement,
while the binding properties of differential stains react with specific
structures, helping us to differentiate between bacterial types. Probably the
most widely used bacterial stain is the Gram stain , which for more than 100
years has been an invaluable first step in the identification of unknown
bacteria.
The Gram stain is a differential stain, which only
takes a few minutes to carry out, and which enables us to place a bacterial
specimen into one of two groups, Gram-positive or Gram-negative. The reason for
this differen-tial reaction to the stain was not understood for many years, but
is now seen to be a reflection of differences in cell wall structure.
Specialised forms of microscopy have been developed to allow the viewer to discern detail in living, unstained specimens; these include phase contrast and dark-field microscopy. We can also gain an estimate of the number of microorganisms in a sample by directly counting them under the microscope.
Related Topics