Chapter: XML and Web Services : Building XML-Based Applications : Transforming XML with XSL
XSLT for Document Publishing
XSLT for Document Publishing
XSL technology has an important role in the field of document
publishing. Imagine, for example, that we have an XML document for a list of
books. We would like to publish this document in various formats. Using XSL, we
can convert the book list to an HTML file, PDF document, or other format. The
key to this example is the XML document, which serves as a single data source.
By applying an XSL style sheet, we render a new view of the data. The
development of multiple style sheets allows us to have multiple views of the
same data. This approach provides a clean separation of the data (the XML
document) and the view (the XSL style sheet). We’ll implement the book list
example in this chapter.
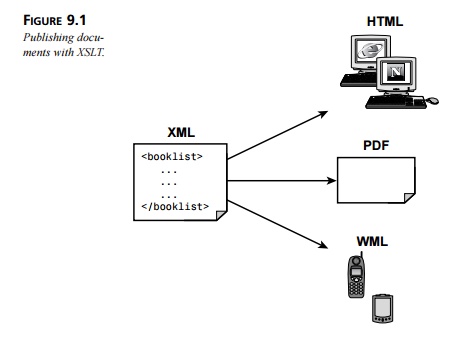
We can also extend this example to support wireless Internet clients. A
growing number of mobile phones and PDAs support the Wireless Application
Protocol (WAP). These WAP-enabled devices contain a minibrowser for rendering
Wireless Markup Language (WML) documents. To support the wireless Internet
clients, all we have to do is design an appro-priate XSL style sheet to convert
the XML document to WML. No modifications are required to the original XML
document. This process is illustrated in Figure 9.1.
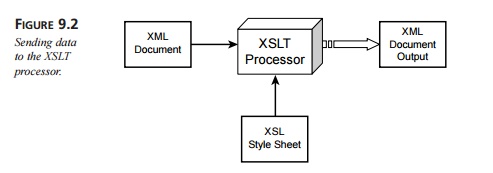
XSLT provides the mechanism for converting an XML document to another
format. This is accomplished by applying an XSLT style sheet to the XML
document. The style sheet contains conversion rules for accessing and
transforming the input XML document to a different output format. An XSLT
processor is responsible for applying the rules defined in the style sheet to
the input XML document. The process is illustrated in Figure 9.2.
Later in the chapter, implementation details are provided on how to
construct the XSL style sheet and apply the conversion rules with an XSLT
processor.
Getting Started with XSLT
In the next example we’ll convert an XML document to an HTML document.
The XML document contains a list of books, as shown is Listing 9.1.
LISTING 9.1 <install_dir>\ch9_xsl\browser_demo\book.xml
<?xml version=”1.0”?>
<?xml-stylesheet
type=”text/xsl”
href=”book_view.xsl”?>
<book>
<author>Michael Daconta et al</author>
<title>XML Development with Java 2</title>
<category>Java</category>
<price currency=”USD”>44.99</price>
<summary>
XML Development with Java 2 provides the information and techniques a
Java developer will need to integrate XML into Java-based applications.
</summary>
</book>
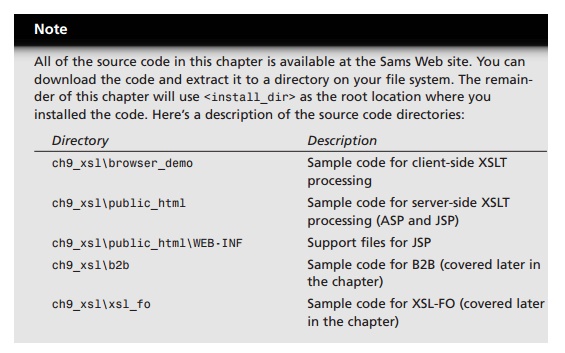
The desired output of the HTML table is shown in Figure 9.3.
Creating the XML Document
The XML document, book.xml, contains elements for the author, title, price, summary, and category.
Listing 9.2 has the complete code for book.xml.
LISTING 9.2 <install_dir>\ch9_xsl\browser_demo\book.xml
<?xml version=”1.0”?>
<book>
<author>Michael Daconta et al</author> <title>XML
Development with Java 2</title>
<category>Java</category>
<price currency=”USD”>44.99</price>
<summary>
XML Development with Java 2 provides the information and techniques a
Java developer will need to integrate XML into Java-based applications.
</summary>
</book>
In this example, we will apply the style sheet in a client-side Web
browser. The XML document makes a reference to a style sheet using the
following code:
<?xml-stylesheet
type=”text/xsl”
href=”book_view.xsl”?>
Creating the XSL Style Sheet
The next step is to create the XSL style sheet. XSL style sheets are XML
documents; as a result, they must be well formed. An XSL style sheet has the
following general struc-ture:
<?xml version=”1.0”?>
<xsl:stylesheet xmlns:xsl=”URI” version=”1.0”>
<!--XSL-T CONVERSION
RULES-->
</xsl:stylesheet>
The <xsl:stylesheet> element defines how the XSLT processor should process the cur-rent XSL
document. The xmlns attribute is the namespace definition. The XSL Transformation engine
reads the xmlns attribute and determines whether it supports the given namespace. The xmlns attribute specifies the XSL
prefix. All XSL elements and types in the document use the prefix.
The xmlns attribute value contains a Uniform Resource Identifier (URI), which
serves as a generic method for identifying entities on the World Wide Web. It
is important to note that the XSLT processor will not connect to the URI; it
simply compares the URI against a collection of URIs that it supports.
The XSLT 1.0 specification defines the following URI for the XSL
namespace:
http://www.w3.org/1999/XSL/Transform
The “1999” in the URI indicates the year the URI was allocated by the
World Wide Web Consortium (W3C). It does not relate to the version of XSLT that
is being used. The XSLT version reference is specified using the version attribute of the <xsl:stylesheet> element. The version attribute is required.
The XSL style sheet contains HTML text and XSL elements. The HTML text
forms the basis of the desired output page. The XSL elements are template rules
for the XSLT processor. A template is associated with a given element in the
XML document. In our example, a template is defined to match on the <book> element using the following
code:
<xsl:template
match=”/book”>
<!--static
text and xsl rules -->
</xsl:template>
XSLT defines the <xsl:value-of> element for retrieving data from a XML document. The <xsl:value-of> element contains a select attribute. This attribute value
is the name of the actual XML element you want to retrieve. For example, the
following code will retrieve the title of the book:
<xsl:value-of
select=”title” />
Now let’s create the file book_view.xsl. This style sheet will create an HTML page that contains information
about the book, which is stored in the file book.xml. The style sheet contains the basic format of an HTML page and uses XSL
elements to retrieve the data.
Currently, the XSL elements are merely placeholders in the document.
Once an XSL processor accesses the XSL style sheet, the processor executes the
XSL elements and replaces them with the appropriate data from the XML document.
Listing 9.3 contains the complete code for book_view.xsl.
LISTING 9.3 <install_dir>\ch9_xsl\browser_demo\book_view.xsl
<?xml version=”1.0”?>
<xsl:stylesheet
xmlns:xsl=”http://www.w3.org/1999/XSL/Transform” version=”1.0”>
<xsl:template
match=”/book”> <html><body>
<b>Title: </b> <xsl:value-of select=”title”
/> <p/>
<b>By: </b> <xsl:value-of
select=”author” /> <p/>
<b>Cost: </b> <xsl:value-of
select=”price” /> <p/>
<b>Category: </b> <xsl:value-of
select=”category” /> <p/>
<b>Description</b>
<p/>
<i><xsl:value-of
select=”summary” /></i>
</body></html>
</xsl:template>
</xsl:stylesheet>
The Missing Piece: The XSLT Processor
So far, we’ve developed the XML document and the XSL style sheet. Now we
need an XSLT processor to generate the output document, as shown in Figure 9.2.
XSLT processors are widely available.
When you select an XSLT processor, you must ensure that it is fully compliant
with the XSLT 1.0 specification.
Table 9.1 contains a list of the most popular XSLT 1.0–compliant processors.
TABLE 9.1 XSLT 1.0 Processors
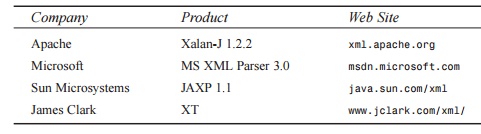
Many other XSLT processors are available at www.xslt.com. The main difference between the
various processors is the programming language supported. For example, the
parsers from Apache, Sun Microsystems, and James Clark provide a Java API. The Microsoft
parser provides an API for Visual Basic and Visual C++. The Apache parser also
provides a C++ API; however, development on the C++ version of Xalan has been
suspended.
Two techniques are available for performing the XSLT processing:
client-side processing and server-side processing.
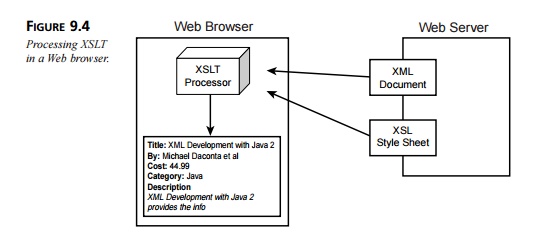
Client-side XSLT processing commonly occurs in a Web browser. The Web browser includes an XSLT
processor and retrieves the XML document and XSL style sheet, as shown in
Figure 9.4.
The client-side technique offloads the XSLT processing to the client
machine. This mini-mizes the workload
on the Web server. However, the
disadvantage is that the Web browser must provide XSLT support. At the time of this writing, Netscape
Communi-cator 6 and Microsoft Internet Explorer 6 support the XSLT 1.0
specification.
Microsoft Internet Explorer 5.x
has very limited support for XSLT 1.0.
The previous ver-sion of the Netscape browser, 4.x, provides no support for XSLT.
The client-side technique is applicable when you’re deploying an
application in a con-trolled environment.
For example, in a corporate environment, the system administrators can install
the latest version of the Web browser that conforms to the XSLT 1.0
specifica-tion. Implementation
details for client-side XSLT processing are provided later in this chapter.
If you are deploying the application on an extranet or the Internet, you
will probably have little control over the type/version of browser installed on
the client machines. If this is the
case, you should implement the server-side technique.
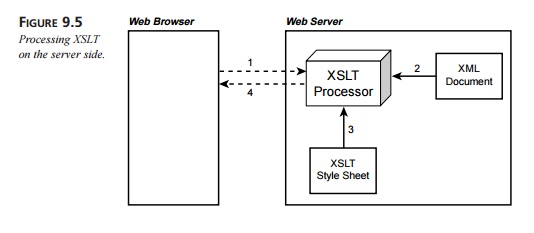
Server-side XSLT processing occurs on the Web server or application
server. A server-side process such as
an Active Server Page (ASP), JavaServer Page (JSP), or Java servlet will
retrieve the XML document and XSL style sheet and pass them to an XSLT
proces-sor. The output of the XSLT
processor is sent to the client Web browser for presentation. The output is generally a markup
language, such as HTML, that is understood by the client browser. The
application interaction is illustrated in Figure 9.5.
An advantage of the server-side technique is browser independence. As shown in the pre-ceding figure, the
output document is simply an HTML file.
This technique supports the older browser versions and makes the application
more robust and versatile.
Implementation details are provided later in this chapter.
Also, by utilizing the server-side technique, the application can
support a diverse collec-tion of clients. The application can detect the user-agent,
such as a WAP-enabled mobile phone, and send back a document containing a
Wireless Markup Language (WML) tag. The WAP-enabled phone can render the
content using the built-in WML mini-browser.
Implementing Client-Side XSLT Processing
In this section, we’ll implement client-side XSLT processing. As mentioned before, you will need a
browser that supports XSLT 1.0, such as Netscape Communicator 6 or Microsoft
Internet Explorer 6.
For client-side processing, the XML document requires a special processing
instruction to reference the XSL style sheet.
The processing instruction is <?xml-stylesheet>, and it has two attributes: type and href. The type attribute specifies the content
type of the document to be retrieved (in this case, text/xsl). The href attribute is a URL reference to the style sheet. The href attribute supports absolute and relative URL references.
The following code example uses a relative URL reference for the style
sheet book_view.xsl:
<?xml-stylesheet
type=”text/xsl” href=”book_view.xsl”?>
Listing 9.4 shows the updated version of the book.xml document. This version contains the special processing instruction to
reference an XSL style sheet.
LISTING 9.4 <install_dir>\ch9_xsl\browser_demo\book.xml
<?xml version=”1.0”?>
<?xml-stylesheet
type=”text/xsl” href=”book_view.xsl”?>
<book>
<author>Michael Daconta et al</author>
<title>XML Development with Java 2</title>
<category>Java</category>
<price currency=”USD”>44.99</price>
<summary>
XML Development with Java 2 provides the information and techniques a
Java developer will need to integrate XML into Java-based applications.
</summary>
</book>
No changes are required to the XSL style sheet. You only have to make sure the XSL style sheet is accessible by
the reference in the XML document. In
this example, the style sheet is located in the same directory as the XML
document. Listing 9.5 contains the
style sheet.
LISTING 9.5 <install_dir>\ch9_xsl\browser_demo\book_view.xsl
<?xml version=”1.0”?>
<xsl:stylesheet xmlns:xsl=”http://www.w3.org/1999/XSL/Transform” version=”1.0”>
<xsl:template
match=”/book”> <html><body>
<b>Title: </b> <xsl:value-of
select=”title” /> <p/>
<b>By: </b> <xsl:value-of
select=”author” /> <p/>
<b>Cost: </b> <xsl:value-of
select=”price” /> <p/>
<b>Category: </b> <xsl:value-of
select=”category” /> <p/>
<b>Description</b>
<p/>
<i><xsl:value-of select=”summary” /></i>
</body></html>
</xsl:template>
</xsl:stylesheet>
This example requires a browser that supports XSLT 1.0, such as Netscape
Communicator 6 or Microsoft Internet Explorer 6.
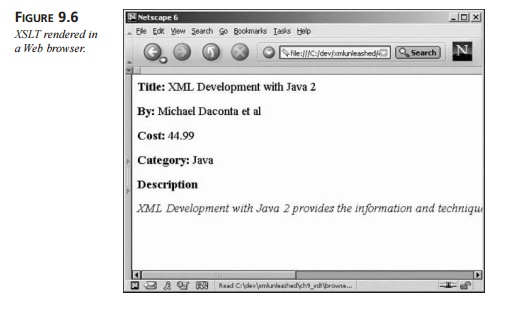
Start the Web browser and open the file <install_dir>\ch9_xsl\browser_demo\ book.xml. The XML document, book.xml, references the style sheet,
book_view.xsl. When the book.xml file is loaded in the browser, the style sheet is applied and the
output is rendered in the browser, as shown in Figure 9.6.
Implementing Server-Side XSLT Processing
In this section, we’ll implement the server-side processing technique. A number of server-side technologies
are available, including Common Gateway Interface (CGI), ColdFusion, Hypertext
Processor (PHP), and so on. This
chapter focuses on server-side processing with Microsoft’s Active Server Pages
(ASP) and Sun Microsystems’ JavaServer Pages (JSP).
ASP: Server-Side XSLT Processing
In order to develop using ASP, you will need the IIS Web server and the
latest version of the Microsoft XML parser. The required components are listed
below.:
Microsoft IIS Web Server 5.0. This
version of IIS is included with Microsoft
Windows 2000 Professional. You can also use IIS 4.0 or Personal Web Server
(PWS); however, you will have to install the Windows NT Option Pack 4. Refer to
Microsoft’s Web site for details on adding ASP support to IIS 4.0 and PWS.
Microsoft XML Parser 3.0. If you
have IE 6 installed on your server machine, then MS XML Parser 3.0 is included.
The MS XML Parser 3.0 is also available as a separate download from http://msdn.microsoft.com.
The setup instructions at the beginning of the chapter showed you how to
download and extract the source code.
You have two options for publishing the source code on the IIS server:
Copy the files in <install_dir>\ch9_xsl\public_html to c:\Inetpub\wwwroot.
Set up a virtual directory that
points to <install_dir>\ch9_xsl\public_html
An ASP file accesses the Microsoft XML parser as a server object. The following ASP code creates an
input source for the XML document and XSL style sheet. Once the docu-ments are loaded, the XML document is transformed
based on the rules in the style sheet.
The output of the document is returned to the Web browser using the Response server object. Listing 9.6 contains the file book_test.asp.
LISTING 9.6 <install_dir>\ch9_xsl\public_html\book_test.asp
<%@ Language=VBScript %> <%
set xml = Server.CreateObject(“Microsoft.XMLDOM”)
xml.load(Server.MapPath(“book.xml”))
set xsl = Server.CreateObject(“Microsoft.XMLDOM”)
xsl.load(Server.MapPath(“book_view.xsl”))
Response.Write(xml.transformNode(xsl))
%>
You can test this example by starting the IIS server and then accessing
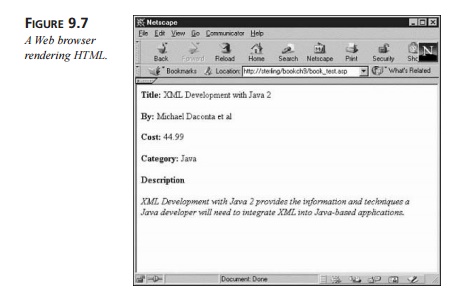
the file book_test.asp in a Web browser. For this example you can use any
Web browser. Remember that server-side
processing is browser independent, so there is no requirement for XSL in the
browser. Figure 9.7 illustrates this
concept by accessing the ASP file using an older version of the Netscape
Communicator browser, version 4.7.
JSP: Server-Side XSLT Processing
Sun Microsystems provides a server-side technology that is very similar
to ASP. Of course, the server-side scripting is accomplished in Java. In order
to perform the server-side processing with JSP, you will need to install the
Java Software Development Kit (SDK) along with a compliant JSP server
container. Here’s a list of required components:
Sun Microsystems’ Software
Development Kit (SDK) 1.3 (or higher). The SDK is available at Sun’s Web site, http://java.sun.com/j2se. Follow the installation
instructions provided with the SDK.
Apache Tomcat Server 4. Apache
Tomcat 4 is the official reference implementation for JSP 1.2 and Java Servlets 2.3. If your application server already supports JSP 1.1 or higher,
there is no requirement to install Tomcat. Apache Tomcat 4 is avail-able from
the Apache Web site, http://jakarta.apache.org/tomcat. Follow the installation instructions provided with the Tomcat server.
Once Tomcat 4 is installed, you need to add a new Web application that
points to the source code directory.
This is accomplished by editing the file <tomcat_install_dir>\ conf\server.xml. Move to the section where the
<Context> elements are listed and then add the following entry:
<Context path=”/bookch9” docBase=”<install_dir>/ch9_xsl/public_html”
debug=”0” reloadable=”true” />
Be sure to update <install_dir> with the installation directory for the book’s source code. This configuration allows you to
access the Web application named bookch9. This Web application’s document base is located at <install_dir>\ch9_xsl\public_html.
Restart the Tomcat server to pick up the new configuration. By default, the Tomcat server is
listening on port 8080. You can
access files for the bookch9 Web application using the URL http://localhost:8080/bookch9/book_test.jsp.
This example makes use of a JSP custom tag for the XSLT processing. A JSP
custom tag is a special tag that is created by a developer. When the JSP server
encounters the custom tag, it executes the handler code associated with the
tag. JSP custom tags are conceptu-ally similar to ASP server objects. However,
the custom action is represented in the JSP page as a custom tag instead of
scripting code.
The Apache <jakarta:apply> tag provides the XSLT processing. The JSP code example shown in Listing
9.7 utilizes the <jakarta:apply> tag. This listing contains the file book_test.jsp.
LISTING 9.7 <install_dir>\ch9_xsl\public_html\book_test.jsp
<%@ taglib
uri=”http://jakarta.apache.org/taglibs/xsl-1.0” prefix=”jakarta” %>
<jakarta:apply
xml=”book.xml”
xsl=”book_view.xsl” />
The first line in this example informs the JSP server to use the tag
library that is identi-fied by the URI http://jakarta.apache.org/taglibs/xsl-1.0. This URI is defined in the Web application’s deployment description. The URI is actually mapped to the file
jakarta-xsl.tld, located
in the directory <install_dir>\ch9_xsl\public_html\WEB-INF. The file jakarta-xsl.tld is the Tag Library Descriptor (TLD). The TLD file pro-vides a
description of the custom tags available in the class library. It also provides
a mapping between the custom tag name and the tag handler class. The tag handler class is located in
the directory <install_dir>\ch9_xsl\public_html\WEB-INF\lib.
The next line of code is the actual <jakarta:apply> tag. This tag has two attributes— one defines the XML input source and
the other defines the XSL style sheet. The results of the XSLT process are
returned to the Web browser.
To test this example, make sure the Tomcat server is running. In a Web
browser, access the JSP with the URL http://localhost:8080/bookch9/book_test.jsp. The output should resemble Figure 9.7.
Advanced Features of XSLT
The previous section covered the basics of XSLT processing. Now that you
have the required components for XSLT processing installed and configured,
we’ll explore some advanced XSLT concepts. In this section, you’ll learn how to
loop over a collection of XML elements, sort the elements, and perform
conditional filtering on the data.
Looping
The XSLT element <xsl:for-each> is used for looping through a list of elements. This is very useful
when you have a collection of related items and you’d like to process them in a
sequential fashion. The <xsl:for-each> element is commonly used in the Web development world to convert an XML
document to an HTML table.
Here’s the syntax for <xsl:for-each>:
<xsl:for-each select=node-set-expression>
<!-- content -->
</xsl:for-each>
The <xsl:for-each> element has a required attribute: select. The value of the select attribute is an expression. The expression contains an XPath expression
for selecting the appropriate elements from the list.
Let’s take the previous book.xml example one step further. Instead of describing a single book, let’s
create an XML document that contains a list of books. This could describe the
books available at an e-commerce site or a list of books available in your
company’s technical library. Listing 9.8 contains the file booklist.xml.
LISTING 9.8 <install_dir>\ch9_xsl\public_html\loop\booklist.xml
<?xml version=”1.0”?> <booklist>
<book>
<author>Michael Daconta et al</author> <title>XML
Development with Java 2</title> <category>Java</category>
<price
currency=”USD”>37.99</price> </book>
<book>
<author>Mark Grand</author> <title>Patterns in
Java</title> <category>Java</category>
<price
currency=”USD”>44.99</price> </book>
<book>
<author>Richard Monson-Haefel</author>
<title>Enterprise JavaBeans</title>
<category>Java</category>
<price
currency=”USD”>34.95</price> </book>
<book>
<author>Chad Darby et al</author> <title>Professional
Java E-Commerce</title> <category>Java</category>
<price currency=”USD”>59.95</price>
</book>
<book>
<author>E. Lynn Harris</author> <title>Any Way The
Wind Blows</title> <category>Fiction-Romance</category>
<price currency=”USD”>19.95</price>
</book>
<book>
<author>E. Lynn Harris</author> <title>Invisible Life</title>
<category>Fiction-Romance</category> <price
currency=”USD”>16.95</price>
</book>
<book>
<author>E. Lynn Harris</author> <title>And This Too
Shall Pass</title> <category>Fiction-Romance</category>
<price currency=”USD”>18.95</price>
</book>
<book>
<author>Tom Clancy</author> <title>Executive
Orders</title> <category>Fiction-Thriller</category>
<price currency=”USD”>7.99</price>
</book>
<book>
<author>Tom Clancy</author> <title>Hunt for Red
October</title> <category>Fiction-Thriller</category>
<price currency=”USD”>27.95</price>
</book>
<book>
<author>Tom Clancy</author> <title>The Sum of All
Fears</title> <category>Fiction-Thriller</category> <price
currency=”USD”>7.99</price>
</book>
</booklist>
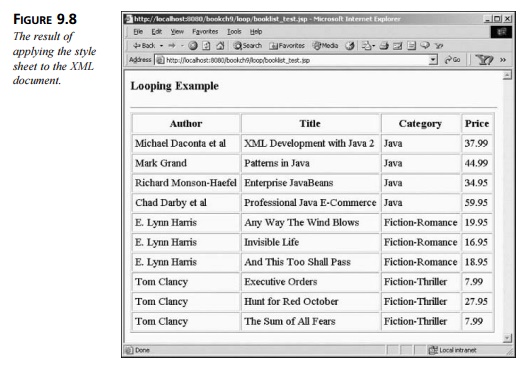
Now, let’s design an XSL style sheet to convert the XML document to an
HTML table. The <xsl:for-each> element loops over a list of items. This example performs a loop for
each <book> element
in the <booklist> element. This process is described in the select attribute with the expression booklist/book. See the following code snippet:
<xsl:for-each
select=”booklist/book” >
<!-- insert table rows and table data -->
</xsl:for-each>
Inside of the <xsl:for-each> element, the appropriate HTML elements are used for the table rows and
table data. To retrieve the data from the XML document, each table cell uses
the <xsl:value-of> element.
Listing 9.9 contains the complete style sheet,
booklist_loop.xsl.
LISTING 9.9 <install_dir>\ch9_xsl\public_html\loop\booklist_loop.xsl
<?xml version=”1.0”?>
<xsl:stylesheet
xmlns:xsl=”http://www.w3.org/1999/XSL/Transform” version=”1.0”>
<xsl:template match=”/”> <html><body>
<h3>Looping Example</h3> <hr></hr>
<table border=”1”
cellpadding=”5”> <tr>
<th>Author</th>
<th>Title</th>
<th>Category</th>
<th>Price</th>
</tr>
<!--
Perform loop for
each book in
the book list -->
<xsl:for-each
select=”booklist/book” >
<tr>
<td> <xsl:value-of
select=”author” /> </td>
<td> <xsl:value-of
select=”title” /> </td>
<td> <xsl:value-of
select=”category” /> </td>
<td> <xsl:value-of
select=”price” /> </td>
</tr>
</xsl:for-each>
</table>
</body></html>
</xsl:template>
</xsl:stylesheet>
You can test the server-side scripts using the techniques presented
earlier in this chapter. The test files are named booklist_test.jsp and booklist_test.asp. They are located in the
directory <install_dir>\ch9_xsl\public_html\loop.
The server-side scripts refer to the appropriate XML document and XSL
style sheet. Listing 9.10 contains
the code for booklist_test.jsp.
LISTING 9.10 <install_dir>\ch9_xsl\public_html\loop\book_test.jsp
<%@ taglib
uri=”http://jakarta.apache.org/taglibs/xsl-1.0” prefix=”jakarta” %>
<jakarta:apply
xml=”/loop/booklist.xml”
xsl=”/loop/booklist_loop.xsl”
/>
To view the test file, start the Tomcat server. In the Web browser, open http:// localhost:8080/bookch9/loop/booklist_test.jsp. Figure 9.8 shows the result.
You can also test this example using the client-side techniques
described earlier in the chapter by adding a reference to the XSL in the XML
document.
Sorting
In XSLT, the <xsl:sort> element is used for sorting the XML data. It is possible to sort based
on a single key or multiple keys. The syntax for the <xsl:sort> element is shown here:
<xsl:sort
select
= string-expression
order = { “ascending” | “descending” } data-type =
{ “text” | “number” }
case-order = {“upper-first” | “lower-first” } lang
= { nmtoken } />
The <xsl:sort> element is used in conjunction with the <xsl:for-each> element. For example, the following code snippet sorts the book titles
in alphabetical order:
<!-- Sort by
the book title --> <xsl:for-each select=”booklist/book” >
<xsl:sort select=”title” />
<!-- insert table rows and table data -->
</xsl:for-each>
Sort Order: Ascending or Descending?
By default, the information is sorted in ascending order. Set the order attribute to descending for a descending sort. The
following code snippet sorts the titles in descend-ing order:
<!-- Sort by
the book title, descending --> <xsl:for-each select=”booklist/book”>
<xsl:sort select=”title” order=”descending”/>
<!-- insert table rows and table data -->
</xsl:for-each>
It is important to note that the <xsl:sort> element assumes that the sort key is a text element. If you need to
sort numerical data, you have to set the data-type attribute to number. If you don’t set the data-type attribute, the XSLT processor will use the default value, text. When sorting numerical data,
the default value of text will not generate the desired output. To demonstrate this point, let’s
attempt to sort the books in booklist.xml by price. The following code snippet purposefully omits the data-type attribute:
<xsl:for-each
select=”booklist/book”>
<xsl:sort select=”price” />
<tr>
<td> <xsl:value-of select=”author” />
</td>
<td> <xsl:value-of
select=”title” /> </td>
<td> <xsl:value-of select=”category” /> </td>
<td> <xsl:value-of select=”price” /> </td>
</tr> </xsl:for-each>
When applied to booklist.xml, this style sheet fragment generates the output in Figure 9.9.
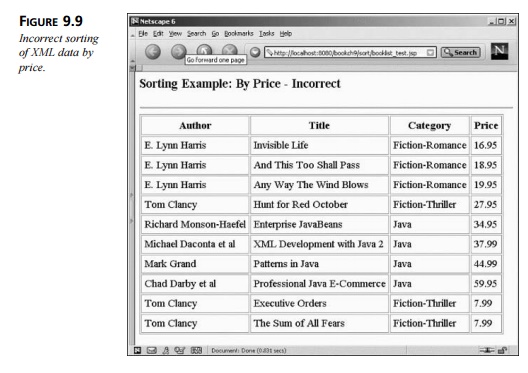
Notice that the prices are not
sorted in an ascending order.
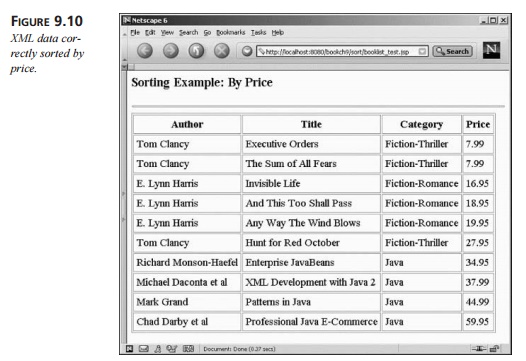
To achieve numerical sorting, you have to specify <xsl:sort select=”price” data-type=”number” />. Listing 9.11 provides the correct usage of the <xsl:sort> element for numerical sorting.
LISTING 9.11 <install_dir>\ch9_xsl\public_html\sort\booklist_sort.xsl
<?xml version=”1.0”?>
<xsl:stylesheet
xmlns:xsl=”http://www.w3.org/1999/XSL/Transform” version=”1.0”>
<xsl:template match=”/”> <html><body>
<h3>Sorting Example: By Price</h3> <hr></hr>
<table border=”1”
cellpadding=”5”> <tr>
<th>Author</th>
<th>Title</th>
<th>Category</th>
<th>Price</th>
</tr>
<!-- Perform
loop for each book in the book list -->
<xsl:for-each select=”booklist/book” >
<xsl:sort select=”price”
order=”ascending” data-type=”number” />
<tr>
<td> <xsl:value-of
select=”author” /> </td>
<td> <xsl:value-of
select=”title” /> </td>
<td> <xsl:value-of
select=”category” /> </td>
<td> <xsl:value-of
select=”price” /> </td>
</tr>
</xsl:for-each> </table>
</body></html>
</xsl:template>
</xsl:stylesheet>
When applied to booklist.xml, the revised style sheet generates the correct output, as shown in
Figure 9.10.
Sorting by Case
The case-order attribute is used to specify whether uppercase or lowercase has
prece-dence during the sort. For example, if the case-order attribute is set to upper-case, then
a b A B
is sorted as follows:
A a B b
If the lower-case attribute value is applied, then
a b A B
is sorted like this:
a A b B
The case-order attribute should only be used when the data-type attribute is set to
text.
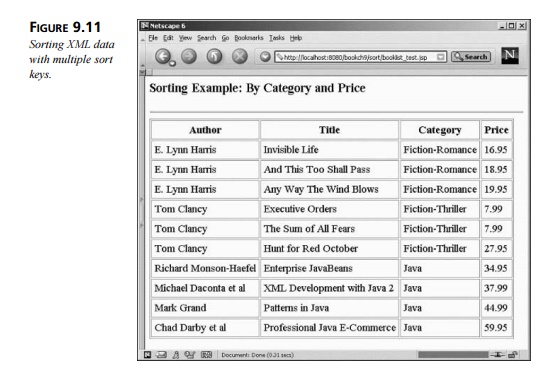
Sorting with Multiple Keys
In certain situations, you might want to sort using multiple keys. For
example, you could sort the books by category and then by price. This is
accomplished by inserting multiple <xsl:sort>
elements within an
<xsl:for-each> element. Listing 9.12 sorts by
category and then
by price.
LISTING 9.12 <install_dir>\ch9_xsl\public_html\sort\booklist_sort_
categoryprice.xsl
<?xml version=”1.0”?>
<xsl:stylesheet
xmlns:xsl=”http://www.w3.org/1999/XSL/Transform” version=”1.0”>
<xsl:template match=”/”> <html><body>
<h3>Sorting Example: By Price</h3> <hr></hr>
<table border=”1”
cellpadding=”5”> <tr>
<th>Author</th>
<th>Title</th>
<th>Category</th>
<th>Price</th>
</tr>
<!--
Perform loop for
each book in
the book list -->
<xsl:for-each select=”booklist/book” > <xsl:sort
select=”category” />
<xsl:sort select=”price”
data-type=”number” /> <tr>
<td> <xsl:value-of
select=”author” /> </td>
<td> <xsl:value-of
select=”title” /> </td>
<td> <xsl:value-of select=”category” /> </td>
<td> <xsl:value-of select=”price” /> </td>
</tr> </xsl:for-each>
</table>
</body></html>
</xsl:template>
</xsl:stylesheet>
When applied to booklist.xml, this style sheet generates the output shown in Figure 9.11. The
implementation details are left as an exercise for you, the reader.
The server-side test scripts are available in the directory <install_dir>\ch9_xsl\pub-lic_html\sort.
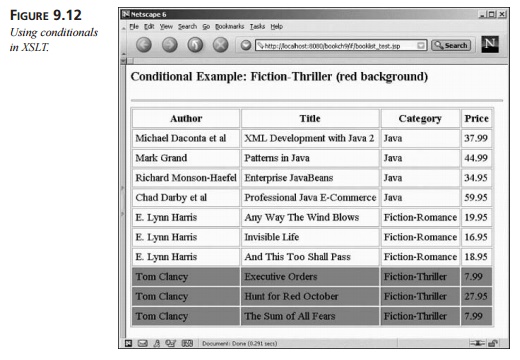
Conditionals
During an XSLT transformation, the style sheet can perform conditional
tests on the data. XSLT contains a very simple if-then conditional. The syntax for the <xsl:if> element is shown here:
<xsl:if
test=Boolean-expression> <!-- content -->
</xsl:if>
The test attribute refers to a Boolean expression. If the Boolean expression evaluates to true, the content within the <xsl:if> element is included in the
output.
The following code snippet performs a test for Fiction-Thriller books:
<xsl:for-each
select=”booklist/book” > <tr>
<xsl:if test=”category=’Fiction-Thriller’”> <xsl:attribute
name=”bgcolor”>red</xsl:attribute>
</xsl:if>
<td> <xsl:value-of select=”author” />
</td>
<td> <xsl:value-of select=”title” />
</td>
<td> <xsl:value-of select=”category” />
</td>
<td> <xsl:value-of select=”price” />
</td>
</tr> </xsl:for-each>
If a Fiction-Thriller book is found, the background color of the row is
set to red. In this example, we’ve introduced a new XSLT element, <xsl:attribute>. The
<xsl:attribute> element creates a new attribute
for the parent element. In this example, the parent is the <tr> element. If the conditional is true, the <tr> element will have the attribute bgcolor and its value set to red. The end result
is <tr bgcolor=”red”>.
When applied to booklist.xml, the XSLT processor generates the output shown in
Figure 9.12. The server-side test scripts are available in the directory
ch9_xsl\public_html\if.
Filters
In relation to conditional tests, XSLT can also filter the data based on
a given expression. When data is
selected using the <xsl:for-each> element, the expression can contain a filter. For example, you can
filter the data to contain only Java books. The following code snippet performs
the desired operation:
<xsl:for-each
select=”booklist/book[category=’Java’]” >
<tr>
<td> <xsl:value-of
select=”author” /> </td>
<td> <xsl:value-of
select=”title” /> </td>
<td> <xsl:value-of select=”category” /> </td>
<td> <xsl:value-of select=”price” /> </td>
</tr> </xsl:for-each>
Related Topics