Visual Communication | Term 3 Unit 6 | 7th Science - Text Document | 7th Science : Term 3 Unit 6 : Visual Communication
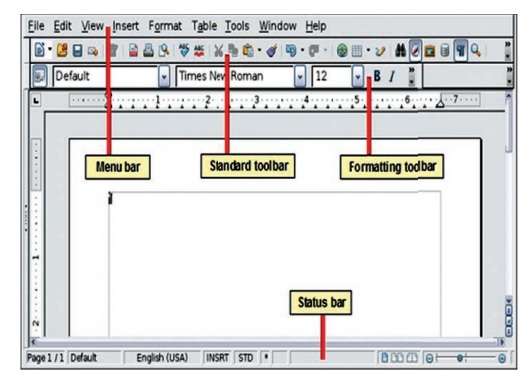
Chapter: 7th Science : Term 3 Unit 6 : Visual Communication
Text Document
TEXT DOCUMENT
In this chapter, we will discuss
about the word processing. You can use it to type letters, reports and other
documents. This lesson introduces you to the Word window. You use the Word
window to interact with Text Document.
Managing Documents
This section of the lesson explains
how to open a new/existing document, save a document, renaming a document and
closing an opened document. There are several ways to create a new document,
open existing documents and save documents in Word.
Create a New Document
To create a new document, do any one
of the following methods:
1.
Click the New Document button on the menu bar.
2.
Choose File→New command from the menu bar.
3.
Press CTRL+N keys on the keyboard.
Open an Existing Document
To open an existing document, do any
one of the following methods:
1. Click the Open File button on the
menu bar.
2. Choose File→Open command from the menu bar.
3. Press CTRL+O keys on the
keyboard. Each of the above method will show the Open dialog box. Choose the
file and click the Open button.
Save a New/Existing Document
To
save a new/existing document that is opened, follow any one of the following
methods:
1.
Click the Save button on the menu bar.
2.
Select File→Save commands from the menu bar.
3.
Press CTRL+S keys on the keyboard.
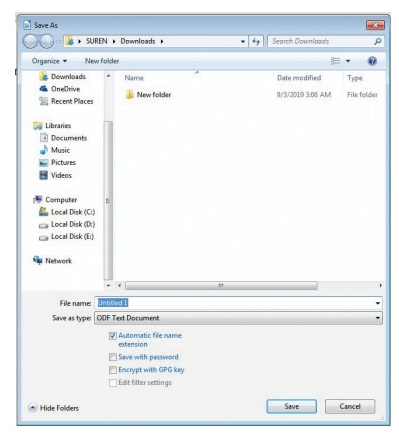
If the document is already named and
saved earlier, it will simply save the document. On the other hand, if the file
is a new document then it will prompt you by opening ‘Save As’ dialog box. Select
the folder where you want to place your document. Type the name of the document
in File Name and then click OK. You can also save a document by choosing
File→Save As commands on the menu bar.
Close the Document
Close the current document by
selecting File→Close command on the menu bar or click the Close icon if it is
visible on the Standard toolbar.
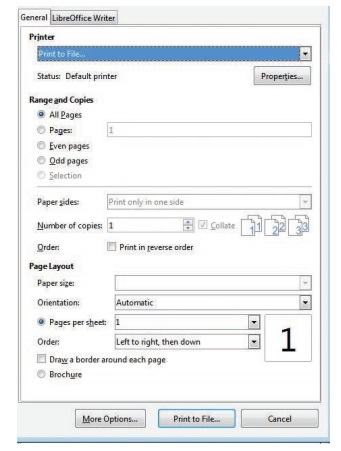
Printing a Document
To print a document or selected
pages follow the steps given below:
1. Open the document to be printed.
2. Choose File → Print command on
the menu bar.
The Print dialog box will open.
Select the Options like print range, Number of copies, Printer name etc. See
that printer is switched on and the paper is available in the printer tray.
3. Click OK.
Print Preview
Print preview provides a way to see
how your document will look when printed. You can see several pages at once. It
is similar to Print Layout View. An advantage of Print preview is that it has
its own toolbar. The toolbar allows you to easily view multiple pages and
change the magnification of the screen. You can also edit your document in
print preview mode. To switch to print preview, use one of these methods:
1. Click on the Print preview in the
file menu. Or Press CTRL+Shift+ O keys.
EXIT TEXT DOCUMENT
When finished you can close all the
files, and quite the Word program by selecting File→Exit command on the File
menu bar.
Selecting Text
Even though the document is built up
by typing one character at a time, while editing and formatting one always work
with words, lines, paragraphs and sometimes with the whole document. For this
purpose one should learn how to select the text. Once the text is selected,
change can be made to that text. The text can be moved, copied and made as
bold. The font and colour of the text can also be changed. For selecting text,
the mouse or the keyboard can be used.
Selecting Text with Mouse
Following steps are to be followed:
1.
Insertion point is moved to the start of the text to be selected.
2.
The left mouse button should be clicked, held down and dragged across the text
to be selected.
3.
When the intended text is selected, the mouse button should be released.
Selecting Text with Keyboard
Following
are the steps to be followed:
1.
Insertion point is moved to the start of the text to be selected.
2.
The Shift key is pressed down and the movement keys are used to highlight the
required text.
3.
When the Shift key is released, the text is selected.
Cut and Copy
The main difference between Cut and
Copy is that cut removes the selected data from its original position while
copy creates a duplicate of the original content.
Moving the Text
The
selected text can be easily cut and pasted in the required location. Following
steps are to be followed.
1.
The text to be moved to a new location is selected.
2.
Edit → Cut is selected or in the tool bar is selected to cut the selected text.
3.
Insertion point is moved to the place where the text is to be pasted.
4.
Edit → Paste is selected or in the tool bar is selected to paste the text in
the new location. The text can also be pasted in this way to another or another
type of document.
The
following keyboard shortcuts can be used to move text.
Ctrl
+ X → to Cut
Ctrl
+ V → to Paste
Copying the Text
1.
The text to be copied is selected.
2.
Edit → Copy is selected or is clicked.
3.
The insertion point is selected where the copy of the text should appear and is
clicked. The following keyboard shortcuts can also be used for copy and paste:
Ctrl
+ C → to Copy
Ctrl
+ V → to Paste
Formatting Options
Almost all the formatting options
are available under Format menu. LibreOffice Writer also conveniently provides
buttons for the most commonly used options. But before these options can be
used, the text on which they are to be used has to be selected. Once the
desired portion of the text is selected then depending on the need any one of
the following buttons are clicked:

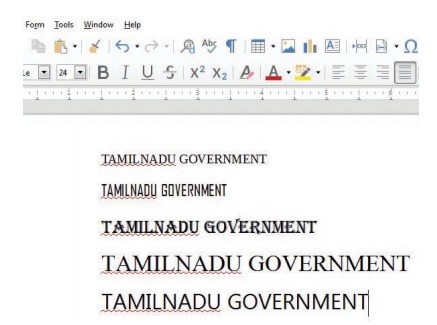
Click
B to make text Bold.
Click
I to make text Italic.
Click
U to make
text Underlined.
The
same can also be achieved by clicking on Format → Character
Alternatively
Ctrl + B, Ctrl+I and Ctrl+U keys can be used to make the selected text bold,
italic and underlined respectively.
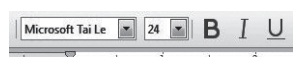
Changing the Fonts
A
font is a set of characters and numbers in a certain style. Each font looks different
from other fonts.
Click
the down arrow in the Fonts Combo box of font tab in Character dialog box.
Use
Format →Character to open the Character dialog box.
From
the list of available fonts, click the required one.
The text changes to the selected font.
Font Size
The
size of the text is also important. The same size of the text cannot be used
for a legal document, and an advertisement material.
Click
the down arrow in the Size combo box of Fonts tab in Character dialog box.
The
text changes to the selected font size.
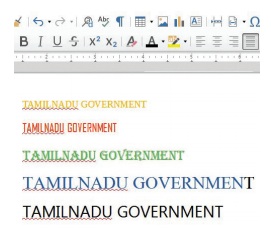
Changing the Font Colour
A
different colour for selected text can be used. Colour printers are becoming
more and more popular. With the help of a colour printer, some splash can be
added to the documents by changing the colour of text.
To
use a different text color, select the text and click the arrow in the
Font
Colour icon. A colour palette is
displayed from which the required colour can be selected.
Alternatively,
select the text and click on the Font color icon, to apply the current colour
of the Font Colour.
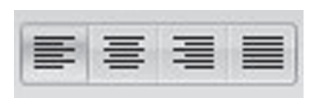
Paragraph Alignment
Paragraph alignment refers to the
appearance of the left and right sides of the paragraph. By
default, Word aligns
paragraphs to the left. You can align paragraphs in Word so the right sides are
symmetrical. This is called right alignment. You can also align them so you
center the lines with even space on both sides. This is called center
alignment. Finally, you can justify the alignment, which aligns both the left
and right sides.
Four types of alignment can be
selected, and the best way to make a change is to use the Formatting toolbar.
Following steps are used:
To change the alignment of one
paragraph, first click within that paragraph.
To change the alignment of several
paragraphs, select the ones needing change.
Changing Page Orientation
Usually the length of a document
will be more than the width. This orientation is called portrait. But in some
of the documents the width will be more than the length. This type of
orientation is called landscape. The default orientation is portrait.
To change the orientation or paper
size, the following steps are used:
* The Format Page option is clicked.
Click the Page tab, if necessary.
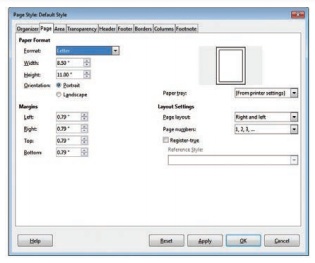
* Select the necessary paper format
from the Format drop-down list in the Page. Format section. Or enter the values
in the Width and Height spin boxes.
* For changing the orientation
Portrait or Landscape radio buttons are used.
Changing Margins Using Rulers
If the user is not having the exact
value for the margins then the Ruler option on the View menu can be used to
change the margins.
Following steps are used in this
method:
* If the ruler is not displayed in
the screen, View → Ruler option is clicked.
* The gray area of the ruler
indicates the margin’s top area.
* The mouse pointer is then moved in
between the gray and white area of the ruler.
* When the pointer is in the right
spot, it changes into a line with arrows
on both sides
* The margin guide is dragged to a
new location.
Related Topics