Types, Method | Sewing - Plackets and Fasteners | 11th Textiles and Dress Designing : Chapter 12 : Basic Sewing
Chapter: 11th Textiles and Dress Designing : Chapter 12 : Basic Sewing
Plackets and Fasteners
PLACKETS AND FASTENERS
Introduction
Plackets are constructed openings that enable in
giving a good fit to the garment. It helps in putting on and taking off a
gar-ment. Plackets are generally attached to waist lines, necklines, wrists and
other snug fitting parts of the garment. When the garment is in use these
plackets are kept closed with the help of fasteners such as zips, buttons,
hooks or tapes.
Plackets
A placket is made either in an opening left on
the seam or by creating a cut in a garment which enables one to wear or remove
the gar-ment easily. The placket made on a seam is stronger and gives a better
finish. The following points should be kept in mind while constructing a
placket.
·
A good placket should lay flat on the garment.
·
A placket should not be thick and should not have
gaps at the edges.
·
The position of the placket should be easily
accessible.
·
The seams of the placket should be strengthened
at the closed ends as it has to go through a certain amount of strain during
wear.
·
While choosing a placket the position of the
placket, texture of the fabric, age and sex of the wearer along with the
current fashion should be kept in mind.
Types of Plackets
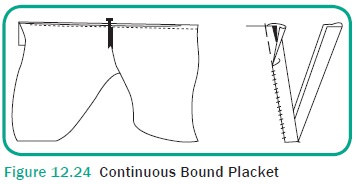
Continuous Bound Placket
These plackets are made on a seam or a cut but
should not be made on curved seams and bulky fabrics. This is also called as
one-piece placket. They are suit-able for children’s dresses, undergarments
like petticoats and sleeve openings where a cuff or band is used (Figure
12.24).
Method of Sewing Continuous Bound Placket
·
To make a placket in a slash, cut a strip of
fabric on the lengthwise grain.
·
The cut should be 3 to 6 cm wide and 3 cm longer
than twice the length of the openings.
·
Match the centre of a long edge of the strip to
the end of the slash edge, with right sides of garment and strips facing each
other.
·
Pull back the tip of the slash about 0.25 cm from
the edge of the placket strip and pin it.
·
Open the placket edges wide and attach to the
strip by a line of tack-ing worked 0.25 cm from the edge of the strip.
·
From the right side of the garment, machine over
the tacking line from one end up to its midpoint.
·
Keep the machine needle in the fab-ric, raise the
pressure foot and move the fullness backward out to prevent fold created on the
placket.
·
Lower the presser foot and stitch along the
opposite end of the opening.
·
Press the seam edges towards the placket strip
and fold under the free edge of the strip of 0.25 cm and crease.
·
Fold the strip over the seam edge and hem it
along the stitching line.
·
Fold the strip under on the overlap section and
tack it close to the seam.
·
Tacking should be removed after fix-ing the
fasteners.
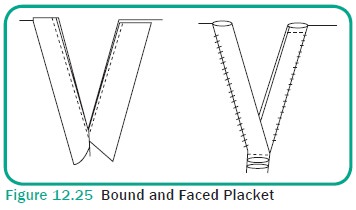
Bound and Faced Placket or Two-Piece Placket
As the name indicates, this is done with two pieces
of fabrics. This placket is com-monly used skirts, petticoats and back opening
dresses. The overlap and under lap sides are finished with facing and binding
respectively (Figure 12.25).
Method of Sewing Bound and Faced Placket
·
Cut two separate strips of fabric, measuring 8 cm
width for the over-lap and the other with 6 cm width for the under lap.
·
The length of the strips should be 2.5 cm more
than the length of the placket opening.
· The overlap and under lap sides are finished with the narrow and wide strips respectively.
·
Care should be taken to maintain the stitching
line of the seam along with the strips stitching line.
·
The one inch extra length of the strips should
extend below the placket opening.
·
Crease the strip back over the seam and turn the
free edges under the wrong side of the garment hem and finish the under lap.
·
The completed bound side of placket should be
0.25 cm wide.
·
Turn the overlap strip over com-pletely to the
wrong side making 0.25 cm fold on the wrong side of the garment and hem neatly.
·
Finish the placket by a row hand stitches on the
wrong side catching the under and overlap together.
Miter Placket
Miter placket is mainly used in men’s shirts,
sleeve opening and on neck openings for children’s garments where strength is
the major requirement. It is also called as tai-lored placket (Figure 12.26).

Method of Sewing Miter Placket
·
Prepare a strip on straight grain mea-suring 7 cm
wide and exact length of the slit which is normally 12-15 cm for the under lap.
·
Place the strip right side facing to match the
end of the slit and with right side facing, sew about 5 cm to join the strip.
·
Fold and machine along the stitch-ing line over
the folded edge (0.25 cm) along the strip.
·
Point the strip to about 2.5 cm wide.
·
A strip measuring 5.5 cm wide and 3 cm longer
than slit is cut for the overlap and this is placed on the seam line about 0.25
cm.
·
Keep the right sides of the strip fac-ing the
wrong side of garment and tack the short side of the strip to the free side of
the placket opening on the seam line.
·
Machine stitch and bring the overlap on the right
side of the garment.
·
Turn under the seam allowance and adjust the
position of the strip so that overlap and under lap are together, sew it.
·
Make a rows of top stitch on the strips and
garment together turn around the point and downward till the opening.
·
Then sew twice keeping the overlap and under lap
in position on the gar-ment to form a square shape.
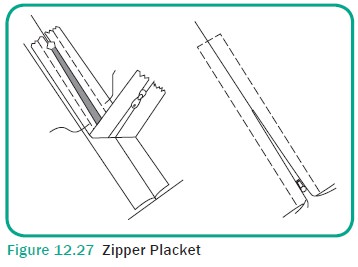
Zipper Placket
Zippers are plastic or metal rows with teeth like
structures, which can be looped or unlooped by a runner. This is used to open
or close the garment. It is attached on the placket. The market is filled with
different types of zippers which can be matched based upon the side of placket
opening and colour of the garment. Zippers are available in different colour
and length (Figure 12.27).
Method of Sewing Zipper Plackets
·
Cut the opening in the garment where the zipper
has to be attached.
·
Select the zipper according to the opening size.
·
Towards the end of the cut make a short slit 0.25
cm wide diagonally on both sides (an inverted ‘V’ shape).
·
Turn all the three raw edges to the wrong side
and tack them.
·
Sew a square piece of tape at the raw edge.
·
Place the zipper on the sewen lap and stitch
through the edges holding the fabric edge.
·
Cover the zipper edges with a small square piece
of tape, tack it first and then sew it.
·
Hem the raw edges neatly to finish the zip.
Faced Placket Open
It is one of the simplest methods of fin-ishing a
neckline. It is mostly used for infants, children and night dresses.
Method of Sewing Faced Placket Open:
·
Cut a placket open for the required length at the
centre back or front
·
Place the facing piece right sides on the garment
and make row of stitches
·
Turn the facing to the wrong side and then top
stitch
·
Hem neatly to finish the facing
Fastener
Fasteners are the items which are used to close a
garment opening. They are deco-rative as well as functional. Care should be
taken while selecting a fastener as they must be rust free and withstand
laun-dering. They can be selected to match the colour, design and texture of
the gar-ment. Decorative fasteners are sewen to add beauty to the garment.
Example: car-toon shaped button on the centre front line of baby’s frock with
back opening. Functional buttons sewen as closure to the garment, it helps in
fitting the garment very close to the body. Example: Shirt buttons sewen in the
centre front line of a men’s shirt. Fasteners should be always sewen on two layers
of fabric to ensure strength. Fasteners can be conspicuous or inconspicuous. Example: Shirt buttons on the shirt
centre front line and hook in women’s blouses respectively. Generally,
fasteners are sewen in garments to create a left lap overlap the right for
women and vice-verse for men’s garment.
Types of Fasteners
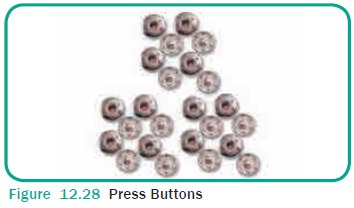
Press Button
Press buttons are available in different sizes
and weights and are used to hold edges that will not have much strain when the
garment is worn. It has two sections: a stud and a socket. The stud is attached
on the wrong side of the overlap and the socket comes over its impression on
the underside of the placket. The press but-tons have four holes into which
button-hole stitches are made to hold them firmly to the garment. This is best
suited for kids garments (Figure 12.28).
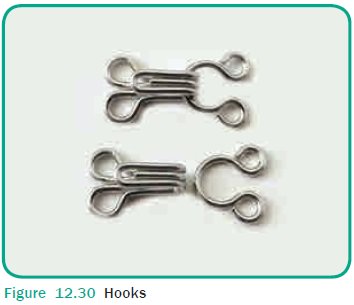
Hook and Eyes/Loops
Hook and Eye / loops are generally used in
plackets. The hook is placed about 0.5 cm inside the finished edge on the wrong
side of the overlap and the eye or loop comes on the underside of the placket.
Hooks and eyes are used mostly in close fitting gar-ments like blouse. They
also available in dif-ferent size, but circular in shape and is made out of
metals. Hooks are metals with curved structure at the top with two parallel
lines and finished with two circles at the bottom. Button hole stitches are
made at the circles placing the hook on the garment to fix the hook onto the
garment (Figure 12.29).
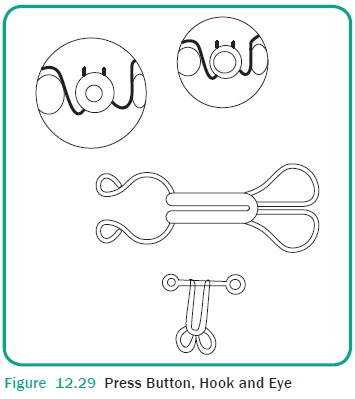
There are two types of eyes, namely metal and thread
loops. The metal loops are sub divided as straight and “U” shaped. Both have
circles at the end which is used as a mode to sew the eye to the garment with
button hole stitches.
The loop eyes are also of two types, namely
thread loops and fabric loops. Thread loops are made by sewing four to five
straight stitches across the under lap to match the hook, using same colour
thread as the garment. Button hole stitch is made on these strands. Fabric
loops are made of strips of fabric matching the gar-ment. These strips are made
into tube like structure, turned to push the seams inside, to give a neat loop.
This strip is cut and placed on the required area and machined.
They form a loop on the placket open to extend
outside to hold the but-ton on the opposite side of the garment. The size and
width of the placket varies depending upon the garment and size of the button.
These loops can be used for decoration also (Figure 12.30).
Buttons and Button Holes :
Buttons are both functional as well as
decorative. They should be selected with care to suit the colour, design and
tex-ture of the fabric and style of the garment. Decorative buttons vary in the
form of glass, metal and plastic. Buttons have two or four holes. Mark the area
where the button has to be sewen. Place the button and make a crosswise or
vertical stitch connecting the four holes in the buttons. If the button is with
a single hole in the wrong side of the button, place this on the right side of
the garment, insert the nee-dle from back side, through the garment and then
pass the thread into the hole in the back side of the button and then pick the
needle back into the garment. This is repeated 3 to 4 times to fix the button.
Buttonholes are slits cut in the garment to hold the buttons in place. It can
be made vertically or horizontally with the button sitting exactly at the
centre of the front line. The raw edges of the slit are finished with
buttonhole stitch (Figure 12.31).

Zippers
Zippers come in a wide variety of colours, length
and types. All zippers consists either a chain of metal or plastic teeth or a
synthetic coil joined to a fabric tape made of cotton or cotton polyester
blend.
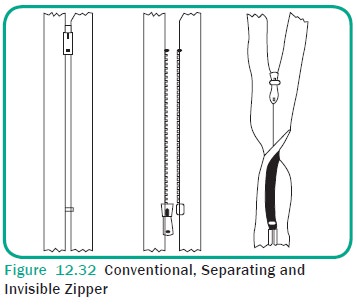
It has stoppers at the top or bottom which keep
the sliders from running off the zip-per. There are three basic types of
zip-pers available in the market. They are (Figure 12.32).
(i)
Conventional Zipper: These are zippers with exposed teeth or chain
and open at the top but are held together at the bottom.
(ii)
Separating
Zipper: They are open at both the
top and the bottom and permit the zipper opening to sepa-rate completely as in
jackets with opened fronts.
(iii)
Invisible
Zipper: They are the newest zippers
and as the name implies they are not visible in the front as they disappear
into the seam. They are mostly used in skirts and in dresses.
Other types of zippers include two way zipper,
trouser zipper and decorative zipper.
Elastics
Elastics are used in areas where stretching is
desired. There are different types of elas-tics available in the market and
should be selected carefully according to the end use of the garment. It can be
used as a casing or can be stitched directly on the garment. Some of the common
types of elastic are-
(i)
Braided Elastic: This elastic nar-rows when stretched
and so used for casing.
(ii)
Woven
Elastic: The width of the elastic
remains same even when stretched and so can be stitched directly to the garment
or for casing.
(iii)
Elastic
Thread: It is also called Bobbin
Elastic. It is very thin elastic covered with thread all around and is mostly
used in bobbins for giving shirring effect.
(iv)
Special
Purpose Elastic: Special elastics
are available for pajamas, lungies and swim-wear.
Tapes and Cords
Different types of tapes and cords are available
which are both functional as well as decorative. They come in a variety of
types, widths and colours and its selec-tion should depend mainly on its end
use. Some of the common tapes available are-
(i)
Seam Tape: Seam tapes are woven or lace tapes. They
are used to finish hem and facing edges.
(ii)
Binding
Tape: Binding tapes are used for
binding curved or straight edges and for casings.
(iii)
Twill
Tape: Twill tapes are mostly used
for reinforcing seams.
(iv)
Piping:
Piping
tapes are narrow bias strip of
fabrics that can be inserted into a seam for decorative purpose.
(v)
Hem
Facing: Hem facing tapes are wide
bias tape or lace which is used on facing hems and binding edges.
(vi)
Ribbon
Tape: Ribbon tapes are knit-ted bands which are stretchable and can be used
to finish necklines, arm holes, sleeve, leg or waistline.
Velcro
Velcro is the commercial name for loop and hook
fasteners. Velcro is a set of two tapes one with a looped napped surface and
other with a hooked napped sur-face. When both the surfaces are pressed
together they grip and remain locked until pulled apart. They are usually made
of nylon and are available in meters. They are used on cuffs, plackets,
mosquito nets and other such items. Velcro is popular in infant garments.
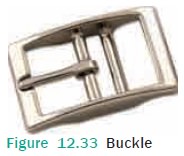
Buckles
Buckles are one of the most interesting types of
fasteners. Buckles are available in plastic, iron, brass, steel and other such
materials. The market is filled with a wide variety of shapes and sizes. There
are two types of buckles – one with prongs which need eyelets to be attached
with it and the other without prongs which do not need any eyelets. Eyelets can
be ready- made, made out of
metals or stitched made out of fabrics (Figure 12.33).
Summary
Plackets are an important part of a garment. It
helps to hold the garment and give a neat fit. Plackets are usually worked on
two lay-ers of fabric, to withstand tear and wear. Plackets are supported with
fasteners like hooks and eyes, buttons, zippers, buckles and Velcro tapes. The
market has wide vari-ety of fasteners to suit different types of gar-ment. Both
plackets and fasteners go hand in hand in supporting the use of garments.
POINTS TO REMEMBER
·
Plackets are used on open edges of the garment to
enable the garment to stay fit onto the person.
·
Plackets help in easy wearing and removing the
garments.
·
Plackets are classified as continuous bound
placket, bound faced placket, miter placket and zipper plackets.
·
Fasteners are small items which are fixed on the
plackets to support wearer to wear and remove the garment comfortably.
·
Press buttons, shirt buttons, tapes, cords,
zippers, velcro, buckles are few types of fasteners.![]()
ACTIVITIES FOR THE TEACHER
·
Demonstrate the sewing of different types of
plackets and fasteners.
·
Download the procedure for making plackets in
you-tube and show it to the students.
ACTIVITIES FOR STUDENTS
·
Prepare samples and make an album.
·
Collect pictures with different type of
fasteners.
Related Topics