Sewing - Fullness | 11th Textiles and Dress Designing : Chapter 12 : Basic Sewing
Chapter: 11th Textiles and Dress Designing : Chapter 12 : Basic Sewing
Fullness
FULLNESS
Introduction
Fullness is done to shape a garment. It also aids
in garment fitting. It adds inter-esting design details in a garment. For ease
of movement and comfort fullness is introduced in garments. There are various
types of fullness. Some of most common types of fullness are darts, tucks,
pleats and gathers.
Darts
Dart is a triangular fold which acts as an
essential part in dress making. It shapes a flat piece of fabric to fit into
natural curves of the body in bust area, armhole, neckline and waist.
They are mostly used in women’s garment. They
play a major role while designing dress and cannot be ignored. While preparing
darts, stitching should start from the broad edge of the dart and move towards
of the tip of the dart. Darts are normally done before a garment is stitched.
It helps in making the garment more fitted.
There are two types of darts namely,
·
Single pointed dart
·
Double pointed dart
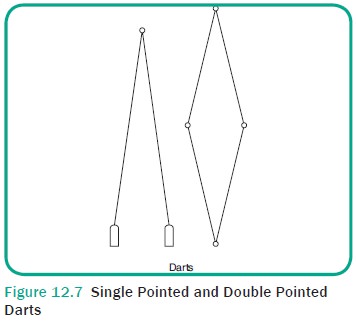
Single Pointed Dart
Single pointed dart is also called as stan-dard
dart (or) half dart. These darts are in triangular shape, wider at one end, and
narrower on the other end (Figure 12.7).
Method of Sewing Single Pointed Dart
·
Transfer points where darts are to be sewn
·
Fold the fabric right side facing
·
Start machining from the wide end and taper till
the tip
·
Pivot the end
·
Fastened the threads at the tapering end
Uses :
Single point dart is used in blouse, skirts,
pants, frocks and kameez.
Double Pointed Dart
Double pointed dart is also called as full dart.
These darts are pointed at both the ends and are wider at the middle. While
stitching / using double pointed dart on thick fabric trim the edges.
Method of Sewing Double Pointed Dart
·
Transfer points where darts are to be sewn.
·
Fold the fabric right sides facing.
·
Start machining from the wider end to the narrow
end of one tip.
·
Repeat for the other end by overlap-ping a few
stitches at centre.
·
Slash at its midpoints to give a smooth fit over
the curve of the body.
·
Pivot the end.
·
Press the dart neatly.
Uses
Double pointed dart is used in bodice of plain
blouse and kameez.
Tucks
Tuck is a fold in a fabric which is stitched down
to add fullness to the garment. They help in shaping a garment and they should
be in even width. Tucks can be done on the right side or wrong side of the
gar-ment depending whether it is used for decorative (or) functional purpose.
They create a decorative element which can also add fullness to a garment. In
fine and deli-cate fabric they look more attractive. They should be evenly
spaced.
The different types of tucks are namely,
·
Pin tuck.
·
Cross tuck.
·
Piped tuck.
·
Shell tuck.
Pin Tuck
Pin tucks are fine narrow fold of about 0.25 cm
sewn from top to bottom. They can be stitched in single (or) in group. It is
mostly used for decorative purpose hence done on specific area of the garment
like the yoke of a frock (Figure 12.8).

Method of Sewing Pin Tucks
·
Mark the places where pin tucks have to be sewn.
·
Fold the first line and stitch near the fold
leaving less than 0.25 cm.
·
Repeat the same procedure for sub-sequent line.
·
Cut / trim the extra threads.
·
Care should be taken to mark the pin tucks with
even spacing.
Uses
Pin tucks are usually worked on kids gar-ments,
ladies dresses, yokes and shirt for decorative purpose.
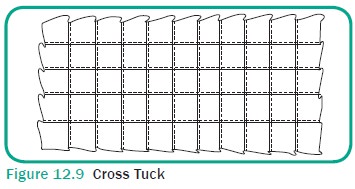
Cross Tuck
Cross tucks are similar to pin tucks which are
sewed both on crosswise direction and in lengthwise direction forming a checked
effect (Figure 12.9).
Method of Sewing Cross Tucks
·
Mark the points where cross tucks are to sewed.
·
Stitch the pin tuck in vertical direc-tion by
folding the fabric for about 0.25 cm.
·
Then draw lines in horizontal direction
·
Sew pin tucks in crosswise direction also
·
Trim the loose threads
Uses
Cross tucks are used to decorate ladies and kids
wear and household linens(curtain, table cloth). They create pleasing effect on
yokes, pockets and larger areas.
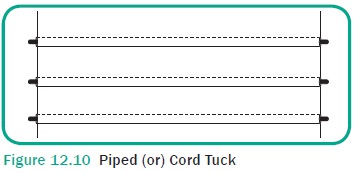
Piped (or) Cord Tuck
Piped or cord tucks are tucks made by plac-ing a
cord at the edge of the fold (on the wrong side). A row of stitches are made close
to the cord. The stiffness of the tucks will depend on the type of cord used.
The cords used can be of any thickness (Figure 12.10).
Method of Sewing Piped or Cord Tuck
·
Mark the places where piped tuck is necessary.
They can be stitched in equal distance or can be grouped.
·
Place a cord on the wrong side and stitch near
the cord, overlapping the cord such that the cord is inside a tube like
structure.
·
Repeat the process wherever necessary
·
Cut the excess thread
Uses
Cross tucks are used in children’s gar-ments to
produce stiffness.
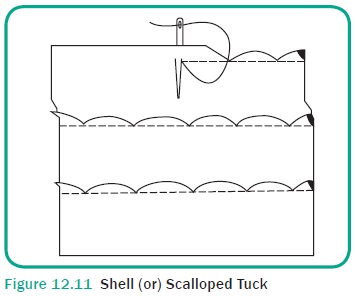
Shell or Scalloped Tuck
Shell or scalloped tucks resemble blanket stitch
and produce a scalloped effect on the garment (Figure 12.11).
Method of Sewing Shell Tucks
·
Fold the edge to 0.25 cm.
·
Mark and pin 0.5 cm apart to make sure that
scallops are of equal width.
·
Start with 2 or 3 running stitch till the pin.
·
Do overcastting stitch by pulling the thread to
create a scallop effect.
·
Repeat the process till the end.
·
Cut the excess thread.
Uses
Shell or scalloped tucks are used on deli-cate
fabric, lingerie, in children garment and in night wear, around armhole and
necklines.
Pleats
Pleats are folds in a garment done on the
waistline of skirts, yokes and sleeves at equal distance to release fullness.
Pleats are done on top and fall neatly to the bot-tom of fabric. The material
required to make a pleat is three times the size of a finished pleat. They are
normally about 2.5 to 5 cm. They create eye movement and can be used as style detail.
The effect of pleat varies depending on the fabric used. The depth of pleat
depends on the weight of fabric and the effect required.
The different types of pleats are :
·
Knife pleat.
·
Box pleat.
·
Inverted pleat.
·
Accordion pleat.
·
Sun ray pleat.
·
Pinch pleat.
·
Kick pleat.
The most commonly used pleats are ex-plained
below :
Knife Pleat
Knife pleat are usually about 2.5 to 3 cm width.
Knife pleats are folds made by a row of stitch in same direction, generally at
the top where the pleats start. They can be used continuously, grouped (5 or 6)
or can be used as a single pleat. They form a sharp edge at the top and then
flare out (Figure 12.12).

Method of Sewing a Knife Pleat
·
Mark lines where fold has to be made.
·
Fold along the marked line.
·
Pin and sew along the marked line.
·
Remove pin and cut the excess threads.
Uses :
Knife pleat is used in ordinary skirt, pants and frock.
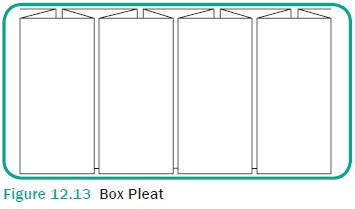
Box Pleat :
Two knife pleats facing in opposite direc-tion is
termed as box pleat. The edges of the box pleat touch each other. If two set of
box pleats made at the same point it is called as double box pleat (Figure
12.13).
Method of Sewing a Box Pleat
·
Mark lines where box pleats has to be made.
·
First make fold in right side and make the other pleat
on left hand side, repeat.
·
Pin and press.
·
Remove pins and machine.
·
Cut the excess threads.
Uses
Box pleat is used in children garment, school
uniforms, skirts, center back of gent’s shirt. It can be used as a design
detail on pockets.
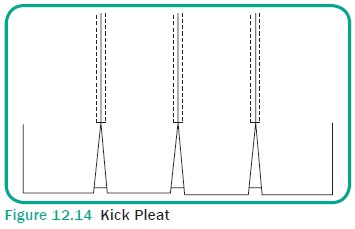
Kick Pleat
A plain pleat, knife pleat or box pleat is
stitched along the fold till the desired length for freedom of movement is
termed as kick pleat. It releases fullness at base (Figure 12.14).
Method of Sewing a Kick Pleat
·
First mark a plain knife or box pleat as per
requirement.
·
Stitch near the fold of pleat till the required
length.
Uses
Kick pleat is used in sportswear, frocks and
skirts.
Gathers
Gathers are used for distributing full-ness
evenly in a given area. The material required will be twice the width or it can
be varied based upon the effect required. Stiff cotton produces crisp effect,
but other man-made fibre or silk gives a graceful effect.
Gathers can be done by hand, machine or by
elastic.
Method of Making Gathers
·
Stitch two rows of loose machine stitches.
·
Gather the section by pulling the thread.
·
Pin only the edges on the flat surface.
·
Evenly spread gather over the fabric.
·
Pin the gathers to the fabric.
·
Machine horizontally, remove the pins.
·
Pivot the edges.
Points to remember while sewing gathers
·
Always the gathered edges should be on top
(facing you).
·
If length to be gathered is long then divide the
length and stitch loose machine stitches.
Uses
Gather is used in neckline, sleeves, waist-line
and yoke.
Summary
Fullness helps a fabric to fit in natural curves
of body, and make a garment look attractive. Darts gives shape to contour.
Pleat, gather and tuck releases fullness in any part of garment. Selection of
the type of fullness depends on the type of material.
POINTS TO REMEMBER
·
Fullness is done to create variety.
·
Fullness helps in getting proper fit and comfort.
·
Pleats, tucks and gathers releases fullness.
·
Darts shapes flat pattern.
·
Fullness adds decoration to a garment.
ACTIVITIES FOR THE TEACHER
·
Demonstrate darts, tucks, pleats and gathers.
·
Show PowerPoint presentation of fullness used in
garment.
ACTIVITIES FOR STUDENTS
·
Draw different types of fullness.
·
Collect picture for various types of fullness.
·
Stitch samples for different fullness.
Related Topics