Surveying | Geography - Clinometers | 12th Geography : Chapter 9 : Surveying
Chapter: 12th Geography : Chapter 9 : Surveying
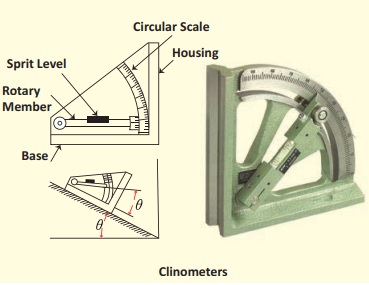
Clinometers
Clinometers
In this Instruction, we will learn how
to use clinometers to measure the height of a tall object. What you will need; Clinometers,
Tape, Paper, Pen or pencil, Assistant.
Step 1: Pick a Spot
Let us pick a spot to measure your object
which may be a tree or electric or telephone pole. You should be far enough away
from your object that you can see the top of it, and you need to be on level ground
with the base of the object.
Step 2: Measure Angle
Here's where we bust out our handy clinometers.
Look through the straw of your clinometers at the top of the tree or whatever object
you're measuring. The weighted string should hang down freely, crossing the protractor
portion of the clinometers. Read the angle shown, and subtract from 90° to find
your angle of vision from your eye to the top of the tree (it can be helpful here
to have an assistant to read the measurement while we look through the straw). We
record our results on a paper. From the spot, the clinometers ( read by assistant)
show 55°. Subtracting from 90° that indicated
that we looked at an angle of 35° to the top of the tree.

Step 3: Measure Distance
Once we have our angle of vision, we
can use tape measure to find the distance from the spot we are standing to the base
of the object we are measuring (an assistant comes in handy here, too). We must
know how far away we are to accurately calculate the height. Our spot was 15.6 meters
from the base of the tree we measured.
Step 4: Find Your Eye-height
The last piece of data you need to calculate
the height of the object is the height from the ground to our eye (our eye-height).
We must have the assistant help us measure this using our tape measure. Our eye
height was recorded for this example as 1.64 metres.
Step 5: Draw a Picture
In calculating the height of the object
you just measured, we find it helpful to begin by drawing a picture and labeling
it with all of the information we have.
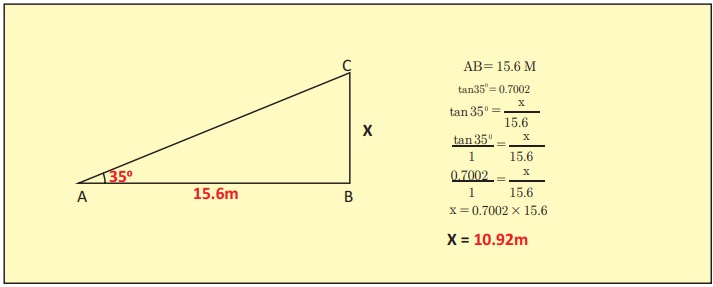
Step 6: Model as a Triangle
The next step is to simplify our drawing
to model our system as a right triangle. Label our triangle with the angle we read
on our clinometers as well as the distance you were standing from the object (we
don't need the eye-height just yet).
We can find x in this triangle (which
represents the portion of the height from eye-level up) by using some basic trigonometry,
specifically the tangent ratio of the triangle:
Tan (angle) = x / distance
Multiply by the distance on both sides
and you get:
x = tan (angle) * distance
Use a calculator to multiply these together
and get a decimal value.
In
the example:
Tan (35°) = x / 15.6
x = tan(35°) * 15.6
x = 10.92 metres
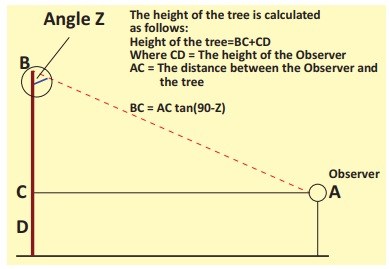
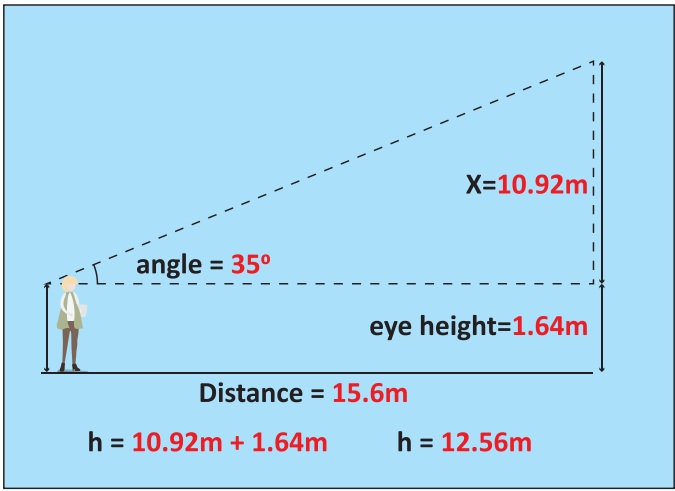
Step 7: Combine with Eye Height
To find the height of our object, we
bring this x value back to the original drawing. By labeling it, we can see that
the height of the object, h, is equal to the x value we just found plus the eye-height
we measured earlier:
h = x + (eye-height)
In the example:
h = 10.92m + 1.64m
h = 12.56m
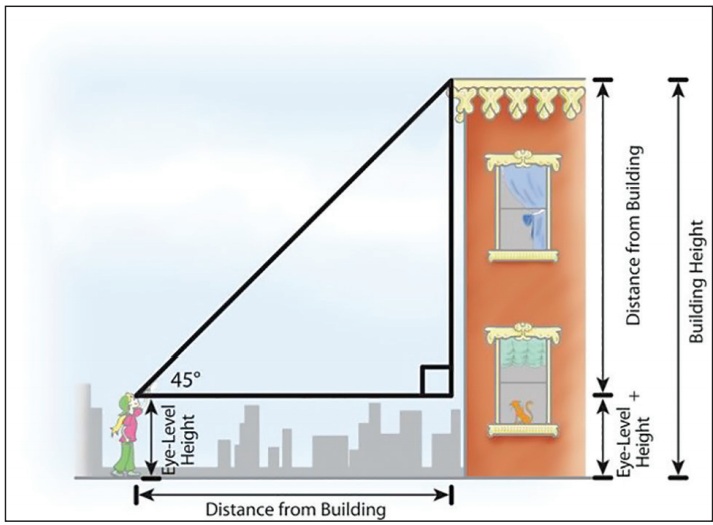
Exercise
Find out the height of the building shown
below. Or Find out the height of a tree or building or electric pole near your premise.
Given eye sight and distance from the building are 1.5m and 18m respectively
Related Topics