Chapter: XML and Web Services : Building XML-Based Applications : Transforming XML with XSL
XSL Formatting Objects
XSL Formatting Objects
The XSL technology is also composed of XSL Formatting Objects (XSL-FO). XSL-FO was designed to assist with the printing and displaying of XML data. The main emphasis is on the document layout and structure. This includes the dimensions of the output doc-ument, including page headers, footers, and margins. XSL-FO also allows the developer to define the formatting rules for the content, such as font, style, color, and positioning. XSL-FO is a sophisticated version of Cascading Style Sheets (CSS). In fact, XSL-FO borrows a lot of the terminology and elements from CSS.
XSL-FO documents are well-formed XML documents. An XSL-FO formatting engine processes XSL-FO documents. You can use two techniques for creating XSL-FO docu-ments. The first is to simply develop the XSL-FO file with the included data. The second technique is to dynamically create the XSL-FO file using an XSLT translation.
XSL-FO Formatting Engines
The current W3C Candidate Recommendation for XSL-FO is 15 October 2001 and is available at http://www.w3.org/TR/2001/REC-xsl-20011015. Many of the XSL-FO formatting engines implement a subset of the XSL-FO specification. Also, the browser support for XSL-FO is nonexistent.
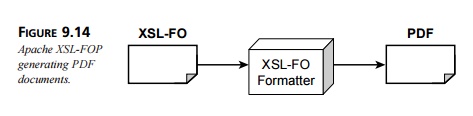
However, don’t be discouraged. Engines are available that allow you to experiment with the basic features of XSL-FO. In fact, we’ll use the Apache XSL-FOP to generate PDF documents from XML. Table 9.2 contains a list of XSL-FO formatting engines.
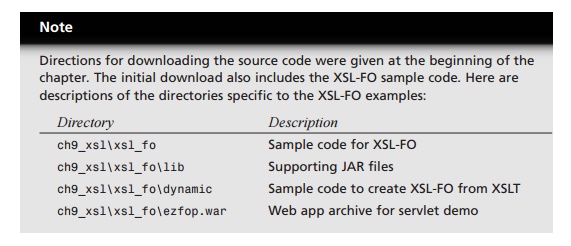
The source code distribution for this chapter includes the Apache XSL-FO formatting engine. You have everything you need to run the examples. You can download additional engines if you’d like to experiment with them.
TABLE 9.2 XSL-FO Formatting Engines
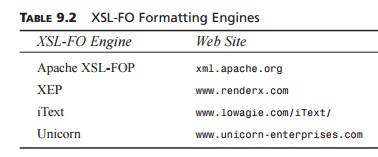
The examples in this chapter are based Apache XSL-FOP version 0.20.1.
In this section, we will create a simple XSL-FO document. Once the document is cre-ated, we will use the Apache XSL-FOP formatter to convert the document to a PDF file. The application interaction is illustrated in Figure 9.14.
Basic Document Structure
An XML-FO document follows the syntax rules of XML; as a result, it is well formed. XSL-FO elements use the following namespace:
http://www.w3.org/1999/XSL/Format
The following code snippet shows the basic document setup for XSL-FO:
<?xml version=”1.0” encoding=”utf-8”?>
<fo:root xmlns:fo=”http://www.w3.org/1999/XSL/Format”> <!-- layout master set -->
<!-- page masters: size and layout -->
<!-- page sequences and content --> </fo:root>
The element <fo:root> is the root element for the XSL-FO document. An XSL-FO doc-ument can contain the following components:
Page master
Page master set
Page sequences
Page Master: <fo:page-master>
The page master describes the page size and layout. For example, we could use an 8.5× 11-inch page or an A4 letter. The page master contains the dimensions for a page, including width, height, and margins. The page master is similar to a slide master in Microsoft PowerPoint. The components of the page master are shown in Figure 9.15.
The <fo:simple-page-master> element defines the layout of a page. The following code snippet describes a U.S. letter:
<fo:simple-page-master master-name=”simple” page-height=”11in” page-width=”8.5in” margin-top=”1in” margin-bottom=”1in” margin-left=”1.25in” margin-right=”1.25in”>
</fo:simple-page-master>
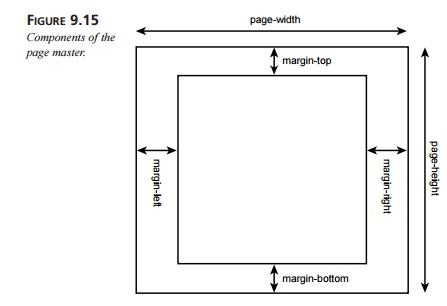
Notice the attributes for <fo:simple-page-master>. The attributes define the height and width of the page, along with the size of the margins. The dimensions in this example are listed in inches (in). Table 9.3 lists the dimensions supported in XSL-FO.
TABLE 9.3 XSL-FO Dimensions
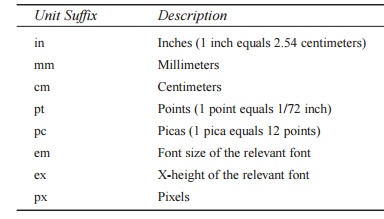
Unit Suffix : Description
in Inches (1 inch equals 2.54 centimeters)
mm Millimeters
cm Centimeters
pt Points (1 point equals 1/72 inch)
pc Picas (1 pica equals 12 points)
em Font size of the relevant font
ex X-height of the relevant font
px Pixels
To set the page height to 210 millimeters, use the following syntax:
page-height=”210mm”
The <fo:simple-page-master> element can also be used to describe an A4 letter (height 210 mm and width 297 mm):
<fo:simple-page-master master-name=”A4-example” page-height=”210mm” page-width=”297mm” margin-top=”0.5in” margin-bottom=”0.5in” margin-left=”0.5in” margin-right=”0.5in”>
</fo:simple-page-master>
Each page is divided into five regions. Regions serve as containers for the document con-tent. The regions are depicted below in Figure 9.16.
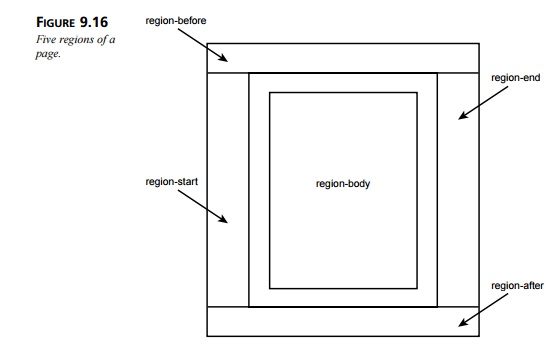
The region-before and region-after areas are commonly used for page headers and footers. The region-body area is the center of the page and contains the main content. The region-start and region-end sections are commonly used for left and right side-bars, respectively. During the definition of a page master, you specify the size of the regions using the following elements:
<fo:region-before>
<fo:region-after>
<fo:region-body>
<fo:region-start>
<fo:region-end>
The following example defines the dimensions for <fo:region-body>, <fo:region-
before>, and <fo:region-after>:
<fo:simple-page-master master-name=”simple” page-height=”11in” page-width=”8.5in”>
<fo:region-body margin-top=”0.5in”/> <fo:region-before extent=”0.5in”/> <fo:region-after extent=”0.5in”/>
</fo:simple-page-master>
The extent attribute has a different meaning, depending on the region. For <fo:region-end> and <fo:region-start>, the extent attribute specifies the width. For <fo:region-before> and <fo:region-after>, it specifies the height.
Page Master Set: <fo:page-master-set>
A document can be composed of multiple pages, each with its own dimensions. The page master set refers to the collection of page masters.
In the following code example, a page master set is defined that contains one page set:
<fo:layout-master-set>
<fo:simple-page-master master-name=”simple” page-height=”11in” page-width=”8.5in” margin-top=”1in” margin-bottom=”1in” margin-left=”1.25in” margin-right=”1.25in”>
<fo:region-body margin-top=”0.5in”/> <fo:region-before extent=”3cm”/> <fo:region-after extent=”1.5cm”/>
</fo:simple-page-master> </fo:layout-master-set>
Let’s integrate the new elements into the basic document structure. Recall from earlier in this section that an XSL-FO document has the following structure:
<?xml version=”1.0” encoding=”utf-8”?>
<fo:root xmlns:fo=”http://www.w3.org/1999/XSL/Format”> <!-- layout master set -->
<!-- page masters: size and layout -->
<!-- page sequences and content --> </fo:root>
With the information provided thus far, we can fill in the blanks for the page master set. The following code example contains a page master set with a simple page master:
<?xml version=”1.0” encoding=”utf-8”?>
<fo:root xmlns:fo=”http://www.w3.org/1999/XSL/Format”> <!-- layout master set -->
<fo:layout-master-set>
<!-- page masters: size and layout --> <fo:simple-page-master master-name=”simple”
page-height=”11in” page-width=”8.5in” margin-top=”1in” margin-bottom=”1in” margin-left=”1.25in” margin-right=”1.25in”>
<fo:region-body margin-top=”0.5in”/> <fo:region-before extent=”3cm”/> <fo:region-after extent=”1.5cm”/>
</fo:simple-page-master>
</fo:layout-master-set>
<!-- page sequences and content --> </fo:root>
Now that we have the page layout defined, we can start adding content with page sequences.
Page Sequences: <fo:page-sequence>
A page sequence defines a series of printed pages. Each page sequence refers to a page master for its dimensions. The page sequence contains the actual content for the document.
The <fo:page-sequence> element contains <fo:static-content> and <fo:flow> ele-ments.
The <fo:static-content> element is used for page headers and footers. For example, we can define a header for the company name and page number, and this information will appear on every page.
The <fo:flow> element contains a collection of text blocks. The <fo:flow> element is similar to a collection of paragraphs. A body of text is defined using the <fo:block> ele-ment. The <fo:block> element is a child element of <fo:flow>. The <fo:block> ele-ment contains free-flowing text that will wrap to the next line in a document if it overflows.
In this example, we’ll use the <fo:flow> and <fo:block> elements to create a document for a fictional company, Ez Books Online. The desired output for the document as a PDF is shown in Figure 9.17.
The following code fragment defines a page sequence. This sequence uses the simple page master we defined earlier in this section. Also, the <fo:flow> element contains two <fo:block> elements. Here’s the code:
<fo:page-sequence master-name=”simple”>
<fo:flow flow-name=”xsl-region-body”>
<!-- this defines a level 1 heading with orange background --> <fo:block font-size=”18pt”
font-family=”sans-serif” line-height=”24pt” space-after.optimum=”15pt” background-color=”orange” color=”white” text-align=”center” padding-top=”3pt”>
Ez Books Online </fo:block>
<!-- Paragraph that contains info about the company --> <fo:block font-size=”12pt”
font-family=”sans-serif” line-height=”15pt” space-after.optimum=”14pt” text-align=”justify”>
Welcome to Ez Books Online, the world’s smallest online book store. Our company’s mission is to sell books on Java, Thrillers and Romance. We have something for everyone...so we think. Feel free to browse our catalog and if you find a book of interest then send us an e-mail. Thanks for visiting!
</fo:block>
</fo:flow> </fo:page-sequence>
The <fo:flow> element has to specify a region for its content. In this example, the content is placed in the main body region.
The first <fo:block> element defines a heading with an orange background. Notice how the content of each <fo:block> can be customized using font and line attributes.
The second <fo:block> element contains information about the company. The text for <fo:block> is free flowing. The text will automatically wrap. Ample space is provided at the end of the paragraph using the space-after.optimum attribute.
Now let’s integrate the new elements into the basic document structure. Recall from earlier that an XSL-FO document has the following structure:
<?xml version=”1.0” encoding=”utf-8”?>
<fo:root xmlns:fo=”http://www.w3.org/1999/XSL/Format”> <!-- layout master set -->
<!-- page masters: size and layout -->
<!-- page sequences and content --> </fo:root>
Listing 9.15 contains the additional code for the page sequence.
LISTING 9.15 <install_dir>\ch9_xsl\xsl_fo\simple.fo
<?xml version=”1.0” encoding=”utf-8”?>
<fo:root xmlns:fo=”http://www.w3.org/1999/XSL/Format”> <!-- layout master set -->
<fo:layout-master-set>
<!-- page masters: size and layout --> <fo:simple-page-master master-name=”simple”
page-height=”11in” page-width=”8.5in” margin-top=”1in” margin-bottom=”1in” margin-left=”1.25in” margin-right=”1.25in”>
<fo:region-body margin-top=”0.5in”/> <fo:region-before extent=”3cm”/> <fo:region-after extent=”1.5cm”/>
</fo:simple-page-master>
</fo:layout-master-set>
<!-- page sequences and content --> <fo:page-sequence master-name=”simple”>
<fo:flow flow-name=”xsl-region-body”>
<!-- this defines a level 1 heading with orange background --> <fo:block font-size=”18pt”
font-family=”sans-serif” line-height=”24pt” space-after.optimum=”15pt” background-color=”orange” color=”white” text-align=”center” padding-top=”3pt”>
Ez Books Online </fo:block>
<!-- Paragraph that contains info about the company --> <fo:block font-size=”12pt”
font-family=”sans-serif” line-height=”15pt” space-after.optimum=”14pt” text-align=”justify”>
Welcome to Ez Books Online, the world’s smallest online book store. Our company’s mission is to sell books on Java, Thrillers and Romance. We have something for everyone...so we think. Feel free to browse our catalog and if you find a book of interest then send us an e-mail. Thanks for visiting!
</fo:block>
</fo:flow> </fo:page-sequence>
</fo:root>
Generating a PDF Document
Now that we have the XSL-FO document simple.fo, let’s convert it to a PDF file. In this chapter, we are using the open-source Apache-FOP formatting engine. It is included in the source code download for this chapter. Apache-FOP requires the Java Development Kit from Sun Microsystems. The Adobe Acrobat Reader is required to view the PDF docu-ments. The Acrobat Reader is freely available at http://www.adobe.com.
Follow these steps to generate a PDF document from simple.fo:
Open an MS-DOS window.
Move to the directory <install_dir>\ch9_xsl\xsl_fo\.
Set up the Java classpath by typing setpaths.
Execute Apache-FOP by typing fop simple.fo simple.pdf.
The Apache-FOP formatter now reads the input file simple.fo and generates the output file simple.pdf.
View the simple.pdf file in Adobe Acrobat Reader. Your screen should resemble what’s shown in Figure 9.17.
Page Headers and Footers
The <fo:static-content> element defines content that should appear on every page. The <fo:static-content> element is commonly used to set up page headers and footers. The <fo:static-content> element is a component of <fo:page-sequence>.
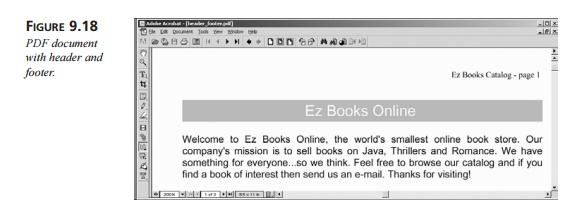
In this example, we’ll define a page header that contains the company name and current page number. We’ll also define a footer that lists the company’s Web site. This example is also composed of multiple pages to illustrate the fact that the header and footer are repeated on each page.
The header is defined using the following code fragment:
<!-- header -->
<fo:static-content flow-name=”xsl-region-before”> <fo:block text-align=”end”
font-size=”10pt” font-family=”serif” line-height=”14pt” >
Ez Books Catalog - page <fo:page-number/> </fo:block>
</fo:static-content>
The content for the header is placed in xsl-region-before, which is the top of the page in this example. The <fo:block> element uses the text-align attribute to place the text at the end of the region. This example uses the English language, so the text is right jus-tified. The current page number is determined using the <fo:page-number> element.
The footer is defined using the following code fragment:
<!-- footer -->
<fo:static-content flow-name=”xsl-region-after”> <fo:block text-align=”center”
font-size=”10pt” font-family=”serif” line-height=”14pt” >
Visit our website http://www.ezbooks.web </fo:block>
</fo:static-content>
The footer content is placed at the bottom of the page in xsl-region-after. A message containing the company’s Web site is listed in the footer.
New pages are generated using <fo:block break-before=”page”>. The following code fragment generates a page break before the content is rendered. The static content, header, and footer will also appear on the new page. Here’s the code:
<!-- insert page break for second page --> <fo:block break-before=”page”>
A page break is inserted before this block. Notice we have the headers and footers
in place. This was accomplished with the fo-static-content elements. We can continue on...business as usual.
</fo:block>
Now that we’ve discussed the smaller pieces of this example, let’s pull it all together. Listing 9.16 contains the complete code for header_footer.fo.
LISTING 9.16 <install_dir>\ch9_xsl\xsl_fo\header_footer.fo
<?xml version=”1.0” encoding=”utf-8”?>
<fo:root xmlns:fo=”http://www.w3.org/1999/XSL/Format”>
<fo:layout-master-set>
<!-- layout information --> <fo:simple-page-master master-name=”simple”
page-height=”11in” page-width=”8.5in” margin-top=”1in” margin-bottom=”1in” margin-left=”1.25in” margin-right=”1.25in”>
<fo:region-body margin-top=”0.5in”/> <fo:region-before extent=”0.5in”/> <fo:region-after extent=”0.5in”/>
</fo:simple-page-master> </fo:layout-master-set>
<fo:page-sequence master-name=”simple”>
<!-- header -->
<fo:static-content flow-name=”xsl-region-before”> <fo:block text-align=”end”
font-size=”10pt” font-family=”serif” line-height=”14pt” >
Ez Books Catalog - page <fo:page-number/> </fo:block>
</fo:static-content>
<!-- footer -->
<fo:static-content flow-name=”xsl-region-after”>
<fo:block text-align=”center” font-size=”10pt” font-family=”serif” line-height=”14pt” >
Visit our website http://www.ezbooks.web </fo:block>
</fo:static-content>
<!-- body -->
<fo:flow flow-name=”xsl-region-body”>
<!-- this defines a level 1 heading with orange background --> <fo:block font-size=”18pt”
font-family=”sans-serif” line-height=”24pt” space-after.optimum=”15pt” background-color=”orange” color=”white” text-align=”center” padding-top=”3pt”>
Ez Books Online </fo:block>
<!-- Paragraph that contains info about the company --> <fo:block font-size=”12pt”
font-family=”sans-serif” line-height=”15pt” space-after.optimum=”14pt” text-align=”justify”>
Welcome to Ez Books Online, the world’s smallest online book store. Our company’s mission is to sell books on Java, Thrillers and Romance. We have something for everyone...so we think. Feel free to browse our catalog and if you find a book of interest then send us an e-mail. Thanks for visiting!
</fo:block>
<!-- insert page break for second page --> <fo:block break-before=”page”>
A page break is inserted before this block. Notice we have the headers and footers in place.
This was accomplished with the fo-static-content elements. We can continue on...business as usual.
</fo:block>
<!-- insert page break for third page --> <fo:block break-before=”page”>
Information on our third page. Again...notice the page number is incrementing for us...automagically. Wouldn’t it be great to generate this XSL-FO page dynamically? Hold
tight, dynamic demos are coming up! </fo:block>
</fo:flow>
</fo:page-sequence> </fo:root>
Notice that <fo:static-content> is a component of <fo:page-sequence>. Also,
<fo:static-content> has to be listed before any <fo:flow> elements. If not, the for-matting engine will generate a parsing error.
You can generate the PDF document from header_footer.fo using the steps from the previous section. Once you’ve set up the Java classpath, perform the conversion by typ-ing the following:
fop header_footer.fo header_footer.pdf
The PDF document should resemble what’s shown in Figure 9.18. Navigate to the differ-ent pages in the document to verify the existence of the header and footer.
Graphics
XSL-FO also allows for the insertion of external graphic images. The graphic formats supported are dependent on the XSL-FO formatting engine. The Apache-FOP formatting engine supports the popular graphics formats: GIF, JPEG, and BMP.
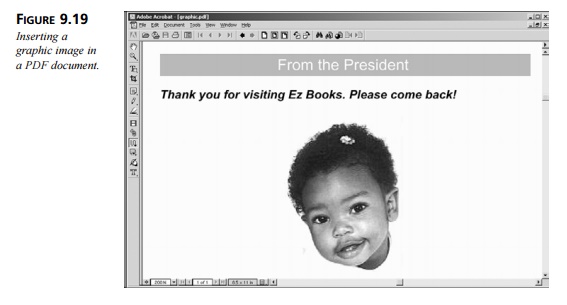
The following code fragment inserts the image smiley.jpg:
<fo:block text-align=”center”>
<fo:external-graphic src=”smiley.jpg” width=”200px” height=”200px”/> </fo:block>
We can incorporate this image in a letter from the company president. Converting the file
<install_dir>\ch9_xsl\xsl_fo\graphic.fo to a PDF generates what’s shown in figure
Tables
XSL-FO has rich support for structuring tabular data. In fact, there are many similarities between HTML tables and XSL-FO tables. Table 9.4 lists the HTML table elements with their corresponding XSL-FO table elements.
TABLE 9.4 Comparing HTML Table Elements and XSL-FO Table Elements
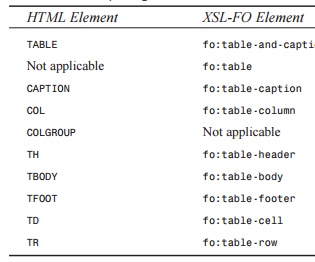
HTML Element : XSL-FO Element
TABLE fo:table-and-caption
Not applicable fo:table
CAPTION fo:table-caption
COL fo:table-column
COLGROUP Not applicable
TH fo:table-header
TBODY fo:table-body
TFOOT fo:table-footer
TD fo:table-cell
TR fo:table-row
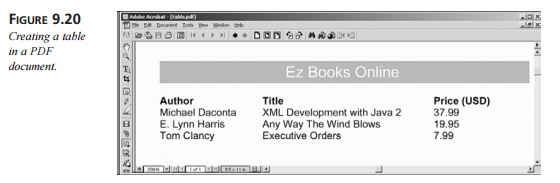
In this example, we’ll create a table for our books. The desired output for the table is shown in Figure 9.20.
The following code fragment defines the basic structure of the table:
<fo:table>
<!-- define column widths --> <fo:table-column column-width=”120pt”/>
<fo:table-column column-width=”200pt”/>
<fo:table-column column-width=”80pt”/>
<fo:table-header> <fo:table-row>
<fo:table-cell>
<fo:block font-weight=”bold”>Author</fo:block> </fo:table-cell>
<fo:table-cell>
<fo:block font-weight=”bold”>Title</fo:block> </fo:table-cell>
<fo:table-cell>
<fo:block font-weight=”bold”>Price (USD)</fo:block> </fo:table-cell>
</fo:table-row> </fo:table-header>
<!-- insert table body and rows here -->
</fo:table>
The column widths are specified using the <fo:table-column> element. Next, the table headers are defined. In HTML, the table headers are automatically formatted using a bold font. However, this is not the case in XSL-FO. If a bold font is desired for the table heading, it must be set explicitly using the font-weight attribute.
The following code fragment inserts the table body and rows:
<fo:table-body> <fo:table-row>
<fo:table-cell>
<fo:block>Michael Daconta</fo:block> </fo:table-cell>
<fo:table-cell>
<fo:block>XML Development with Java 2</fo:block> </fo:table-cell>
<fo:table-cell>
<fo:block>37.99</fo:block> </fo:table-cell>
</fo:table-row> <fo:table-row>
<fo:table-cell>
<fo:block>E. Lynn Harris</fo:block> </fo:table-cell>
<fo:table-cell>
<fo:block>Any Way The Wind Blows</fo:block> </fo:table-cell>
<fo:table-cell>
<fo:block>19.95</fo:block> </fo:table-cell>
</fo:table-row> <fo:table-row>
<fo:table-cell>
<fo:block>Tom Clancy</fo:block> </fo:table-cell>
<fo:table-cell>
<fo:block>Executive Orders</fo:block> </fo:table-cell>
<fo:table-cell>
<fo:block>7.99</fo:block> </fo:table-cell>
</fo:table-row> </fo:table-body>
As you can see, the table body is very similar to HTML. Simply replace the HTML table elements with the appropriate XSL-FO elements. However, note that the table cell data must be wrapped in an <fo:block> element.
Let’s pull it all together. Listing 9.17 contains the complete code for table.fo.
LISTING 9.17 <install_dir>\ch9_xsl\xsl_fo\table.fo
<?xml version=”1.0” encoding=”utf-8”?>
<fo:root xmlns:fo=”http://www.w3.org/1999/XSL/Format”>
<fo:layout-master-set>
<!-- layout information -->
<fo:simple-page-master master-name=”simple” page-height=”11in” page-width=”8.5in” margin-top=”1in” margin-bottom=”1in” margin-left=”1.25in” margin-right=”1.25in”>
<fo:region-body margin-top=”0.5in”/> <fo:region-before extent=”3cm”/> <fo:region-after extent=”1.5cm”/>
</fo:simple-page-master> </fo:layout-master-set>
<fo:page-sequence master-name=”simple”>
<fo:flow flow-name=”xsl-region-body”>
<!-- this defines a level 1 heading with orange background --> <fo:block font-size=”18pt”
font-family=”sans-serif” line-height=”24pt” space-after.optimum=”15pt” background-color=”orange” color=”white” text-align=”center” padding-top=”3pt”>
Ez Books Online </fo:block>
<!-- table start --> <fo:table>
<!-- define column widths --> <fo:table-column column-width=”120pt”/> <fo:table-column column-width=”200pt”/> <fo:table-column column-width=”80pt”/>
<fo:table-header> <fo:table-row>
<fo:table-cell>
<fo:block font-weight=”bold”>Author</fo:block> </fo:table-cell>
<fo:table-cell>
<fo:block font-weight=”bold”>Title</fo:block> </fo:table-cell>
<fo:table-cell>
<fo:block font-weight=”bold”>Price
(USD)</fo:block>
</fo:table-cell>
</fo:table-row> </fo:table-header>
<fo:table-body> <fo:table-row>
<fo:table-cell>
<fo:block>Michael Daconta</fo:block> </fo:table-cell>
<fo:table-cell>
<fo:block>XML Development with Java 2</fo:block> </fo:table-cell>
<fo:table-cell>
<fo:block>37.99</fo:block> </fo:table-cell>
</fo:table-row> <fo:table-row>
<fo:table-cell>
<fo:block>E. Lynn Harris</fo:block> </fo:table-cell>
<fo:table-cell>
<fo:block>Any Way The Wind Blows</fo:block> </fo:table-cell>
<fo:table-cell>
<fo:block>19.95</fo:block> </fo:table-cell>
</fo:table-row> <fo:table-row>
<fo:table-cell>
<fo:block>Tom Clancy</fo:block> </fo:table-cell>
<fo:table-cell>
<fo:block>Executive Orders</fo:block> </fo:table-cell>
<fo:table-cell>
<fo:block>7.99</fo:block> </fo:table-cell>
</fo:table-row> </fo:table-body> </fo:table>
<!-- table end -->
</fo:flow> </fo:page-sequence>
</fo:root>
Converting the file <install_dir>\ch9_xsl\xsl_fo\table.fo to a PDF generates what’s shown in Figure 9.20.
Generating XSL-FO Tables Using XSLT
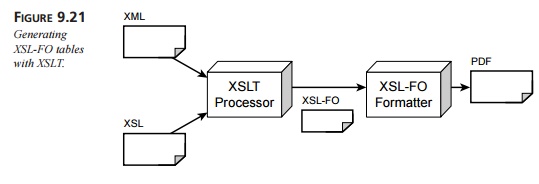
The previous example only listed three books. Imagine the size of the document if we wanted to list 500 books. The document would be extremely large and verbose. In this section, we’ll use XSLT to automatically generate the XSL-FO document.
The file, booklist.xml, contains a list of the books. We can develop an XSL style sheet that will automatically construct the XSL-FO document. This process is illustrated in Figure 9.21.
After reviewing the XSL-FO document for the book table, you can see that the dynamic portion is the construction of each table row. We can use the element <xsl:for-each> to loop over each book and build the table row. This is accomplished with the following code:
<!-- Perform loop for each book in the book list --> <xsl:for-each select=”booklist/book” >
<fo:table-row> <fo:table-cell>[sr]
<fo:block><xsl:value-of select=”author” /></fo:block> </fo:table-cell>
<fo:table-cell>
<fo:block><xsl:value-of select=”title” /></fo:block> </fo:table-cell>
<fo:table-cell>
<fo:block><xsl:value-of select=”price” /></fo:block> </fo:table-cell>
</fo:table-row>
</xsl:for-each>
As you can see, this example is very similar to constructing an HTML table with XSLT. Instead of using the HTML table elements, we’re using the appropriate XSL-FO table elements. Also, this example uses table borders via the values specified for the border-style and border-width attributes. By leveraging XSLT and XSL-FO, we can dynamically generate a PDF file based on an XML document.
Listing 9.18 contains the complete code for this example.
LISTING 9.18 <install_dir>\ch9_xsl\xsl_fo\dynamic\table\booklist_table.xsl
<?xml version=”1.0”?>
<xsl:stylesheet xmlns:xsl=”http://www.w3.org/1999/XSL/Transform” xmlns:fo=”http://www.w3.org/1999/XSL/Format” version=”1.0”>
<xsl:template match=”/”>
<fo:root xmlns:fo=”http://www.w3.org/1999/XSL/Format”>
<fo:layout-master-set>
<!-- layout information --> <fo:simple-page-master master-name=”simple”
page-height=”11in” page-width=”8.5in” margin-top=”1in” margin-bottom=”2in” margin-left=”1.25in” margin-right=”1.25in”>
<fo:region-body margin-top=”0.5in”/> <fo:region-before extent=”3cm”/> <fo:region-after extent=”1.5cm”/>
</fo:simple-page-master> </fo:layout-master-set>
<!-- end: defines page layout -->
<fo:page-sequence master-name=”simple”>
<fo:flow flow-name=”xsl-region-body”>
<!-- this defines a level 1 heading with orange background --> <fo:block font-size=”18pt”
font-family=”sans-serif” line-height=”24pt” space-after.optimum=”15pt” background-color=”orange” color=”white” text-align=”center” padding-top=”3pt”>
Ez Books Online </fo:block>
<!-- table start -->
<fo:table border-style=”solid” border-width=”.1mm” > <!-- define column widths -->
<fo:table-column column-width=”120pt”/> <fo:table-column column-width=”200pt”/> <fo:table-column column-width=”80pt”/>
<fo:table-header> <fo:table-row >
<fo:table-cell border-style=”solid” border-width=”.1mm”> <fo:block font-weight=”bold”>Author</fo:block>
</fo:table-cell>
<fo:table-cell border-style=”solid” border-width=”.1mm”> <fo:block font-weight=”bold”>Title</fo:block>
</fo:table-cell>
<fo:table-cell border-style=”solid” border-width=”.1mm”> <fo:block font-weight=”bold”>Price (USD)</fo:block>
</fo:table-cell> </fo:table-row>
</fo:table-header>
<fo:table-body>
<!-- Perform loop for each book in the book list --> <xsl:for-each select=”booklist/book” >
<fo:table-row>
<fo:table-cell border-style=”solid” border-width=”.1mm”> <fo:block><xsl:value-of select=”author” /></fo:block>
</fo:table-cell>
<fo:table-cell border-style=”solid” border-width=”.1mm”> <fo:block><xsl:value-of select=”title” /></fo:block>
</fo:table-cell>
<fo:table-cell border-style=”solid” border-width=”.1mm”> <fo:block><xsl:value-of select=”price” /></fo:block>
</fo:table-cell> </fo:table-row>
</xsl:for-each> </fo:table-body>
</fo:table>
<!-- table end -->
</fo:flow> </fo:page-sequence>
</fo:root>
</xsl:template>
</xsl:stylesheet>
Generating a PDF Document
This example involves a two-step process. The first step involves XSLT processing the booklist.xml document with booklist_table.xsl. The second step involves converting the output of the XSLT conversion to a PDF file using XSL-FO.
The Apache-FOP product can perform both of these steps internally. All we have to do is provide the XML document and XSL style sheet.
Follow these steps to generate the PDF document:
Open an MS-DOS window.
Move to the directory <install_dir>\ch9_xsl\xsl_fo\dynamic\table.
Set up the Java classpath by typing setpaths.
Execute Apache-FOP by typing the following:
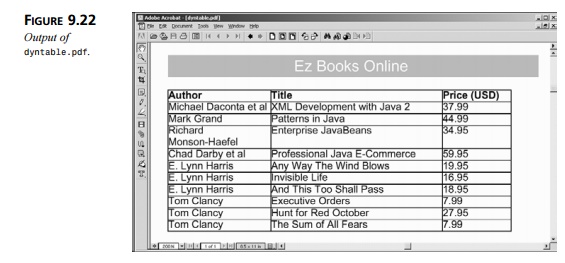
fop -xml booklist.xml -xsl booklist_table.xsl dyntable.pdf
View the dyntable.pdf file in Adobe Acrobat Reader. Figure 9.22 shows what your screen should look like.
Related Topics