Chapter: Operating Systems : I/O System
Setting Up a Linux Multifunction Server
SETTING UP A LINUX MULTIFUNCTION
SERVER
Follow the steps below to avoid any complications during the
hardware installation:
1. Confirm
that the printer you will use to connect to the DPR-1020 is operating
correctly.
2. When you
have confirmed that the printer is operating correctly, switch its power OFF.
3. Confirm
that your network is operating normally.
4. Using a CAT
5 Ethernet cable, connect the DPR-1020 Ethernet Port (labelled LAN) to the
network.
5. While the
printer is turned OFF, connect the USB printer cable to the printer and then to
the USB port on the Print Server.
6. Switch on
the printer.
7. Insert
the power adapter’s output plug into the DC 5V power
socket on the rear panel of the Print Server.
8. Connect
the other end of the power adapter into a power outlet. This will supply power
to the Print Server. The blue LED on the Print Server’s front
panel should turn on and the Print Server’s
self-test will proceed.
Power ON Self-Test
ü
When the DPR-1020 is powered ON, it automatically
performs a Self-Test on each of its major components. The final result of the
Self-Test is signaled by the state of the USB LED indicator following the
Self-Test. Preliminary to the actual component tests, the three LED indicators
are tested to confirm their operation.
ü
Immediately after power-up, all three of the blue
LEDs should illuminate steadily for several seconds. Then the USB LED should
light OFF simultaneously. Irregularity of any of the three LEDs during these
LED tests may mean there is a problem with the LEDs themselves.
ü
The actual component tests immediately follow the
LED tests. A normal (no fault) result is signaled by simultaneous flashing of
the LEDs three times, followed by a quiescent state with all three LEDs dark.
ü
If the Self-Test routine traps any component
error, then following the LED tests the Self-Test will halt and the LEDs will
continuously signal the error according to the following table. In the event of
any such error signal, contact your dealer for correction of the faulty unit.
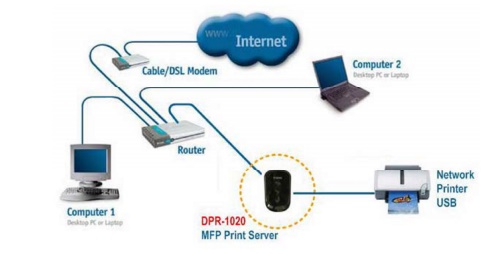
Getting Started
Below is a sample network using
the DPR-1020. The DPR-1020 has a built- in web configurator that allows users
to easily configure the Print Server and manage multiple print queues through
TCP/IP.
Auto-Run Installation
Insert the included installation
CD into your computer’s CD-ROM drive to initiate the
auto-run program. If auto-run does not start, click My Computer > [CD ROM
Drive Letter].
The
content of the installation CD-ROM includes:
• Install PS Software
– click
this to install the PS Software, which contains PS-Link and
PS-Wizard
that can configure more settings for the MFP Server, such as:
o
Change the IP address
p
Support the multi-functions (Print/Scan/Copy/Fax)
of a MFP printer, GDI printing, and other software from any MFP/GDI printer.
`- Easily
add a printer to your computer.
ü
View Quick Installation Guide – click
this to preview the Quick Installation Guide in PDF format for step-by-step
instructions of the MFP Server Installation.
ü
View Manual – click
this to preview the User Manual in PDF format for detailed information
regarding the MFP Server.
ü
Install Acrobat Reader – click
this to install Acrobat Reader for the viewing and printing of PDF files found
in this Installation CD-ROM.
ü
Exit – click to
close the Auto-Run program.
Related Topics