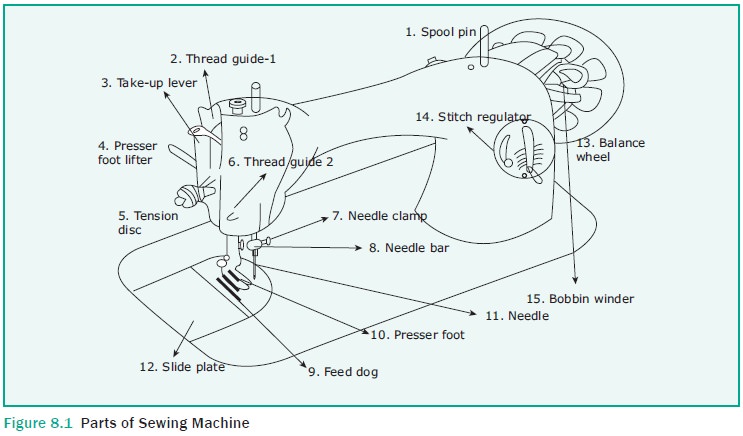
Chapter: 11th Textiles and Dress Designing : Chapter 8 : Sewing Machine
Operating the Sewing Machine
OPERATING THE SEWING MACHINE
All sewing machines have a booklet (manual) which
explains the parts of the machine and method of operating the machine. It is
important to carefully read and understand it before actually using the sewing
machine.
The points to remember, while stitching in a
basic sewing machine
·
First sit in a comfortable position on a suitable
stool or chair in front of a machine.
·
Learn to move your foot carefully at steady
speed.
·
Move the fly wheel and simultaneously move the
legs. Pedal slowly and contin-uously to get hand and leg coordination.
·
In case of electrical sewing machine move the foot
or hand to press the electric motor.
·
Practice stitching along straight and curved
lines without threading.
·
Select thread and needles based upon the fabric.
For thin and delicate fabrics, fine threads and smaller size needles are
selected whereas for thicker fabric, thick and larger size needles are best.
·
Bobbin winding is an important con-cept in sewing
which has to be done with great care. Bobbin is placed on bobbin holder near
the fly wheel. Thread is gently pulled from the thread and rolled upon the spool
pin and passed through the thread guide. Thread is later wound on the bobbin by
rotating the fly wheel.
·
When the needle in the machine becomes blunt, it
needs to be changed. For chang-ing the needle, the take up lever has to be
raised to its highest point and the needle clamp screw has to be loosened. This
will remove the old needle. The new needle has to be fixed. The machine nee-dle
has a flat side with short groove and a round side with long groove. The round
side should face the side from which the machine is to be threaded.
·
An easy method for recognizing ten-sions between
the upper and the lower thread is to stitch diagonally across a square fabric
folded on true bias and then stretch the cloth firmly between the fingers until
one or both threads break. The broken thread is always with tighter tension. If
the ten-sions are balanced both the threads break together and need more force
to break.
·
Adjustments are made on the upper thread by
turning the screw on the tension regulator with the presser foot down. For
adjustments in the lower thread, the tension is regulated by turning the screw
carefully on the bob-bin case using the screw driver.
·
For bottom threading, insert the bobbin into the
bobbin case. The thread from the bobbin has to go be pulled through the
slanting slot and a spring in the bobbin case. There should be a slight but
noticeable tension and the bobbin should stay firm in its place. Extra thread
about 5–7 cm long has to be left extend-ing from the bobbin case. The slide
plate should then be closed.
·
For top threading the take-up lever has to be
raised to its highest point and the thread is passed through thread guide to
tension mechanism. The thread should then pass through the hole in the take-up
lever from the side near-est to the tension disc. The remaining guide is then
inserted into the needle from the side on which the last guide appears.
·
For sewing, first the take-up lever has to be
taken to its highest point by raising the presser foot and turning the fly
wheel. The cloth is then placed under the presser foot with seam allowance to
the right of the needle and the remaining cloth on the left. Now the wheel is
turned until the needle enters the cloth at the exact starting point, and then
the presser foot is lowered. The cloth can then be stitched by slowly starting
the machine and guid-ing the cloth gently with both hands.
Related Topics