Textiles and Dress Designing - Methods of Printing | 12th Textiles and Dress Designing : Chapter 3 : Printing
Chapter: 12th Textiles and Dress Designing : Chapter 3 : Printing
Methods of Printing
Methods of Printing
1. Block Printing
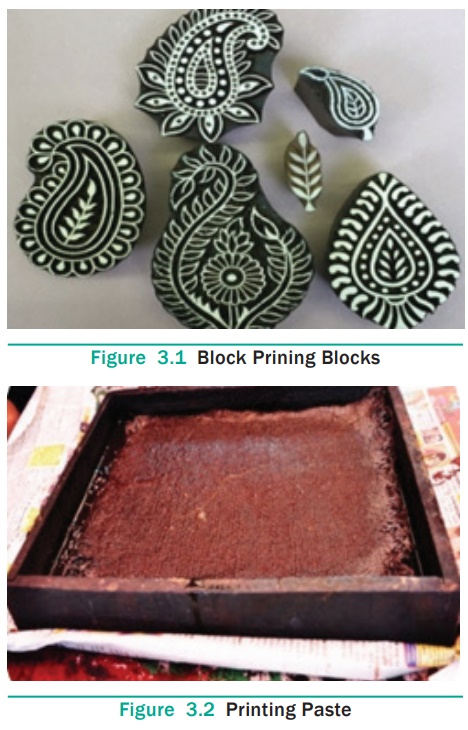
Block printing is the ancient method of printing designs on the
textile material by hand. It is the simplest of the printing methods. In this
method, the desired design is carved on a wooden or metal block. The fabric is
pinned on a table which is firm, strong and withstands the pressure of
printing. The top is made of metal with a resilient surface made of artificial
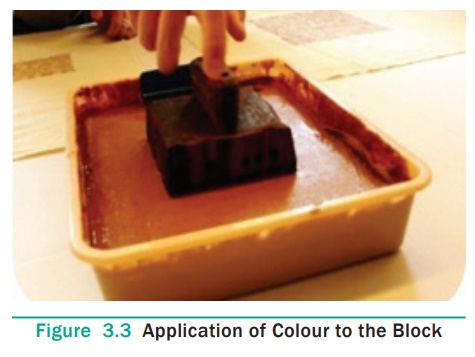
leather. The wooden block is stamped in the print paste or applied on the
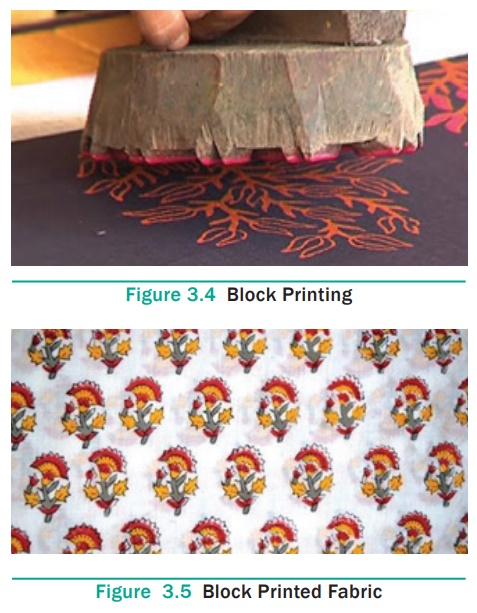
surface of the block. The block is stamped firmly on the selected part of the
fabric. This process is repeated to print the required length of fabric.
Multicoloured designs require separate blocks for each colour. Block printing
is done mainly in decorative pieces or in expensive linens for upholstery
purposes.
Advantages
·
Simplest method of printing
·
Handmade art
·
No special printing equipment required
Disadvantages
·
Tedious and time consuming process
·
Expensive
·
Irregular colour shade
·
Overall production is low
·
Carving of blocks is difficult and laborious.
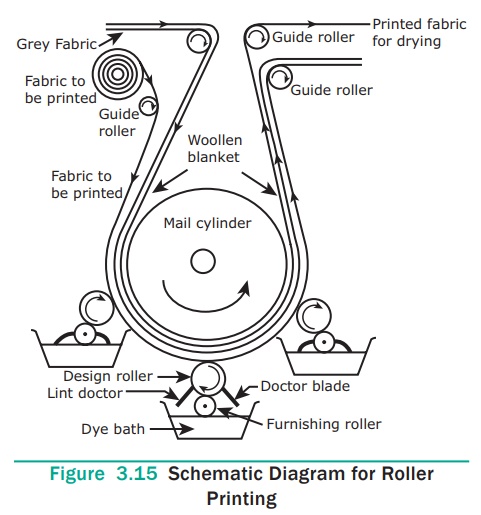
2. Roller Printing
It is a machine printing method, in which designs are printed on
textile fabric by engraved rollers. This method of printing produces over 4000
yards of printed fabric per hour. The cylinder is made up of cast iron which
acts as a printing table. The cylinder is covered with many layers of special
fabric which has linen in warp and wool in weft for providing resiliency. It is
covered with a layer of woollen blanket which provides the perfect surface for
printing. The woollen blanket is covered with unbleached cotton cloth which
will absorb excess dye. The last layer is the fabric which is to be printed.
The design is transferred onto the cloth by engraved copper
rollers. The design roller is arranged in such a way that the paste is applied
on the roller and then transferred to the cloth. Number of engraved rollers
rotate in contact with larger cylinder in rotation. The cloth is printed at the
rate of 1000 to 4000 yards per hour. There are series of rollers each
imprinting a different colour on the fabric. The sizes of the engraved
cylinders depend on the pattern to be printed. There are different ways of
engraving the roller such as hand engraving, machine or mill engraving and
photographic engraving. The design roller rotates against the cloth and the
design is imprinted. The fabric moves on to the second roller where the second
colour is printed. The doctor blade placed in contact with design roller
scrapes the excess dye from the surface of the design roller. The printed cloth
is dried and then steamed to set the dye.

Advantages
·
Superior to other methods for the production of fine and precise
designs
·
Production is faster and accurate
·
All colours required to print can be achieved in one process
itself
·
Versatile in colours, pattern and scale
Disadvantages
·
Required skilled labour
·
Laborious process
·
Production cost is more for printing in small quantities
·
Creation of engraved rollers is expensive
·
Time consuming process
·
If rollers are not aligned properly, it results in one or more
colours falling out of position
3. Stencil Printing
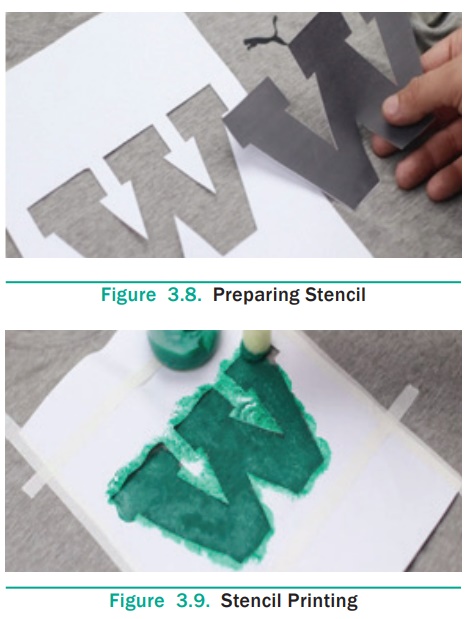
In stencil printing, the design is first traced on the cardboard,
wood, metal or plastic sheets with marker pens or pencils. Using scissors,
knife or sharp blade the design is cut out. The uncut portion represents the
part that is to be left uncoloured. When cutting the stencil care must be taken
that small patterns must be cut through first. If large patterns are cut over
or keeping small pattern inside then the smaller designs would be cut away with
it. The stencil is placed on the fabric to be printed and the printing paste is
applied with stencil brush through its interstices. When printing is repeated,
care must be taken that the stencil on face side does not take up dye. Other
colours can be applied on the design when the first colour dries. This method
is suitable for both fine delicate design and large space design.

Advantages
·
Low budget investment
·
Exclusive designs and intricacy
Disadvantage
·
Unevenness on printing table leads to uneven printing
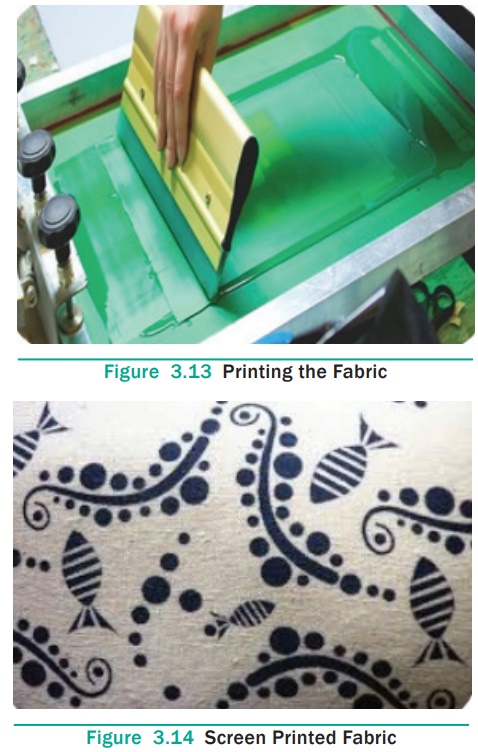
4. Screen Printing
In this printing method, fabric is spread on large table and
design screen is placed on the fabric. The screen consists of wooden frame
covered with nylon or silk cloth and the technique is called as silk screen
printing. Lacquer is applied on the screen to make the areas except design opaque
so that printing paste is transferred through the design only. Based on the
number of colours, many numbers of screens are prepared to complete the design.
The printed portion should be allowed to dry before placing the second screen.
When screens are placed properly, they will produce a complete design.
Advantages
·
Whole width of fabric is printed at once and so the process is
faster than block printing
·
Screens can be preserved for future use
Disadvantages
·
Preparation of screen is a time consuming process
·
Preservation of screen needs extra care
·
A small damage in the screen will spoil the entire printing
The design is created by painting or making non-design portions of
the screen opaque, thus preventing the print paste from passing through. The
areas where the print paste passes through will create a printed pattern. The
screen is placed in contact with the fabric to be printed and the print paste
is forced through the screen by a squeegee. The squeegee is used to spread the
dye evenly through the screen. It is moved across the screen, forcing the print
paste through the mesh openings. It helps in making a clean image on the
printed surface. A screen is prepared for each colour of the design. There are
two types of screen printing namely Flat screen printing and Rotary screen
printing.
Flat Screen Printing or Hand Screen Printing
It is done by hand. The design is copied onto a series of very
fine, flat screens, one for each colour to be printed. Lacquer or other
impermeable substance is applied to all parts of the screen that are not part
of its design. Each screen is fitted onto a wooden or metal frame. The fabric
to be printed is spread onto a long table. A screen is set over the fabric and
the printing paste is poured on the screen and forced through its unblocked
areas onto the fabric with a squeegee. The screen is then moved to the next
section of the fabric and the operation is repeated until the entire fabric is
printed. This process is repeated for each colour of the design. Hand screen
printing is time-consuming and limited to short length of fabrics.
Automatic Flat Screen Printing
In this method, the process is automated and therefore faster.
Here the fabric moves on a wide rubberized belt. The screens are placed above
the belt. As the fabric moves, the screens are automatically lowered to the
cloth and the appropriate colour is applied with automatically regulated
squeegees. The cloth is dried in an oven.
Advantages
·
Prints upto twenty colours in one run
·
High production rate
·
Produce brighter and cleaner shades
·
Produces designs consisting of squares, circles and ovals
Disadvantage
·
High cost
Rotary Screen Printing
This method of printing is done using machine. The fabric to be
printed is moved on a wide rubber belt under the rotary screen cylinders. It is
the fastest method of screen printing, with a production of more than 3500
yards per hour. A squeegee in each rotary screen forces the paste through the
screen onto the fabric. The cloth is then passed into a drying oven to set the
colour and washed.
Advantages
·
Faster method of printing
·
Rotary metal screens are light weight in contrast to the heavy
copper rollers and hence they cost less.
·
Operates continuously
·
Production output is higher
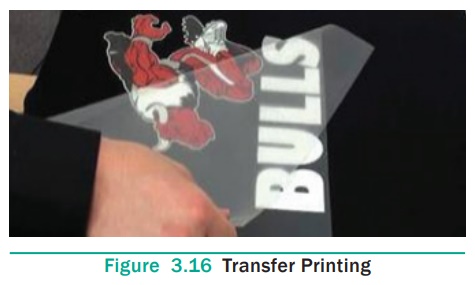
5. Transfer Printing
Transfer printing means shifting of a design from one surface to
another. In this method, designs made of pigments in paraffin or thermoplastic
base can be transferred by heat and pressure to the fabric surface. The fabrics
printed by this method become stiff and they are not fast to washing and light.
A more effective and easier method of transferring the design intact from paper
to fabric is by vaporizing the pigments in the design. Vaporizing can be done by
dry heat transfer and wet heat transfer.
Disperse dyes are the only dyes which can be sublimated and used
for heat transfer printing. Hence transfer printing is suitable for fabrics
which have affinity to disperse dyes. Polyester, nylon and acrylics can be
printed by this method. The fabric to be printed is passed through a heat
transfer printing machine which brings paper and fabric together and passes
them through the machine at about 204°C. Under high temperature, the dye on the
printed paper sublimates and is transferred onto the fabric.
Advantages
·
Production cost is low because there is no requirement of post
printing treatments
·
There is no wastage of pigment as the design made on paper is
transferred to fabric
·
Prints with excellent line details, intricacy and shading can be
done
·
Design can be made with many colours
·
Rich and brilliant shades can be generated on woven and knitted
fabrics
·
Process is simple and does not require skilled labour
·
High quality prints
·
Less time
·
Environment friendly process
·
Economical for short runs
Disadvantages
·
Selection of dyes is limited
·
Poor colourfastness
·
Not suitable for all types of fabrics
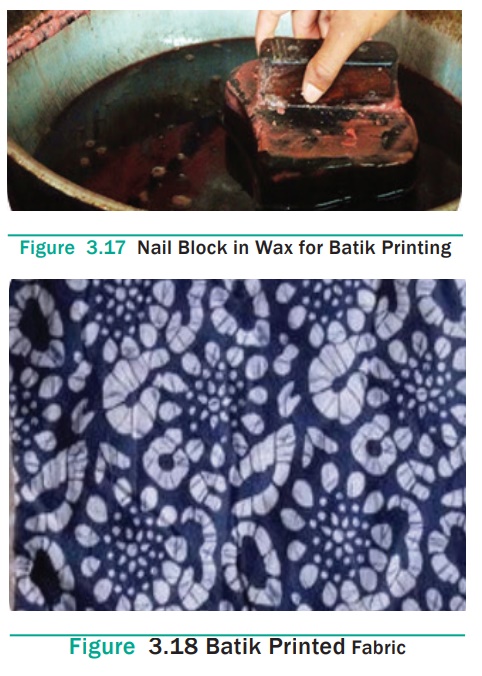
6. Batik Printing
Batik printing is a hand printing method. This is a resist style
of printing. In this method, designs are made using wax and the fabric is
immersed in the dye bath to colour the unwaxed portions. The wax is applied
using various tools such as brushes, tjap and tjanting.
Tjanting is a spouted tool used to draw designs on the fabric with
melted wax. Tjap is a pattern made of fine copper strips. The tjap is pressed
on liquid wax and applied to the fabric. Wax is applied on both sides of the
fabrics. After application of wax, the fabric is dyed to obtain desired colour.
Only the portions not covered by the wax will absorb the dye. After the dye has
been fixed, the fabric is dried, then boiled and rinsed to remove the wax. It
is a slow process.
Advantage
·
Gives an artistic effect to the fabric
Disadvantages
·
Very laborious and time consuming process
·
Dye has to be applied at a temperature lower than the melting
point of wax
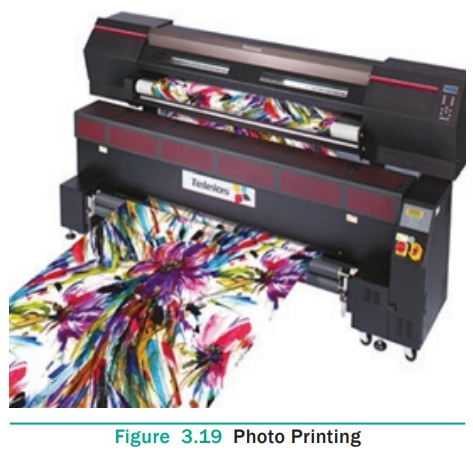
7. Photo Printing
In this method, the fabric is coated with a chemical that is
sensitive to light and photographs are printed on the fabric. The results are
similar to the photograph printed on the paper. This is a direct style of
printing.
Related Topics