Measuring Instruments - Vernier caliper and Screw Gauge | 9th Science : Measurement and Measuring Instruments
Chapter: 9th Science : Measurement and Measuring Instruments
Vernier caliper and Screw Gauge
Vernier
caliper and Screw Gauge
In our daily life, we use metre scale for measuring
lengths. They are calibrated in cm and mm scales. The smallest length which can
be measured by metre scale is called least count. Usually the least count of a
scale is 1 We can measure the length of objects up to mm accuracy using this
scale. But this scale is not sufficient for measuring the size of small
spherical objects. So, Vernier caliper and screw gauge are used.
1. Vernier scale
The diameters of spherical objects such as cricket
ball and hollow objects such as a pen cap cannot be measured with a meter
scale. For that we use an instrument named Vernier caliper which can measure
the inner and outer diameters of objects.
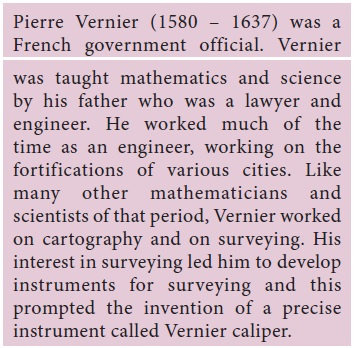
2. Description of Vernier caliper
The Vernier caliper consists of a thin long steel
bar graduated in cm and mm. This is the main scale. To the left end of the
steel bar an upper and a lower
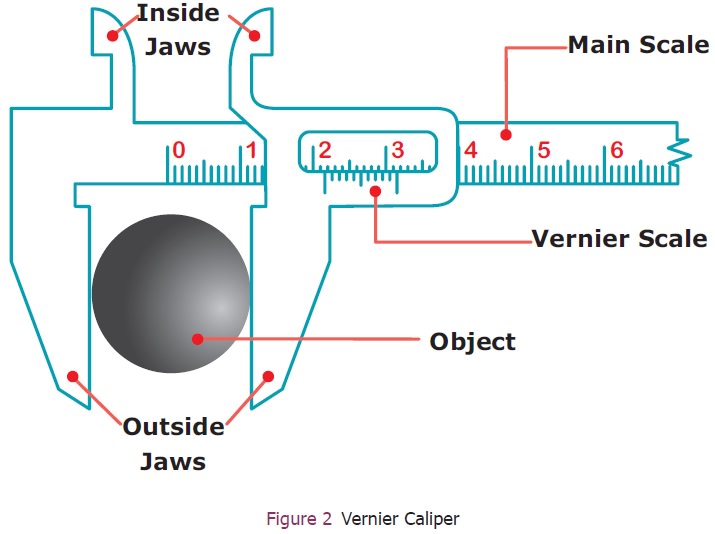
These are
named as fixed jaws. To the right of the fixed jaws, a slider with an upper and
a lower moveable jaw is fixed. The slider can be moved or fixed to any position
using a screw. The Vernier scale is marked on the slider and moves along with
the movable jaws and the slider. The lower jaws are used to measure the
external dimensions and the upper jaws are used to measure the internal
dimensions of objects. The thin bar attached to the right side of the Vernier
scale is used to measure the depth of hollow objects.
3. Usage of Vernier caliper
The first step in using the Vernier caliper is to
find out its least count, range and zero error.
Least count

The main scale division can easily be obtained by
inspecting the main scale. It will be in centimeter, further divided into
millimetre. The value of the smallest main scale division is 1 mm. The Vernier
scale division is obtained by counting number of division in it. In the Vernier
scale there will be 10 divisions.

Zero error
Unscrew the slider and move it to the left, such
that both the jaws touch each other. Check whether the zero marking of the main
scale coincides with that of the Vernier scale. If they are not coinciding with
each other, the instrument is said to posses zero error. Zero error may be
positive or negative. If the zero mark of the Vernier is shifted to the right,
it is called positive error. On the other hand, if the Vernier zero is shifted
to the left of the main scale zero marking, then the error is negative.
Positive zero error
Figure 3(a) shows the positive zero error. From the
figure you can see that zero of the vernier scale is shifted to the right of
zero of the main scale. In this case the reading will be more than the actual
reading. Hence, this error should be corrected. In order to correct this error,
find out which vernier division is coinciding with any of the main scale
divisions. Here, fifth vernier division is coinciding with a main scale
division. So, positive zero error = +5 x LC = +5 x 0.01 = 0.05 cm.
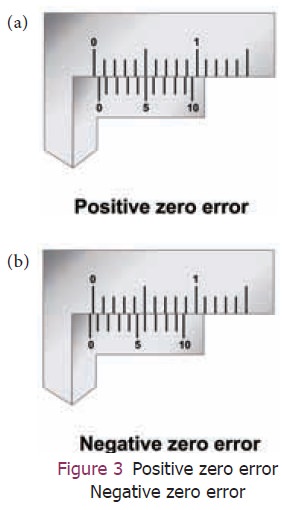
Negative zero error
Now look at the Figure 3(b). You can see that zero
of the vernier scale is shifted to the left of the zero of the main scale. So,
the obtained reading will be less than the actual reading. To correct this
error we should first find which vernier division is coinciding with any of the
main scale divisions, as we found in the previous case. In this case, you can
see that sixth line is coinciding. But, to find the negative error, we can
count backward (from 10). So, the fourth line is coinciding. Therefore,
negative zero error = ‒4×LC = ‒4×0.01 = ‒0.04 cm.
Example:
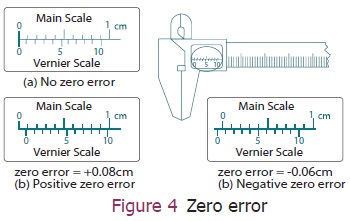
Calculate the positive and negative error from the
given Figure 4.
Solution:
Case (a): Zero of the vernier scale and zero of the
main scale are coinciding with each other. So there is no zero error.
Case (b): e zero of veriner scale is shi ed to the
right from the zero of the main scale. It is positive error. The 8th division
of vernier scale coincides with one of the main scale divisions. So the
positive error = (8×0.01cm) = 0.08 cm.
Case (c): e zero of veriner scale is shi ed to the
le from the zero of main scale. It is negative error. The 4th division of
vernier scale (6th from backward) coincides with one of the main scale
divisions. So the negative zero error = ‒(6×0.01cm)= ‒0.06 cm.
Once you are able to calculate the zero error, you
can get the correct reading using the formula:
The correct reading = Main scale reading + (VC × LC) ± (Zero correction)
Zero Correction:
If error is positive the we should subtract that
error value. If error is negative, we should add that error value.
For example, let us calculate the correct reading,
if the main scale reading is 8 cm, vernier coincidence is 4 and positive zero
error is 0.05 cm,
The
correct reading = 8 cm + (4 × 0.01cm) – 0.05 cm = 8 + 0.04 – 0.05 = 8 – 0.01 =
7.99 cm
Let us try another one. The main scale reading is 8
cm and vernier coincidence is 4 and negative zero error is 0.02 cm, then the
correct reading:
=8 cm+(4×0.01 cm)+(0.02 cm)
=8+0.04+0.02 = 8.06 cm.
We can use Vernier caliper to nd different
dimensions of any familiar object. If the length, width and height of the
object can be measured, volume can be calculated. For example, if we could
measure the inner diameter of a beaker (using appropriate jaws) as well as its
depth (using the depth probe) we can calculate its inner volume.
Example:
Calculate the diameter of the sphere which is shown
in the Figure 5. Assume the scale has no zero error.
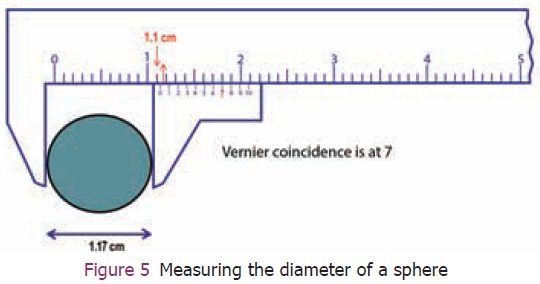
The diameter (D) of the sphere = Main scale reading
(MSR) + (Vernier scale coincidence (VC) × least count (LC))± ZE. In this case
the zero of the vernier scale is right after the main scale reading 1.1. So the
main scale reading is 1.1 cm. The vernier scale coincidence is 7. The least
count is 0.01 cm. The diameter of the sphere = 1.1 cm + (7 × 0.01cm)‒0 = 1.1 +
0.07 = 1.17 cm
4. Digital Vernier caliper
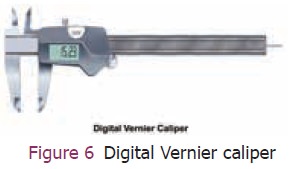
Today, we are living in a digital world and the
digital version of the vernier callipers are available now. Digital Vernier
caliper (Figure 6) has a digital display on
Related Topics