Sewing - Types of Collars | 11th Textiles and Dress Designing : Chapter 12 : Basic Sewing
Chapter: 11th Textiles and Dress Designing : Chapter 12 : Basic Sewing
Types of Collars
Collar
A collar is added to a neckline to enhance its appearance. Collars are made of double layer of fabrics. It also helps to finish the raw edges of the neckline. Since collars form a background to the face they should suit the wearer. Several factors are considered while designing collars. The major factors are :
· Design of fabric – the collar design should harmonize with fabric design.
· Colour and texture of the fabric – there should be harmony between the fabric used for collar and the base garment.
· Pattern of the garment – the design of the collar should suit the pattern of the dress.
· Purpose and use of the garment – collars should be selected according to the end use of the garment.
· Sex and age of the wearer – suitable collars should be selected for men, women and children.
· Appearance of the wearer- facial shapes and size of the neck are important factors to be considered while designing collars.
Types of Collars
The collar edge can be round, curved, square or pointed depending upon design variation. A collar can be made close to or away from the neckline. Some of the types of collars are round collar, peter pan collar, scalloped collar, sailor collar, roll collar, shirt collar, band collar, and shawl collar (Figure 12.20).
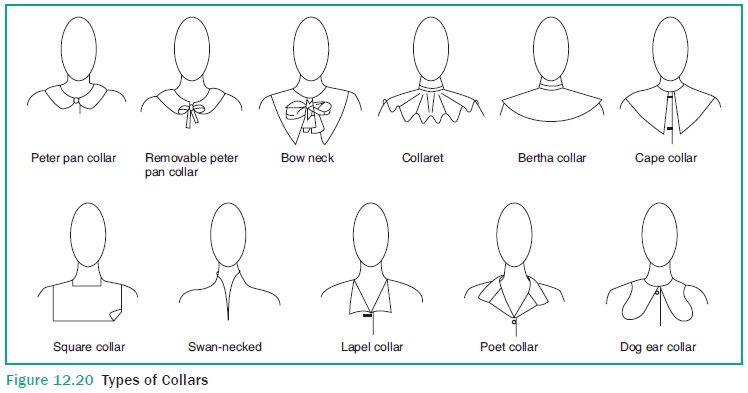
Round collar or one piece Peter Pan collar
· Round collar or one piece Peter Pan collar is mostly used for children’s dresses. The front collar continues to the back where it is divided with rounded ends. If this collar pattern is cut at the centre front and back to get two pattern pieces it is called two piece peter pan collar. A scalloped collar can also be created by just shaping the col-lar edges as scallops (Figure 12.21).
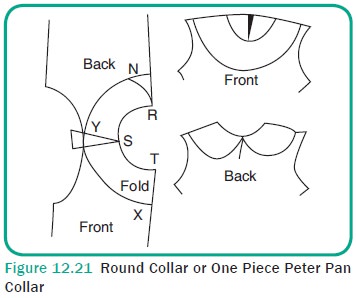
Method of Drafting a Round Collar
· First duplicate the neckline area of the garment as in the figure.
· Keep the front and back bodice pat-terns together on a paper, with neck points of shoulder lines touching with the pattern overlapping 0.25 cm near the shoulder as illustrated in the figure.
· Trace the outline of the upper part of the bodice.
· Label the front neckline as
o Shoulder – S.
o Back neckline – Y.
o Fold – 0.5 cm.
· Join XYZ as shown in the figure (3-7 cm away from the neckline).
· Make a notch at the shoulder S to indicate shoulder points.
· Label collar as shown in the figure and cut the collar pattern.
· This is the drafting of a flat collar or one-piece peter pan collar
· By cutting at the center front of the collar, two-piece peter pan collar can be prepared.
Sailor Collar
· Sailor collar is a flat turned down col-lar. It has a V shape in front and square shape at the back (Figure 12.22).

Method of Drafting a Sailor Collar
· The pattern is made by marking as V shape at point X bodice front neck-line about 7 to 8 cm below. Connect shoulder point S and X on the center front line
· Trace on a sheet of paper the neck-line area of back and modified front bodice patterns after overlapping the shoulder 0.25 cm near armhole
· Mark the back neckline point as O. Mark points alone center back line and shoulder line measuring 5 cm.
· Extend to point P and connect at point Z
· Join all the lines of the pattern as in figure
Shirt Collar
Shirt collar, as the name indicates it is used in the men’s, women’s or kid’s shirt. Generally, it consists of two parts com-monly known as band to hold the other part which is the collar. Sometimes kid’s shirt collars are designed without the stand (Figure 12.23).
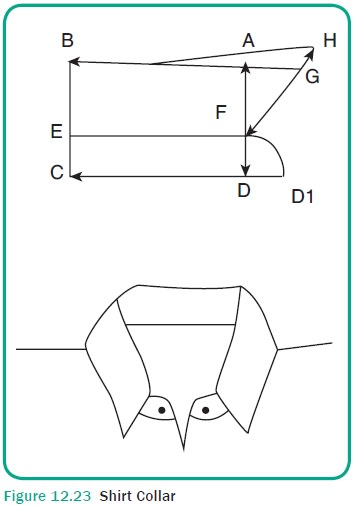
Method of Drafting a Shirt Collar
· Draw a rectangle ABCD where CB = height of collar + 5 cm for band width and CD is ½ neckline measurements
· Mark the following points measur-ing CE and DF = Band width (5 cm)
· Extend the points D to D1 = 2 cm and A to H = 4 cm and H and G ( diagonal top) = 1 cm
· Join the points as shown in the figure
· The stand part of the collar (without the extension) along can be used to draft band or stand collars, which is used in kurta. The edges of the collar are reduced by 2 cm to have small opening at the center front.
Method of Sewing Collars
· Match the neckline of the garment and collar pattern
· Place the wrong sides facing together pin or back alone the sewing line
· Machine along the sewing line
· Remove pins or tacked stitches
· Turn to right side
· Press neatly
· For shirt collar the seam line are stitched and then the whole collar piece is turned around. The seams are not seen in the finished garment
Related Topics