Chapter: Surgical Pathology Dissection : Photography
Setting Up a Photographic System
Setting Up a Photographic System
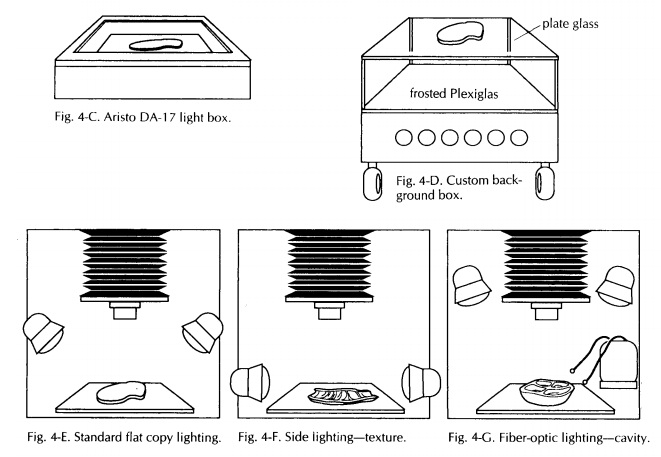
Photographic Stand
A
variety of camera stands are on the market. Pick one with a sturdy column.
Sturdy columns eliminate camera vibration, which causes photo-graphs to be out
of focus. Probably the most ver-satile and easy to use system on the market is
the Polaroid MP4, which consists of a heavy-duty stand, a 4 × 5-inch camera, and
permanently mounted but adjustable lighting (Fig. 4-A). It also has an adapter
for a 35-mm camera. With this system, Polaroid 4 × 5-inch black-and-white neg-ative film can be
used to produce an instant print and negative. The print serves as an instant
record, documenting the size and condition of the specimen, and notes can be
made directly on the print, providing a visual correlate of the gross
description. The negative can be filed and prints for publication made from it
at a future date.
Lens Selection
Most
major camera manufacturers offer a choice of two types of macro lenses. The
60-mm macro lens is sufficient for 95% of routine work in the surgical
pathology laboratory. The 105-mm macro lens allows for more working distance
be-tween the specimen and the front of the lens. This feature is helpful when
doing close-up work. Both of these macro lenses are extremely useful because
they can focus down to a point where the image on the negative is the same size
as the specimen, and they will cover specimens ranging in size from a large
colon down to small polyps. One of the scales that is not present on most
ordinary lenses, but that is printed on macro lenses, is the reproduction
ratio. You should be familiar with this scale because, as discussed later, it
can be used to determine the appropriate exposure for a specimen (Fig. 4-B).
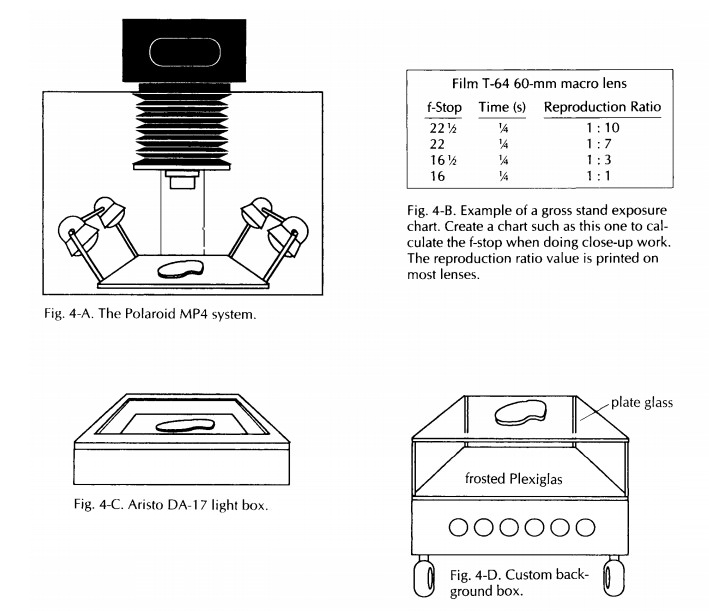
Background Selection
Before
lighting the subject, background selection must be considered. The correct
background will enhance and highlight the subject to be photo-graphed. A
background table can be easily made or commercially purchased. The latter is a
good choice but is only good for medium to small specimens. The Aristo Box
DA-17 (Fig. 4-C) has a cool rectangular, fluorescent light inside. The box
gives a flat shadowless illumination or, if turned upside down, a black
background.
A more
versatile system (Fig. 4-D) can be custom-made to fit space requirements. A
custom background box should have even fluorescent lighting below a glass
surface on which speci-mens can be placed. Immediately on top of the
fluorescent lights is a place for opal glass or Plexiglas, which diffuses the
light for an even background. Colored gels can then be placed on top of the
Plexiglas for a variety of back-ground selections. There is then a space of
about 6 to 8 inches between the background and the specimen glass. This system
eliminates shadows on the background.
If
colored gels are used for backgrounds, great care must be taken. An ill-chosen
background color can affect the color of the specimen in the photograph. For
many specimens, red, yellow, and green are colors to avoid. Shooting an actual
test photograph is the only way to tell for sure. One very simple type of
background is a piece of black velvet available in fabric shops. This mate-rial
will absorb all light that falls on it, yielding a pure black background.
Therefore no shadows from the specimen will be seen. A solid black background
also has the advantage of hiding liquids that have seeped out from a specimen.
This makes a cleaner presentation in the final photograph.
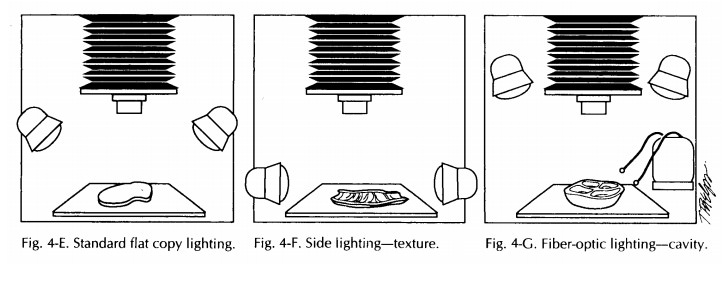
Lighting
Important
features of a specimen may be hidden when the lighting is too dim or obscured
when the lighting is too bright. Appropriate lighting, on the other hand, will
actually enhance the photo-graphic demonstration of these findings. One of the
many advantages of the Polaroid MP4 stand is the fact that the lights may be
easily moved to highlight the features of a particular specimen. Lights placed
in the standard 458 position (stan-dard copy lighting) provide an even, flat
illumi-nation for the majority of specimens (Fig. 4-E).
The standard 458 positioning of the light source may not be optimal for every specimen. For ex-ample, when three-dimensional information is most important, the lights should be positioned at a lower angle (Fig. 4-F). This will provide shadows that will help suggest a relief or distin-guish a form from its background. This posi-tioning of the light source can help show texture as well. Another technique is to unplug the lights on one side so that a stronger contrast can be seen. The main thing to keep in mind is that lighting should not obscure information.
A good addition to a lighting system is a fiber-optic light source (Fig. 4-G). Manipulable fiber optic wands provide an excellent source of illu-mination when close-ups are required. They are particularly useful in illuminating cavities and crevices. When used in combination with other light sources, fiber-optic lights are also effective in ‘‘filling in’’ otherwise darkened areas. Keep in mind that when lighting changes are made, some changes in exposure may also be necessary.
Thirty-Five–Millimeter Slides
Not only
can 35-mm slides be used for projection at conferences, they can be used for
publication as well. The slides also can be scanned into a com-puter, and
letters, numbers, or arrows may be added. Other slides can be scanned and
combined together, such as a gross and microscopic view on one slide. A 35-mm
slide may be converted to a black-and-white print for publication.
Color
slides are best obtained with a 35-mm single-lens-reflex camera with
through-the-lens light metering. The best results are achieved with fine-grain
films. A film should be selected for accurate color rendition, and it should
match the Kelvin temperature of the lights used. Most gross specimen
photography is done with tungsten halogen lamps (3200 K) as opposed to an
elec-tronic flash (5500 K). Unlike the transient illumi-nation of the
electronic flash, tungsten lamps provide constant illumination so that the
lighting can be critically evaluated before the photograph is taken. Kodak
Ektachrome tungsten EPY-64 is a good choice of film. This film is balanced for
tungsten lamps, it has a high resolution, tends to match the true specimen
colors, and is a user-processed film. (User-processed film can be pro-cessed at
most hospital in-house photographic departments, usually on a same-day basis.)
Films such as Kodachrome, on the other hand, tend to enhance red and yellow
colors and must be sent to outside laboratories for processing.
Standardized Exposure Determination
The
amount of light that reaches the film or digital camera can be controlled in
two ways. One is to change the aperture. The aperture refers to the diameter of the lens diaphragm, and this can
be adjusted by changing the f-stop. Each f-stop set-ting changes the amount of
light passing through the lens by a factor of 2. The smaller the f-stop number,
the larger the aperture and the more open the lens. For example, an f-stop of 2
will let more light into the camera than an f-stop of 22. The aperture also
controls the depth of field, which
refers to the zone of sharpness in front of and behind the point of focus. With
large apertures (smaller f-stop numbers), everything outside the plane of focus
abruptly becomes blurred. At very small apertures (such as an f-stop of 22),
objects remain in focus over a greater depth of field. Therefore, optimal
clarity is best achieved using a smaller aperture (higher f-stop).
The
amount of light hitting the film is also controlled by the shutter speed. The shutter speed refers to the length of
time that the lens is open. Each shutter speed, like the f-stop, doubles or
halves the exposure at the next setting. Standard speeds on modern shutters are
1, 1/2, 1/4, 1/8, 1/15, 1/30, 1/60, 1/125 second, etc. Keep in mind that both the aperture and shutter
control the amount of light falling on the film.
You need
to identify the best f-stops and shut-ter speeds for your particular system by
running a series of exposure tests for each different speci-men magnification.
To do this, you need a light meter. An incident light meter works best because
it measures the light falling on the specimen. The reflected light meters that
are found in most cameras can be ‘‘fooled’’ and give incorrect read-ings
because of the light coming from the back-ground. For example, reflected light
meters may read too much of the background and not enough of the specimen when
a lightly colored specimen on a black background is being photographed. Once
the exposure is approximated with the hand-held incident light meter, a series
of test exposures should be made at different magnifi-cations (reproduction
ratios). Most manufactured lenses have reproduction ratios listed on the lens
barrel for each magnification. In making this test run, choose a standard
exposure such as 1/4 second, and then vary the
aperture of the camera by one half of an f-stop at each magnification. This
exposure time will enable you to use small apertures, which result in a better
depth of field and translate into better specimen focus. The best aperture then
can be determined for a spe-cific image magnification, and a chart can be made
listing the correct aperture that matches each magnification (Fig. 4-B). While
this system is easy to use, it may be necessary to modify the exposure for very
dark blood-red specimens or very light white specimens.
Scale
While
many find scales and labels unnecessary distracters in an otherwise aesthetic
photograph, at least one of the specimen photographs should include a scale
along with the specimen identifi-cation number. A scale helps the viewer orient
the specimen and provides a benchmark for the perception of size, while
specimen labeling en-sures that the photographs will not be lost or
misidentified later. Commercially prepared plas-tic rulers are available that
can be made into vari-ous sizes to accommodate different specimens. Small
adhesive labels with the specimen identifi-cation number can be attached
directly to the ruler. When placing the scale in a photograph, be sure to place
it in the anatomical inferior posi-tion. The scale should be positioned at the
level of the specimen so that it is in plane of focus.
Digital Photography
When it
comes to photographing gross speci-mens, digital images offer several
advantages over conventional 35-mm photography. First and foremost is the ease
with which an image, once captured in digital format, can be edited,
orga-nized, catalogued, and stored. Second, a digital system permits immediate
review of the image captured. Most digital cameras have a video ‘‘out’’ port
that allows for the image to be cap-tured and displayed on a video monitor in
real time. Some digital cameras are also equipped with small screens for
reviewing the image cap-tured. Third, digital imaging is cost-effective. For
laboratories that routinely use photography as a component of their gross
dissections, digital image photography can reduce film and pro-cessing costs.
Digital
imaging technology is advancing at breakneck speed. Each month seems to bring
an updated digital camera that is less costly and of higher quality than the
previous model. There are literally hundreds of digital cameras now on the
market, and choosing the best one is a formi-dable task. When selecting a
digital camera, one of the most important features to keep in mind is the
resolution of the image sensor. Resolution has to do with the ability to
appreciate fine detail in an image. Digital photographs are made up of
thousands to millions of picture elements known as pixels, and the quality of
an image depends, in part, on the number of pixels used to create the image.
High pixel numbers enhance detail, sharpen edges, and provide a more meaningful
record of the specimen. Conversely, low pixel numbers obscure fine detail and
result in images that have less value for teaching, publication, and
documentation of the gross findings. Keep in mind that a high-resolution
digital camera is not a substitute for good judgment and technique. No matter
how good the camera, informative images still require careful attention to
specimen orienta-tion, lighting, and exposure.
Related Topics