Chapter: Plant Anatomy:An Applied Approach: Practical microtechnique
Sectioning - Materials and methods in Practical microtechnique
Sectioning
The safety razor blade can be used to produce sections which are thin enough for study under magnifications of 100–400×, or sometimes more. However, practice is needed. Those with a steady hand will get better sec-tions with the thinner, double-sided razor blade, but very thin blades are too flexible. Many anatomists bear the scars of early battles with tough plant material! It is advisable to cover one side of a double-edged blade (if you use these) with masking tape, to avoid cutting yourself, rather than the specimen.
Cutting freehand sections is a time-consuming process, and is not suited to the mass production of teaching material. However, for simple demonstrations, inquiries or identifications is quite suitable. For the pro-duction of large quantities of slides of the same specimen for class study, a more refined method of sectioning is needed. A rotary or rocking microtome should be used where wax-embedded specimens are going to be used to prepare thin sections A microtome is indispensable for sections under 10 µm thick, or for subjects where serial sections are needed of, for example, flower buds, where the various parts would separate and be-come disarranged when not embedded before attempting a sectioning procedure.
Sections of between 15 and 30 µm are required for histological studies. These can be cut with a sledge or sliding microtome. The sledge microtome allows the specimen which is to be to be sectioned to be firmly held in a uni-versal clamp (to allow for correct orientation) and the knife is brought to-wards and over the specimen. Models in which the knife is fixed, and the specimen is made to move past the knife, are not so universally useful and somewhat more dangerous!
The moving knife sledge microtome can be used for the following types of material, using 50% alcohol for lubrication (applied to the knife blade with a small camel hair brush).
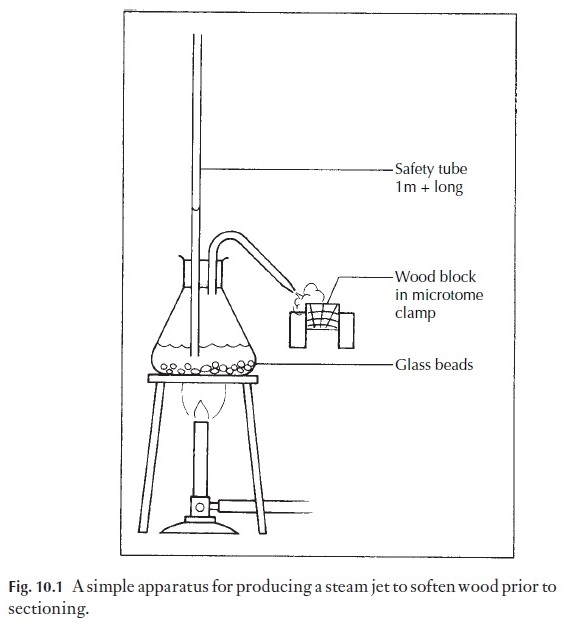
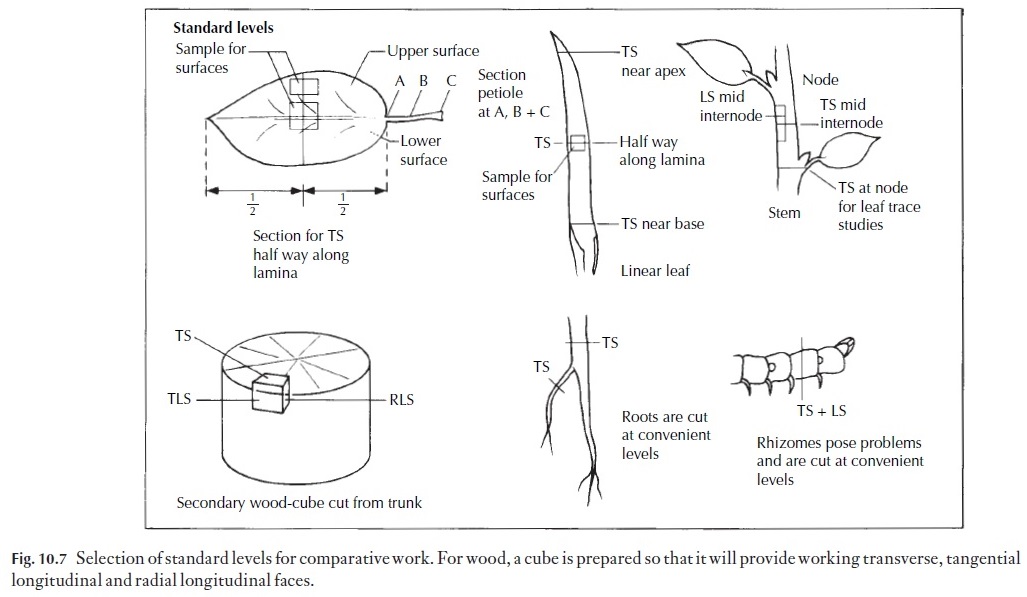
1 Tough materials, such as wood. The material should be cut into ap-proximately 1 cm cubes, orientated as described in Fig. 10.7. The cubes are boiled in water until waterlogged, i.e. they sink when cold water is added to the container. The cubes are removed, cooled and clamped in place. If they are very hard, they may need to have a jet of steam directed on the surface to be cut (Fig. 10.1), but often they are soft enough to cut directly. Some woods contain silica, a substance so hard that it rapidly blunts the microtome knife. Silica can be removed by standing the wood for 12 or more hours in 10%
hydrofluoric acid, in plastic containers. Very great caution should be taken with this acid. It causes serious burns even in low concentration, and the burns heal very slowly. It is not recommended for class use, but could be used by trained technicians. After treatment, the wood must be washed in running water for several hours.
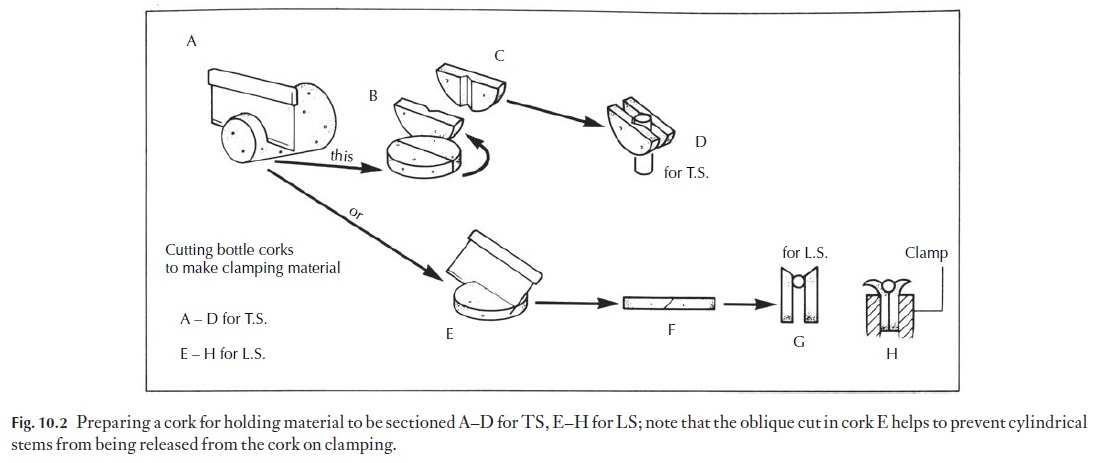
2 Twigs may need to be boiled before sectioning. Softer stems are bestfixed and washed before sectioning. Many cylindrical objects need some support in the microtome clamp. Support is normally provided in the form of cork or pith. Pith tends to become soggy when wet, and cork can contain unexpected sclereids which blunt the knife, but on the whole we prefer cork. Some people now prefer Styrofoam. Suitable bottle corks with few lenticels should be selected (Fig. 10.2A–D). Circular slices about 34 mm thick are cut off, using a razor blade. The discs of cork are cut across the diameter and the two halves placed side by side.
For transverse sections of stems, a notch cut in one half of the cork will help to keep the specimen correctly oriented, without allowing it to be compressed excessively. Alternatively, the cork may be cut along its ![]()
![]() long axis, and the two halves used to mount the specimen to be sectioned.
long axis, and the two halves used to mount the specimen to be sectioned.
For making longitudinal sections, the cork slice is cut across the diameter at an angle (Fig. 10.2E–H). When the two parts are placed side by side with the material to be sectioned at the bottom of the V, clamping causes the outer parts of the cork to roll outwards, but the material is retained. If the disc was cut to produce a flat surface before clamping, the outward curving would release the specimen, as in Fig. 10.3.

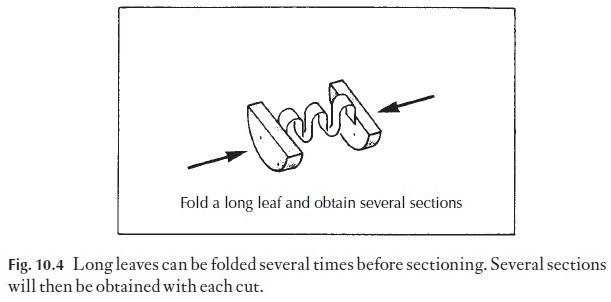
3 Leaves to be sectioned transversely are rarely just the right width for theclamp. Wider leaves can be folded once or several times so that they form a sandwich in the cork, Fig. 10.4. With narrow leaves, it is best to put several leaves between the cork slices there is more chance of getting some good sections.
Most mesophyte leaves section easily. Some succulent or very soft hydro-phyte leaves and stems can pose problems. In these plants the cells are thin-walled and burst easily if compressed when turgid. A simple and usually effective remedy is to allow the specimen to go limp on the bench for half an hour or so. It can then be firmly clamped, cut and the sections put in water. If they do not return to their natural shape in water, 50% alcohol may be used, or even, for a second or so, immersion in undiluted bleach such as Domestos or Parozone (sodium hypochlorite) will cause them to return to the uncompressed form.
As each section is cut it will slide onto the knife blade, lubricated by the 50% alcohol. It should be lightly transported on a paint brush to a Petri dish of 50% alcohol. The section can be examined temporarily in water, or will keep for several months in 50% glycerine solution on a slide (stored flat). Starch distribution can be studied in such sections, and chloroplasts and other larger cytoplasmic inclusions can be seen.
Related Topics