Word Processor Basics ( OpenOffice Writer) - Paragraph formatting | 11th Computer Science : Chapter 6 : Word Processor Basics ( OpenOffice Writer)
Chapter: 11th Computer Science : Chapter 6 : Word Processor Basics ( OpenOffice Writer)
Paragraph formatting
Paragraph formatting
1. Paragraph Alignment
A paragraph is any text that ends
with a hard return. A hard return is accomplished anytime you press the Enter key. Paragraph Alignment or
justification refers to the way in which the lines of a paragraph are aligned.
Paragraph alignment lets you control the appearance of individual paragraphs.
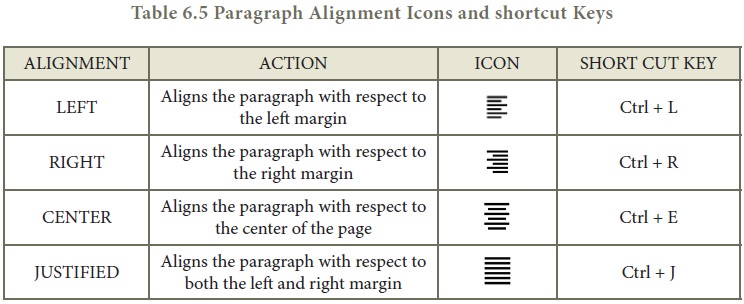
There are four types of alignment
available in Open office Writer - left
- alignment, Right - alignment, Center - alignment, and Justify - alignment.
Left-alignment
- A paragraph's text is LEFT aligned when it is
aligned evenly along the left margin and uneven along the right margin. This is
the default alignment when a paragraph is typed.
Right-alignment
- A paragraph's text is RIGHT aligned when it is
aligned evenly along the right marign and uneven along the left margin.
Center-alignment- All the lines in the paragraph are aligned to the
center of the page size.
Justified-alignment
- All the lines in the paragraphy, are arranged evenly
both on the left and right margins. This is achieved in writer by automatically
inserting additional space between the words.
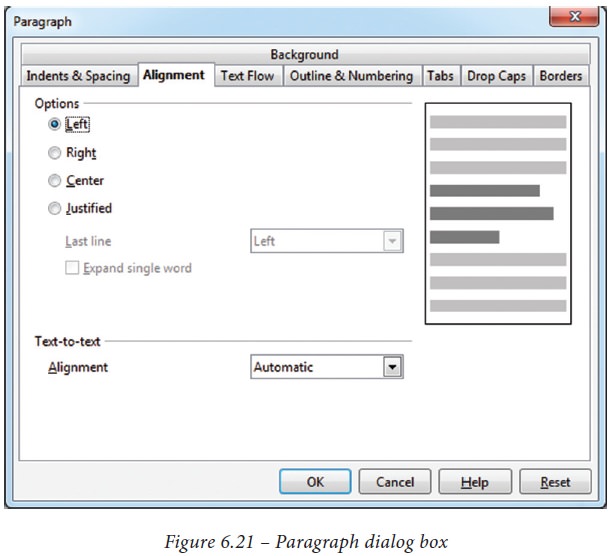
Paragraph formatting can be
applied by Format -> Paragraph, the paragraph dialog box appears as displayed in Figure 6.21.
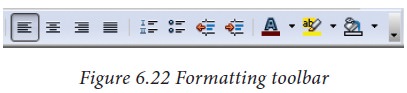
The paragraph formatting can also
be done by icons using the formatting tool bar as shown in Figure 6.22 and
shortcut keys as shown in Table 6.5
Table
6.5 Paragraph Alignment Icons and shortcut Keys
An example showing all the four
paragraph alignment:
Left Alignment
All power is with in you take up
one idea, make that one idea your life. Think of it dream of it, live on that
idea let the brain, muscles, nerves, every part
of your body be full of that idea,
and just leave avry other idea alone. This is the way to success.
Right Alignment
All power is with in you take up
one idea, make that one idea your life. Think of it dream of it, live on that
idea let the brain, muscles, nerves, every part of your body be full of that
idea, and just leave avry other idea alone. This is the way to success.
Center Alignment
All power is with in you take up
one idea, make that one idea your life. Think of it dream of it, live on that
idea let the brain, muscles, nerves, every part of your body be full of that
idea, and just leave avry other idea alone. This is the way to success.
Justified Alignment
All power is with in you take up
one idea, make that one idea your life. Think of it dream of it, live on that
idea let the brain, muscles, nerves, every part of your body be full of that
idea, and just leave avry other idea alone. This is the way to success.
Example 6.1 Paragraph
Alignment
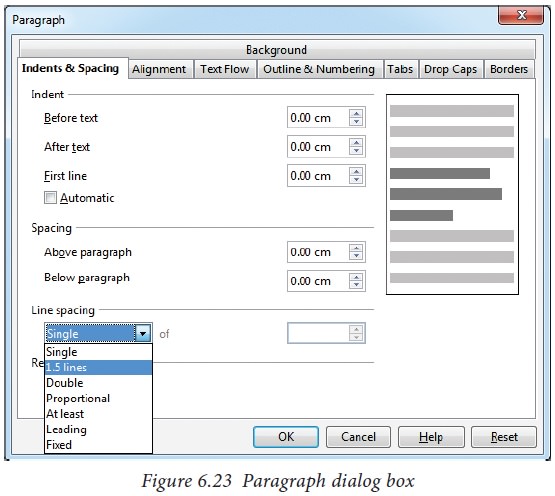
2. Line Spacing:
Line spacing determines the amount
of vertical space between lines of
text in a paragraph. By default, the lines are single-spaced, that is the
spacing accommodates the largest font in that line, plus a small amount of
extra space. In Open Office, setting line spacing is quite easy through the context
menu, select the line or word or phrase, right-click -> line spacing, select the type single, 1.5 or
double. There are seven different types of
line spacing as seen in the dialog box given below in Fig.6.23.
· Select the entire document by Edit -> Select All
· Format -> paragraph
· The paragraph dialog box appears,
click Indents & Spacing tab
In the line spacing option, select the type and click OK button.
3. Indenting text
Indent is the distance from the
left and right margin of a paragraph. It is used to improve the efficiency and
readability of the paragraph and makes the paragraph look more attractive. In
paragraphs, an easy way to apply indent for the first line of text can be
created by moving the cursor to the front of the line and pressing the tab key
on the keyboard. There are four types of indents:
· Left Indent
· Right Indent
· First Line Indent and Hanging
Indent.
Left
indent - The Left indent
controls the space between the paragraph and the left margin. This is the default indent. Each click on the
Increase indent icon moves the paragraph ½ inch away from the left margin.
The left indent can also be
applied by Format -> Paragraph -> Indents
& Spacing tab, enter a value in the “before
text” spin box. This results in a left indent.
Right
Indent - The Right indent controls the space between the
paragraph and the right margin. Each click on the decrease indent icon removes
the indent applied by the Increase indent. The Right indent can be applied by
the dialog box method.
Select Format -> Paragraph Indents & Spacing tab, enter a value in “after text” spin box. This
results in a right indent.
First
Line Indent - A first-line indentation indents the first line of
the paragraph. It is the most common way to start a new paragraph.
This indent can be applied by Format -> Paragraph -> Indents & Spacing tab, select first line option in
the Indent group, enter a positive value which results in first
line indent.
Hanging
indent -This is a special kind of indent where the first line of
the paragraph alone hangs outside leaving the rest of the text. To apply
Hanging indent, a negative value is
given in the “first line” option of
the paragraph dialog box.
4. Bullets and Numbering
Bullets and numbering are used to
emphasize list of things and make list easy to read and follow. It provides an
excellent way to segregate, list and organize information for a reader. You can
control the appearance, or format a bulleted or numbered list.
Bullets
– This is a paragraph level attribute that applies a bullet
character to the start of the paragraph. In bulleted lists, each paragraph
begins with a bullet
character. This is suitable when
the text has to be presented as a list of items preceded by a bullet symbol and
no sequence has to be followed. Bullets are quickly created by clicking on the
bullet icon ![]()
Numbering
– This attribute applies a numeral to the start of the
paragraph. Numbering is more suitable when the text has to be presented as a
sequence. In numbered list, each paragraph begins with an expression that
includes a number or letter and a separator such as a period or parenthesis.
The numbers in a numbered list are updated automatically when you add or remove
paragraphs in the list. Numbering is quickly created by clicking on the
numbering icon. ![]()
5. Style of Bullets and Numbering
The default type of bullet is ( .
) and the default type of numbering is (1, 2, 3 ……). The style of bullets and
numbering can be changed by applying the following steps:
· Select the text to be bulleted
· Format -> Bullets and Numbering
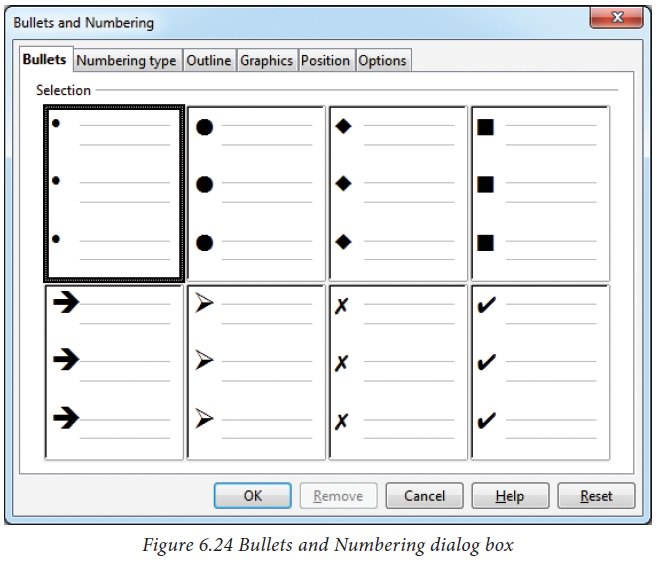
· Select Bullets Tab
· The Bullets and Numbering dialog box appears where different styles of bullets are
displayed
· Click on the required style
· Click Ok button
· The selected text is bulleted.
The bullets and numbering dialog
box with the bullets tab is displayed in Figure 6.24.
If the text is not typed, then
apply the steps above and then type the text, the newly entered text will
appear in bulleted form.
To apply Numbering
1. Select the text to be numbered
2. Format -> Bullets and Numbering
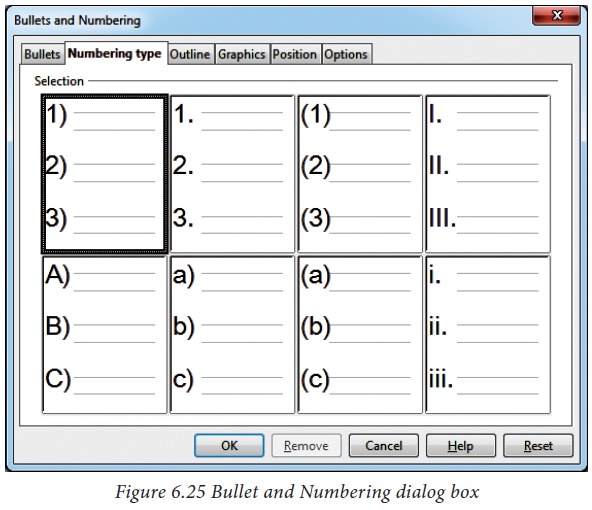
3. Select Numbering Type Tab
4. The Bullets and Numbering dialog box appears where different styles of numbering are
displayed
5. Click on the particular style
6. Click Ok button
7. The selected text is numbered.
The bullets and numbering dialog
box with the numbering type tab is displayed in Figure 6.25.
If the text is not typed, then
apply the steps above and then type the text, the newly entered text will appear
in numbered form.
Turning off Bullets and Numbering
As you can quickly add bullets or
numbers to existing text by clicking on the icons, the bullets and numbers can
be removed easily.
Select the text where the bullets
and numbers are to be removed.
• Click on the bullets icon ![]() again to remove bullets.
again to remove bullets.
• Click on the numbering icon ![]() again to remove numbering.
again to remove numbering.
Related Topics