Chapter: Biology Practicals: Laboratory Equipment
Laboratory Equipment - Biology Practicals
Laboratory Equipment
Beakers
Use: To hold liquids
Materials: Water bottles, juice containers, lids for bottles or jars, and a knife. Procedure: Take empty plastic bottles of different sizes. Cut them in half. The base can be used as a beaker.
Blotting/Filter Paper
Use: To use remove/wipe excess water.
Materials: Tissue paper.
Cages
Use: To capture different animals.
Materials: Cardboard box, wire mesh, string, and bottles.
Procedure: Make a cut in the bottle without cutting completely through the bottle.
Get an empty box and cut it on top. Cover the top with wire mesh and
secure it with string. Then make a small cut like a box with three sides so that the door can open and close.
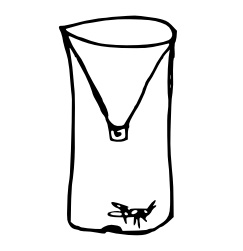
Figure 1.1: A bottle cage, which can be used to collect and display specimens
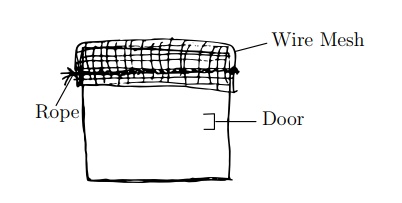
Figure 1.2: A box cage, which can be used to display live specimens
Carbon Paper
Use: To prevent light from entering.
Materials: Aluminium foil from cigarette packets, gift paper can be used as a substitute for carbon paper.
Delivery Tube
Use: For the movement and collection of gases.
Materials: Straws, pen tubes, IV infusion tubes and pumpkin or pawpaw petioles.
Dissection Needles
Use: To hold a specimen in place while performing a dissection. Materials: O ce pins, needles from syringes, or acacia thorns.
Dissection Trays
Use: To hold a specimen in place while performing a dissection. Materials: Take away food container, candles.
Procedure: Melt the candle wax in a take away container to create a dissec-tion tray.
Droppers
Use: To add liquids in drops. Materials: 2 mL syringes.
Procedure: Take a syringe. Remove the needle.
Hazard: Remove the needle from the syringe. Never use syringes with the needles.
Never provide needles to the students.
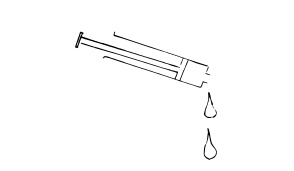
Figure 1.3: Small syringes from pharmacies can be used as droppers
Funnel
Use: To guide liquid or powder into a small opening. Materials: Empty water bottles, knife.
Procedure: Take an empty water bottle and remove the cap. Cut them in half. The upper part of the bottle can be used as a funnel.
Heat Source
Use: Heating substances.
Materials: Candles, kerosene stoves, charcoal burners, metal can and moto poa.
Procedure for making a Moto Poa stove: Cut a metal can in half and add a little moto poa, then light for quick heat.
Petri Dishes
Use: To grow cultures or display small specimens. Materials: Water bottle and scissors.
Procedure: Take empty plastic bottles of different sizes. Cut about 1 inch up from the bottom of the bottle. Lids of different containers can also be used at petri dishes.
Scalpels
Use: To dissect different organisms.
Materials: Knife, box cutter, or razor blades.
Spatula
Use: To transfer small amounts of a solid substance.
Materials: Wooden, plastic, or metal spoon, a knife and plastic bottle. Procedure: Cut a thin rectangle from plastic water bottle half way so that it resembles a spatula.
Stopper
Use: To close a bottle or make an airtight seal. Materials: Bottle caps, Sandals (ndala), and a knife.
Procedure: Cut a spherical piece of a sandal according to the size of the stopper you need.
Sweep Net
Use: To catch insects.
Materials: Large stick, scissors, mosquito net, string.
Procedure: Get a mosquito net with a ring. Stitch the ring to the net to the net to make it rm. Cut out a rectangular notch from the center of the stick. Insert the ring together with the net into the notch in the stick, then secure them with a string. Tie a string around the bottom of the net and remove the excess net with scissors.
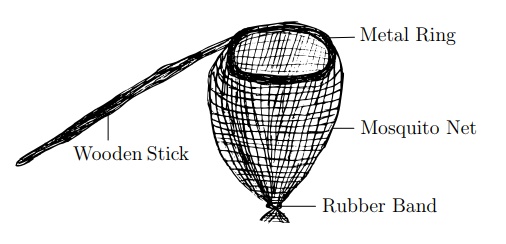
Figure 1.4: A sweep net can be made from a mosquito net and used to collect many different organisms
Test Tubes
Use: To hold a small amount of liquid for examination or testing. Materials: Syringe, candle or heat source, and a hard surface.
Procedure: Buy syringes of different volume from a pharmacy. Remove the plunger and the needle. Burn the bottom with a candle till the plastic begins to melt, then press the melted bottom against a hard surface to close.
Hazards: Remove the needle from the syringe. Never use syringes with the needles. Never provide needles to the students.
Test Tube Holders
Use: To hold test tubes while heating.
Materials: A small piece of wood and a rubber band.
Procedure: Tie a rubber band to a piece of dry wood, then wrap the rubber band around the test tube. Fold a piece of paper in such a way that it can
hold a test tube.
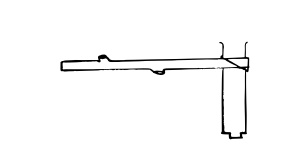
Figure 1.5: Simple local materials can be used to make a test tube holder
Watch Glass
Use: To display small specimens. Materials: Water bottles and scissors.
Procedure: Take empty plastic bottles of different sizes. Cut about 1 inch up from the bottom of the bottle. Lids of different containers can also be used as watch glasses.
Water Bath
Use: To heat substances without using a direct ame. Materials: Heat source, water, and a cooking pot.
Procedure: Bring water to a boil in a small aluminium pot, then place the test tubes in the water to heat the substance inside the test tube.
White Tile
Use: To easily observe colour changes in leaves.
Materials: Glue or cellotape, wood block, white paper, and plastic sheeting Procedure: Using cellotape or glue, cover a wood block with white paper. Then cover the white paper with a plastic sheet to prevent water from wetting the paper.
Water Drop Microscope
Use: To magnify very small organisms so they are easier to observe. Materials: Sti sheet of plastic sheeting, clothes pins, block of wood, sheet of metallic gift paper, cardboard box, glue, and light source, blotting paper, hole punch, knife or razor blade, and water. Procedure:
1. Cut a rectangular piece of sti plastic sheeting, about 3 cm x 7 cm.
2. Using a paper hole punch, make a round hole in the plastic rectangle.
3. Glue the plastic rectangle to the end of a clothes pins so that the hole hangs over the end of the clothes pin.
4. Glue this clothes pin to the centre of a block of wood.
5. Take apart another clothes pin and use the two pieces to make the slide holder. Glue them to the board on either side of the rst clothes pin such that a slide can rest on top of them just below the water drop hole.
6. Cut a small piece of gift paper/aluminium foil to act as a mirror.
7. Glue one edge of the foil into the cardboard box.
8. When the glue has dried, lift the other end so that the mirror is at an angle directing light towards the \microscope".
9. Place a drop of water on the hole you punched in the plastic sheeting by using your nger.
10. Optional: Take apart a clothes pin and use it as a wedge in the jaw of the rst clothes pin. Slide it in to lower the drop of water towards the slide and pull it out to raise the drop. This acts as a course adjustment knob.
Another clear piece of sti plastic can be used as the slide for holding a specimen.
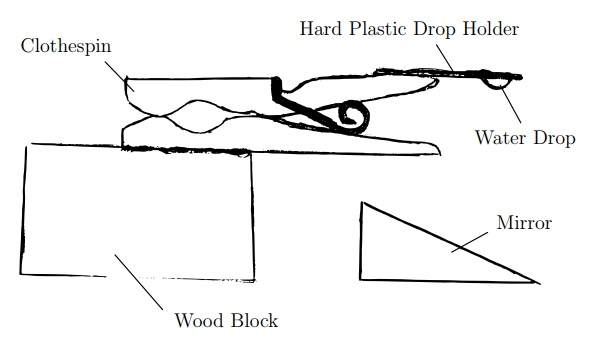
Figure 1.6: Side view of a water-drop microscope

Figure 1.7: Top view of a water-drop microscope
Related Topics